<?xml version="1.0" encoding="utf-8"?>
<feed xmlns="http://www.w3.org/2005/Atom">
    <title>Xilong Yang</title>
    <subtitle>Amid the sixpences, may you find your moon.</subtitle>
    <id>https://xilong.site/</id>
    <link rel="alternate" type="text/html" href="https://xilong.site/" />
    <link rel="self" type="application/atom+xml" href="https://xilong.site/atom.xml" />
    <author>
        <name>Xilong Yang</name>
    </author>
    <rights>CC BY-NC 4.0</rights>
    <generator>kiln</generator>
    <updated>2026-05-26T00:00:00Z</updated>

    <entry>
        <title type="html"><![CDATA[Implementing SHA-256 in Haskell]]></title>
        <id>https://xilong.site/post/Implementing_SHA256_in_Haskell.html</id>
        <link rel="alternate" type="text/html" href="https://xilong.site/post/Implementing_SHA256_in_Haskell.html" />
        <updated>2026-05-26T00:00:00Z</updated>
        <!-- Every post here opens with an abstract, which is what
             `abstract` holds and what `content` therefore starts after.
             A feed carries the whole article, so it needs both, in the
             order the page itself shows them. -->
        <content type="html"><![CDATA[<p>I am refactoring my site builder from a Python implementation to Haskell. For signature generation, I implemented SHA-256 in Haskell. The implementation is correct, but it is about 30 times slower than the Linux sha256sum tool, even after accounting for process invocation overhead.</p>
<p>As a result, I switched to the system tool and wrote this post to preserve my non-production SHA-256 implementation.</p>
<h2 id="sha-256-algorithm">SHA-256 Algorithm</h2>
<h3 id="key-components">Key components:</h3>
<ul>
<li>8 initial hash values: the first 32 bits of the fractional parts of the <strong>square roots</strong> of the first eight primes</li>
<li>64 constants: the first 32 bits of the fractional parts of the <strong>cube roots</strong> of the first 64 primes</li>
<li>Chunk size: 512 bits</li>
<li>Scheduled words per chunk: 64 × 32-bit words</li>
<li>Rotate-right function: <code>ROTR</code></li>
<li>Functions for expanding a chunk to words: <code>S0</code>, <code>S1</code></li>
<li>Functions for updating the result hash values: <code>EP0</code>, <code>EP1</code>, <code>CH</code>, <code>MAJ</code></li>
</ul>
<h3 id="procedure">Procedure</h3>
<ol type="1">
<li>Preprocessing the message.
<ol type="1">
<li>Append a <code>1</code> bit after the message.</li>
<li>Append <code>0</code> bits after the message until the length mod the chunk size (512) is 448.</li>
<li>Append the length of the original message, in bits, as a 64-bit unsigned big-endian integer. So that the length of the message mod the chunk size is exactly 0. (448 + 64 = 512)</li>
</ol></li>
<li>Split the preprocessed message into chunks of size 512 bits.</li>
<li>Let <code>h[]</code> be the 8 initial hash values; let <code>k[]</code> be the 64 constants.</li>
<li>Process each chunk iteratively to update the hash state. For a single chunk:
<ol type="1">
<li>Create a list of 32-bit words containing 64 elements: <code>w[64]</code>.</li>
<li>Split the chunk into 16 words (512 = 32 * 16), and put them into the first 16 words.</li>
<li>Generate the remaining words using the following recurrence relation:
<ul>
<li><code>w[i] = w[i - 16] + S0(w[i - 15]) + w[i - 7] + S1(w[i - 2])</code></li>
<li><code>S0(x) = ROTR(x, 7) ^ ROTR(x, 18) ^ (x &gt;&gt; 3)</code></li>
<li><code>S1(x) = ROTR(x, 17) ^ ROTR(x, 19) ^ (x &gt;&gt; 10)</code></li>
</ul></li>
<li>Make a copy of <code>h[]</code> and call it <code>h'[]</code></li>
<li>Iterate over <code>w[]</code> to update values in <code>h'[]</code>
<ol type="1">
<li><code>t1 = h'[7] + EP1(h'[4]) + CH(h'[4], h'[5], h'[6]) + k[i] + w[i]</code>
<ul>
<li><code>EP1(x) = ROTR(x, 6) ^ ROTR(x, 11) ^ ROTR(x, 25)</code></li>
<li><code>CH(x, y, z) = (x &amp; y) ^ ((~x) &amp; z)</code></li>
</ul></li>
<li><code>t2 = EP0(h'[0]) + MAJ(h'[0], h'[1], h'[2])</code>
<ul>
<li><code>EP0(x) = ROTR(x, 2) ^ ROTR(x, 13) ^ ROTR(x, 22)</code></li>
<li><code>MAJ(x, y, z) = ((x &amp; y) ^ (x &amp; z) ^ (y &amp; z))</code></li>
</ul></li>
<li>Update <code>h' {a, b, c, d, e, f, g, h}</code> to <code>{t1 + t2, a, b, c, d + t1, e, f, g}</code></li>
</ol></li>
<li>Update <code>h[]</code> by adding the corresponding values from <code>h'[]</code> .</li>
</ol></li>
<li>Concatenate the final hash words <code>h[]</code> to the final result. (32 * 8 = 256 bit)</li>
</ol>
<h2 id="complete-source-code">Complete Source Code</h2>
<pre class="language-haskell line-numbers match-braces"><code>module Modules.Utils.Sha256 (sha256Hex) where

import Data.Word
import Data.Bits
import Data.List
import Numeric (showHex)
import qualified Data.Text as Text
import qualified Data.Text.Encoding as TextEncoding
import qualified Data.ByteString as ByteString

-- ---[ Overview ]------------------------------------------------------------
-- | Pure SHA-256 implementation used by the builder.
--
-- Design notes:
-- - public API takes &#39;String&#39;, encodes as UTF-8, and returns lowercase hex
-- - core implementation follows SHA-256 standard flow:
--   padding -&gt; 512-bit chunking -&gt; word schedule expansion -&gt; compression
-- - this module is self-contained (no external crypto dependency)

-- ---[ Public API ]------------------------------------------------------------

-- | Computes SHA-256 digest as a lowercase hexadecimal string.
--
-- Input text is encoded as UTF-8 bytes before hashing.
sha256Hex :: String -&gt; String
sha256Hex = (concatMap byteToHex) . sha256 . utf8Encode
  where
    byteToHex :: Word8 -&gt; String
    byteToHex b =
      let s = showHex b &quot;&quot;
      in if length s == 1 then &#39;0&#39; : s else s
    
    utf8Encode :: String -&gt; [Word8]
    utf8Encode = ByteString.unpack . TextEncoding.encodeUtf8 . Text.pack

-- ---[ Implementation Details ]-----------------------------------------------

-- 512-bit chunk size in bytes.
chunkSize :: Int
chunkSize = 64

-- Initial hash state constants (H0..H7).
h :: [Word32]
h = [ 0x6a09e667, 0xbb67ae85, 0x3c6ef372, 0xa54ff53a
    , 0x510e527f, 0x9b05688c, 0x1f83d9ab, 0x5be0cd19]

-- Round constants (K0..K63).
k :: [Word32]
k = [ 0x428a2f98, 0x71374491, 0xb5c0fbcf, 0xe9b5dba5, 0x3956c25b
    , 0x59f111f1, 0x923f82a4, 0xab1c5ed5, 0xd807aa98, 0x12835b01
    , 0x243185be, 0x550c7dc3, 0x72be5d74, 0x80deb1fe, 0x9bdc06a7
    , 0xc19bf174, 0xe49b69c1, 0xefbe4786, 0x0fc19dc6, 0x240ca1cc
    , 0x2de92c6f, 0x4a7484aa, 0x5cb0a9dc, 0x76f988da, 0x983e5152
    , 0xa831c66d, 0xb00327c8, 0xbf597fc7, 0xc6e00bf3, 0xd5a79147
    , 0x06ca6351, 0x14292967, 0x27b70a85, 0x2e1b2138, 0x4d2c6dfc
    , 0x53380d13, 0x650a7354, 0x766a0abb, 0x81c2c92e, 0x92722c85
    , 0xa2bfe8a1, 0xa81a664b, 0xc24b8b70, 0xc76c51a3, 0xd192e819
    , 0xd6990624, 0xf40e3585, 0x106aa070, 0x19a4c116, 0x1e376c08
    , 0x2748774c, 0x34b0bcb5, 0x391c0cb3, 0x4ed8aa4a, 0x5b9cca4f
    , 0x682e6ff3, 0x748f82ee, 0x78a5636f, 0x84c87814, 0x8cc70208
    , 0x90befffa, 0xa4506ceb, 0xbef9a3f7, 0xc67178f2]

messageSizeFieldBytes :: Int
messageSizeFieldBytes = 8

-- Number of words directly parsed from one 512-bit chunk.
initialWordsCount :: Int
initialWordsCount = 16

-- Number of scheduled words per chunk after expansion.
wordsCount :: Int
wordsCount = 64

-- Small sigma 0 for message schedule.
s0 :: Word32 -&gt; Word32
s0 x = rotateR x 7 `xor` rotateR x 18 `xor` shiftR x 3

-- Small sigma 1 for message schedule.
s1 :: Word32 -&gt; Word32
s1 x = rotateR x 17 `xor` rotateR x 19 `xor` shiftR x 10

-- Big sigma 0 for compression rounds.
ep0 :: Word32 -&gt; Word32
ep0 x = rotateR x 2 `xor` rotateR x 13 `xor` rotateR x 22

-- Big sigma 1 for compression rounds.
ep1 :: Word32 -&gt; Word32
ep1 x = rotateR x 6 `xor` rotateR x 11 `xor` rotateR x 25

-- Choice function.
ch :: Word32 -&gt; Word32 -&gt; Word32 -&gt; Word32
ch x y z = (x .&amp;. y) `xor` (complement x .&amp;. z) 

-- Majority function.
maj :: Word32 -&gt; Word32 -&gt; Word32 -&gt; Word32
maj x y z = (x .&amp;. y) `xor` (x .&amp;. z) `xor` (y .&amp;. z)

-- Hashes raw bytes and returns digest bytes.
sha256 :: [Word8] -&gt; [Word8]
sha256 msg = concatMap w32ToW8s finalH
  where
    initialWords :: [[Word32]]
    initialWords = (splitChunksToWords . splitToChunks . padding) msg

    expandedWords :: [[Word32]]
    expandedWords = map expandWords initialWords

    processChunk :: [Word32] -&gt; [Word32] -&gt; [Word32]
    processChunk hs ws
      | length hs /= 8 = error &quot;Wrong initial H for processChunk.&quot;
      | length ws /= wordsCount = error &quot;Wrong words for processChunk.&quot;
      | otherwise =
          -- Start from previous hash state and run 64 compression rounds.
          let finalWorking = foldl&#39; (refreshH ws) hs [0 .. wordsCount - 1]
          in zipWith (+) hs finalWorking
    
    finalH :: [Word32]
    finalH = foldl&#39; processChunk h expandedWords

    w32ToW8s :: Word32 -&gt; [Word8]
    w32ToW8s x =  
      [ fromIntegral (shiftR x 24)
      , fromIntegral (shiftR x 16)
      , fromIntegral (shiftR x 8)
      , fromIntegral x
      ]

-- Applies SHA-256 message padding:
-- append 0x80, then zero bytes, then original message bit length in BE64.
padding :: [Word8] -&gt; [Word8]
padding msg = initBytes ++ replicate paddingSize continueByte ++ msgSizeBytes
  where
    firstByte :: Word8
    firstByte = 0x80

    continueByte :: Word8
    continueByte = 0x00
    
    initBytes :: [Word8]
    initBytes = msg ++ [firstByte]

    modSize :: Int
    modSize = length initBytes `mod` chunkSize

    targetModSize :: Int
    targetModSize = chunkSize - messageSizeFieldBytes

    paddingSize :: Int
    paddingSize = (targetModSize - modSize) `mod` chunkSize

    msgSizeBytes :: [Word8]
    msgSizeBytes = intToBE64 (fromIntegral (length msg) * 8)

    intToBE64 :: Integer -&gt; [Word8]
    intToBE64 x =  
      let w = fromIntegral x :: Word64
      in
      [ fromIntegral (shiftR w 56)
      , fromIntegral (shiftR w 48)
      , fromIntegral (shiftR w 40)
      , fromIntegral (shiftR w 32)
      , fromIntegral (shiftR w 24)
      , fromIntegral (shiftR w 16)
      , fromIntegral (shiftR w 8)
      , fromIntegral w
      ]

-- Splits padded bytes into 512-bit chunks.
splitToChunks :: [Word8] -&gt; [[Word8]]
splitToChunks msg 
  | length msg `mod` chunkSize /= 0 = error &quot;Message length incorrect!&quot;
  | otherwise = splitToChunks&#39; msg
  where
    splitToChunks&#39; :: [Word8] -&gt; [[Word8]]
    splitToChunks&#39; [] = []
    splitToChunks&#39; msg&#39; = 
      let (chunk, rest) = splitAt chunkSize msg&#39;
      in chunk : splitToChunks&#39; rest

-- Converts each 512-bit chunk into sixteen big-endian Word32 values.
splitChunksToWords :: [[Word8]] -&gt; [[Word32]]
splitChunksToWords = map splitChunkToWords
  where
    splitChunkToWords :: [Word8] -&gt; [Word32]
    splitChunkToWords chunk
      | length chunk `mod` 4 /= 0 = error &quot;Chunk size incorrect!&quot;
      | otherwise = splitChunkToWords&#39; chunk

    splitChunkToWords&#39; :: [Word8] -&gt; [Word32]
    splitChunkToWords&#39; [] = []
    splitChunkToWords&#39; word8s =
      let (wordGroup, rest) = splitAt 4 word8s
      in bytesToWord32 wordGroup : splitChunkToWords&#39; rest
    
    bytesToWord32 :: [Word8] -&gt; Word32
    bytesToWord32 [w0,w1,w2,w3] = 
      shiftL (fromIntegral w0) 24 .|. 
      shiftL (fromIntegral w1) 16 .|. 
      shiftL (fromIntegral w2)  8 .|. 
      fromIntegral w3 

-- Expands 16 initial words into 64 scheduled words.
expandWords :: [Word32] -&gt; [Word32]
expandWords initialWords
  | length initialWords /= initialWordsCount = error &quot;Count of initial words must be 16&quot;
  | otherwise = expandWords&#39; initialWords initialWordsCount
  where
    expandWords&#39; :: [Word32] -&gt; Int -&gt; [Word32]
    expandWords&#39; ws i
      | i == 64 = ws
      | otherwise = expandWords&#39; (ws ++ [nextWord ws i]) (i + 1)

    nextWord :: [Word32] -&gt; Int -&gt; Word32
    nextWord ws i = (ws !! (i - 16)) + s0(ws !! (i - 15)) + ws !! (i - 7) + s1(ws !! (i - 2))


-- Executes one compression round and returns the next working state.
refreshH :: [Word32] -&gt; [Word32] -&gt; Int -&gt; [Word32]
refreshH ws h&#39; i
  | i &lt; 0 || i &gt;= wordsCount = error &quot;Invalid number for refresh H.&quot;
  | otherwise = 
    case h&#39; of 
      [h0, h1, h2, h3, h4, h5, h6, h7] -&gt;
        let t1 = h7 + ep1 h4 + (ch h4 h5 h6) + (k !! i) + (ws !! i)
            t2 = ep0 h0 + maj h0 h1 h2
        in [t1 + t2, h0, h1, h2, h3 + t1, h4, h5, h6]
      _ -&gt; error &quot;Wrong initial H for refresh H.&quot;</code></pre>
<h2 id="why-it-is-slow">Why It Is Slow</h2>
<p>The implementation is intentionally simple and list-oriented, which makes it easy to follow but extremely inefficient.</p>
<p>Some major performance costs include:</p>
<ul>
<li>linked-list indexing via <code>(!!)</code></li>
<li>repeated list concatenation using <code>(++)</code></li>
<li>boxed list representation for bytes and words</li>
<li>conversion from ByteString to <code>[Word8]</code></li>
</ul>
<p>Still, I like the current structure, and I am not interested in sacrificing readability for performance.</p>]]></content>
    </entry>
    <entry>
        <title type="html"><![CDATA[Some Tricks at the Bit-level]]></title>
        <id>https://xilong.site/post/Some_Tricks_at_the_Bit_Level.html</id>
        <link rel="alternate" type="text/html" href="https://xilong.site/post/Some_Tricks_at_the_Bit_Level.html" />
        <updated>2025-05-28T00:00:00Z</updated>
        <!-- Every post here opens with an abstract, which is what
             `abstract` holds and what `content` therefore starts after.
             A feed carries the whole article, so it needs both, in the
             order the page itself shows them. -->
        <content type="html"><![CDATA[<p>On my journey through Chapter 2 of CSAPP, some magical tricks appeared intermittently. So I am trying to catch them by writing this article.</p>
<h2 id="fold-bits">Fold bits</h2>
<p>Consider that we get a mission to check if all the odd-numbered bits in an int are set to 1. What is the faster way?</p>
<p>The answer is: to fold it.</p>
<pre class="language-c line-numbers match-braces"><code>/*
 * allOddBits - return 1 if all odd-numbered bits in word set to 1
 *   where bits are numbered from 0 (least significant) to 31 (most significant)
 *   Examples allOddBits(0xFFFFFFFD) = 0, allOddBits(0xAAAAAAAA) = 1
 *   Legal ops: ! ~ &amp; ^ | + &lt;&lt; &gt;&gt;
 *   Max ops: 12
 *   Rating: 2
 */
int allOddBits(int x) {
  x = x &amp; (x &gt;&gt; 16);
  x = x &amp; (x &gt;&gt; 8);
  x = x &amp; (x &gt;&gt; 4);
  x = x &amp; (x &gt;&gt; 2);
  return (x &gt;&gt; 1) &amp; 1;
}</code></pre>
<p>By using the fold technique, we can implement logical not without operator <code>!</code> by folding the ‘or’ operation:</p>
<pre class="language-c line-numbers match-braces"><code>/*
 * logicalNeg - implement the ! operator, using all of
 *              the legal operators except !
 *   Examples: logicalNeg(3) = 0, logicalNeg(0) = 1
 *   Legal ops: ~ &amp; ^ | + &lt;&lt; &gt;&gt;
 *   Max ops: 12
 *   Rating: 4
 */
int logicalNeg(int x) {
  x = (x &gt;&gt; 16) | x;
  x = (x &gt;&gt; 8) | x;
  x = (x &gt;&gt; 4) | x;
  x = (x &gt;&gt; 2) | x;
  x = (x &gt;&gt; 1) | x;
  return ~x &amp; 1;
}</code></pre>
<p>Furthermore, we can fill all the bits in the right ( left ) side of the most ( least ) significant bit to 1 by an inverse way (the shift number’s order is reversed):</p>
<pre class="language-c line-numbers match-braces"><code>// All of the bits in the right side of the most significant 1 should set to 1.
compare = compare | (compare &gt;&gt; 1);
compare = compare | (compare &gt;&gt; 2);
compare = compare | (compare &gt;&gt; 4);
compare = compare | (compare &gt;&gt; 8);
compare = compare | (compare &gt;&gt; 16);</code></pre>
<p>By combining those techniques, it is possible to compare two integer number x and y without any arithmetic operator or compare operator:</p>
<pre class="language-c line-numbers match-braces"><code>/*
 * isLessOrEqual - if x &lt;= y  then return 1, else return 0
 *   Example: isLessOrEqual(4,5) = 1.
 *   Legal ops: ! ~ &amp; ^ | + &lt;&lt; &gt;&gt;
 *   Max ops: 24
 *   Rating: 3
 */
int isLessOrEqual(int x, int y) {
  // Check the sign bits.
  // x &lt;= y is possible if any of following condition is satisfied:
  // 1. The sign bits of x and y is same.
  // 2. The sign bits are not same but the x&#39;s sign bit is set to 1
  //    (which means x is negative and y is positive).
  // If any of those condition is satisfied, the sign_check will be set to 0.
  int sign_x = (x &gt;&gt; 31) &amp; 1;
  int sign_y = (y &gt;&gt; 31) &amp; 1;
  int diff_sign = sign_x ^ sign_y;
  int sign_check = diff_sign &amp; (!sign_x);

  // Compare x and y.
  // For both positive number and negative number, the number which
  // contains the most significant 1 will be the greater one.
  // Get the different bits between x and y.
  int compare = x ^ y;
  // Transfer the compare result to the form &#39;00..011..1&#39;, which means
  // all of the bits in the right of the most significant 1 should set to 1.
  compare = compare | (compare &gt;&gt; 1);
  compare = compare | (compare &gt;&gt; 2);
  compare = compare | (compare &gt;&gt; 4);
  compare = compare | (compare &gt;&gt; 8);
  compare = compare | (compare &gt;&gt; 16);
  // Erase all but the most significant 1.
  // For example, the formalized number 00001111 will turn to 00001000
  //   (compare &gt;&gt; 1): 00000111
  //   (compare &amp;  1): 1
  //   (compare &gt;&gt; 1) + (compare &amp; 1): 00001000
  // There are two special cases:
  // 1. When x == y, compare will be 0 and the result of the expression (compare &amp; 1) will also be 0.
  //    Thus the result of the expression (compare &gt;&gt; 1) + (compare &amp; 1) will be 0.
  //
  // 2. When the sign bit is difference, the result of the express (compare &gt;&gt; 1) will be 0xFFFFFFFFFFFFFFFF.
  //    Thus the result of the expression (compare &gt;&gt; 1) + (compare &amp; 1) will be 0.
  //    That is, the expression is invalid in this case, but at least it will not interference the sign check.
  //    So it still works.
  compare = (compare &gt;&gt; 1) + (compare &amp; 1);
  // If the most significant bit is contained by x, result will be 0.
  // Otherwise it will be 1.
  compare = compare &amp; x;

  // The x &lt;= y if and only if
  // the most significant different bit is contained by x
  // and the sign_check is passed.
  return !(compare + sign_check);
}</code></pre>
<h2 id="count-bits">Count bits</h2>
<p>Consider that we need to find the minimum number of bits required to represent x in two’s complement. And all of the operators that allowed to use are: <code>! ~ &amp; ^ | + &lt;&lt; &gt;&gt;</code>.</p>
<p>First at all, the minimum number of bits is only decided by the position of the most significant 1 in the number’s two’s complement representation. That is, consider we have <code>x = 00001010</code>, the most significant 1 is located at the 4th position from the right. So we can represent x by using 5 bits (don’t forget the sign bit).</p>
<p>Wait a minute. How about the negative number? Consider if the x is equals to <code>11110101</code>, what is the minimum number of bits to represent it? The answer is also 5 bits. In this situation, we need to find the position of the most significant 0 instead 1. However, it is unnecessary to distinct if the x is negative or positive. Just inverse all of the bits in a negative number, so that we can consider it as a same way to positive numbers.</p>
<pre class="language-C line-numbers match-braces"><code>// Inverse negative numbers
x = (x &gt;&gt; 31) ^ x;</code></pre>
<p>It seems hard to find an easy way to find the position of the most significant 1. So we can fill all of the bits located in the right side of the most significant 1 by using the fold technique, so that the problem of finding the most significant 1 is converted to the problem of counting the number of bits that are set to 1.</p>
<pre class="language-C line-numbers match-braces"><code>// Set the bits in the right side of most significant 1 to 1.
x |= x &gt;&gt; 1;
x |= x &gt;&gt; 2;
x |= x &gt;&gt; 4;
x |= x &gt;&gt; 8;
x |= x &gt;&gt; 16;</code></pre>
<p>For a number which represented by 2 bits, it is possible to count the number of bits which is set to 1 by using a mask.</p>
<pre class="language-C line-numbers match-braces"><code>mask = 01b;
// count the numbers of 1s by adding the two bits.
x = (x &amp; mask) + ((x &gt;&gt; 1) &amp; mask);</code></pre>
<p>By using a longer mask, we can count the number of 1s for each 2 bits in a number:</p>
<pre class="language-C line-numbers match-braces"><code>int mask = 0x55555555; // 01010101....
x = (x &amp; mask) + ((x &gt;&gt; 1) &amp; mask);</code></pre>
<p>After this, the number can be considered as a list of 2 bits numbers. Each 2 bits number in the list saves the number of 1 in those 2 bits. For example:</p>
<pre class="language-bash line-numbers match-braces"><code>x                              = 0b01001110
mask                           = 0b01010101
x &amp; mask                       = 0b01000100
(x &gt;&gt; 1) &amp; mask                = 0b00000101
(x &amp; mask) + ((x &gt;&gt; 1) &amp; mask) = 0b01001001
2 bits group of x              = 01 00 11 10
2 bits group of result         = 01 00 10 01 (numbers of 1s of the 2 bits group of x)</code></pre>
<p>So we can simply count the 1s for each 4 bits and so forth by using a similar way, so that we can implement a function to find the minimum number of bits required to represent x in two’s complement:</p>
<pre class="language-C line-numbers match-braces"><code>/* howManyBits - return the minimum number of bits required to represent x in
 *             two&#39;s complement
 *  Examples: howManyBits(12) = 5
 *            howManyBits(298) = 10
 *            howManyBits(-5) = 4
 *            howManyBits(0)  = 1
 *            howManyBits(-1) = 1
 *            howManyBits(0x80000000) = 32
 *  Legal ops: ! ~ &amp; ^ | + &lt;&lt; &gt;&gt;
 *  Max ops: 90
 *  Rating: 4
 */
int howManyBits(int x) {
  int mask_2bit = 0x55;
  int mask_4bit = 0x33;
  int mask_8bit = 0x0f;
  int mask_16bit = 0xff;
  int mask_32bit = 0xff;

  // Inverse negative
  x = (x &gt;&gt; 31) ^ x;

  // Set the bits in the right of most significant 1 to 1.
  x |= x &gt;&gt; 1;
  x |= x &gt;&gt; 2;
  x |= x &gt;&gt; 4;
  x |= x &gt;&gt; 8;
  x |= x &gt;&gt; 16;

  // Count 1s
  // Generate a 2 bit mask 0x55555555(0101....)
  mask_2bit += mask_2bit &lt;&lt; 8;
  mask_2bit += mask_2bit &lt;&lt; 16;

  // Group each 2 bits to present the sum of 1s in those bits.
  x = (x &amp; mask_2bit) + ((x &gt;&gt; 1) &amp; mask_2bit);

  // Generate a 4 bit mask 0x33333333(00110011....)
  mask_4bit += mask_4bit &lt;&lt; 8;
  mask_4bit += mask_4bit &lt;&lt; 16;

  // Group each 4 bits to present the sum of 1s in those bits.
  x = (x &amp; mask_4bit) + ((x &gt;&gt; 2) &amp; mask_4bit);

  // Generate a 8 bit mask 0x0f0f0f0f(0000111100001111....)
  mask_8bit += mask_8bit &lt;&lt; 8;
  mask_8bit += mask_8bit &lt;&lt; 16;

  // Group each 8 bits to present the sum of 1s in those bits.
  x = (x &amp; mask_8bit) + ((x &gt;&gt; 4) &amp; mask_8bit);

  // Generate a 16 bit mask 0x00ff00ff(00000000111111110000000011111111)
  mask_16bit += mask_16bit &lt;&lt; 16;

  // Group each 16 bits to present the sum of 1s in those bits.
  x = (x &amp; mask_16bit) + ((x &gt;&gt; 8) &amp; mask_16bit);

  // Generate a 32 bit mask 0x00ff00ff(00000000000000001111111111111111)
  mask_32bit += mask_32bit &lt;&lt; 8;

  // Group each 32 bits to present the sum of 1s in those bits.
  x = (x &amp; mask_32bit) + ((x &gt;&gt; 16) &amp; mask_32bit);

  // Minimum bits to present the number should be numbers of 1s + 1.
  return x + 1;
}</code></pre>]]></content>
    </entry>
    <entry>
        <title type="html"><![CDATA[The Binary Representation of Floating-Point Numbers (IEEE 754)]]></title>
        <id>https://xilong.site/post/The_Binary_Representation_of_Float_Numbers_IEEE_754.html</id>
        <link rel="alternate" type="text/html" href="https://xilong.site/post/The_Binary_Representation_of_Float_Numbers_IEEE_754.html" />
        <updated>2024-05-14T00:00:00Z</updated>
        <!-- Every post here opens with an abstract, which is what
             `abstract` holds and what `content` therefore starts after.
             A feed carries the whole article, so it needs both, in the
             order the page itself shows them. -->
        <content type="html"><![CDATA[<p>The binary representation of floating-point numbers confused me greatly many years ago. Here is an introduction to the IEEE 754 standard.</p>
<h2 id="issue">Issue</h2>
<p>Code for the issue:</p>
<pre class="language-c line-numbers match-braces"><code>#include &lt;stdio.h&gt;

int main() {
  int arr[10] = {3, 3, 3, 3, 3, 3, 3, 3, 3, 3};

  // Calculate the mean of all the numbers in arr.
  float a = 0;
  for (int i = 0; i &lt; 10; ++i) {
    a += (float)arr[i] / 10;
  }
  for (int i = 0; i &lt; 10; ++i) {
    if (arr[i] &gt; a) {
        printf(&quot;%d &quot;, arr[i]);
    }
  }
  return 0;
}</code></pre>
<p>It’s evident that the above program theoretically shouldn’t output any data. However, the actual execution result is as follows:</p>
<pre class="language-none line-numbers match-braces"><code>3 3 3 3 3 3 3 3 3 3</code></pre>
<h2 id="analysis">Analysis</h2>
<p>After several attempts, I finally found that the issue is caused by the value of ‘a’ in this program not being 3.0, but rather 2.9999. This suggests that the problem is probably linked to the precision of the floating-point arithmetic.</p>
<p>Here is an introduction to the <em>IEEE 754</em> floating-point number standard, which is followed by the C programming language.</p>
<p>A floating-point number which according to the IEEE 754 standard has a form comprising a single <strong>sign bit</strong>, followed by <em>k</em> bits for the <strong>exponent</strong>, and <em>n</em> bits for the <strong>fraction</strong>.</p>
<p>For example, when <em>k</em> = 8 and <em>n</em> = 23, the form is shown in the diagram below,</p>
<table>
<thead>
<tr>
<th>Sign</th>
<th>Exponent</th>
<th>Fraction</th>
</tr>
</thead>
<tbody>
<tr>
<td>x</td>
<td>xxxx xxxx</td>
<td>xxx xxxx xxxx xxxx xxxx xxxx</td>
</tr>
</tbody>
</table>
<p>The <strong>sign bit</strong> determines whether the number is positive or negative. It will be set to ‘0’ when the number is positive. Otherwise it will be set to ‘1’.</p>
<p>The <em>k</em> bits in <strong>exponent</strong> area determine one of three categories for a floating-point number and represents its exponent. Furthermore, the value of <em>k</em> also determines a <strong>Bias</strong> value calculated as <span class="math inline">2<sup><em>k</em> − 1</sup> − 1</span>.</p>
<p>The <em>n</em> bits in <strong>fraction</strong> area determine a value of the number without exponent. Just like the coefficient of a number expressed in scientific notation.</p>
<p>Thus, the value of a floating-point number can be calculated by the expression:</p>
<p><span class="math display"><em>V</em> = (−1)<sup><em>S</em></sup> × <em>M</em> × 2<sup><em>E</em></sup></span></p>
<p>Where S is the value of the <strong>sign bit</strong>, M is the value represented by the <strong>fraction</strong> and E is the value represented by the <strong>exponent</strong>.</p>
<h3 id="normalized-values">Normalized Values</h3>
<p>When the k bits in the exponent area are neither all 0s nor all 1s, the number is a <strong>normalized</strong> value. For a normalized value, the exponent of the number is calculated by the following expression.</p>
<p><span class="math display"><em>E</em> = <em>e</em> − <em>B</em><em>i</em><em>a</em><em>s</em>.</span></p>
<p>Where e is the unsigned number value of exponent area.</p>
<p>In this form, the fraction area has an implicit leading 1 to the left of the point. That is:</p>
<p><span class="math display"><em>M</em> = 1.<em>f</em><em>r</em><em>a</em><em>c</em><em>t</em><em>i</em><em>o</em><em>n</em></span></p>
<p>For example, a float-point number with <em>k</em> = 3 bits for exponent and <em>n</em> = 4 bits for fraction, which has a bit-level representation <code>0 001 1010</code>. It will yield a value:</p>
<p><span class="math display"><em>S</em> = 0</span> <span class="math display"><em>B</em><em>i</em><em>a</em><em>s</em> = 2<sup><em>k</em> − 1</sup> − 1 = 3</span> <span class="math display"><em>E</em> = 1 − <em>B</em><em>i</em><em>a</em><em>s</em> = −2</span> <span class="math display"><em>M</em> = 1.1010</span> <span class="math display"><em>V</em> = (−1)<sup>0</sup> × 1.1010 × 2<sup>−2</sup> = 0.011010</span></p>
<blockquote>
<p>Why don’t we use the exponent value directly rather than minus a suspicious Bias?</p>
<p>The reason is to represent the negative exponent naturally. We can easily compare two exponents just by comparing the unsigned values of their bit-level representations.</p>
</blockquote>
<h3 id="denormalized-values">Denormalized Values</h3>
<p>When the bits in the exponent area are all 0s, the number is a <strong>denormalized</strong> value. There are only 2 differences between a normalized value and a denormalized value.</p>
<ol type="1">
<li>The exponent of the number is calculated by the following expression.</li>
</ol>
<p><span class="math display"><em>E</em> = 1 − <em>B</em><em>i</em><em>a</em><em>s</em></span></p>
<ol start="2" type="1">
<li>The fraction has no more implicit 1 in the head. That is:</li>
</ol>
<p><span class="math display"><em>M</em> = 0.<em>f</em><em>r</em><em>a</em><em>c</em><em>t</em><em>i</em><em>o</em><em>n</em></span></p>
<p>For example, a float-point number with <em>k</em> = 3 bits for exponent and <em>n</em> = 4 bits for fraction, which has a bit-level representation <code>0 000 1010</code> will yield a value:</p>
<p><span class="math display"><em>S</em> = 0</span> <span class="math display"><em>B</em><em>i</em><em>a</em><em>s</em> = 2<sup><em>k</em> − 1</sup> − 1 = 3</span> <span class="math display"><em>E</em> = 1 − <em>B</em><em>i</em><em>a</em><em>s</em> = −2</span> <span class="math display"><em>M</em> = 0.1010</span> <span class="math display"><em>V</em> = (−1)<sup>0</sup> × 0.1010 × 2<sup>−2</sup> = 0.001010</span></p>
<blockquote>
<p>Why don’t we use the <span class="math inline">−<em>B</em><em>i</em><em>a</em><em>s</em></span> to be the value of the exponent, rather than <span class="math inline">1 − <em>B</em><em>i</em><em>a</em><em>s</em></span>?</p>
<p>The reason is to take a naturally transform from denormalized values to normalized values.</p>
<p>For example, consider a number which has <em>k</em> = 3 bit to represent the exponent and <em>n</em> = 4 bit for the fraction. The biggest <strong>denormalized</strong> values in the form has a bit-level representation:</p>
<p>0 000 1111, the values is: <span class="math inline">0.1111 × 2<sup>1 − (2<sup>3 − 1</sup> − 1)</sup></span> = <span class="math inline">0.001111</span></p>
<p>Increase it by 1 in the bit-level, we can get the smallest <strong>normalized</strong> number which has a bit-level representation:</p>
<p>0 001 0000, the values is: <span class="math inline">1.0000 × 2<sup>1 − (2<sup>3 − 1</sup> − 1)</sup></span> = <span class="math inline">0.010000</span></p>
<p>If the exponent set to <span class="math inline">−<em>B</em><em>i</em><em>a</em><em>s</em></span> directly, the value of the denormalized number will be:</p>
<p><span class="math inline">0.1111 × 2<sup>−(2<sup>3 − 1</sup> − 1)</sup> = 0.0001111</span></p>
<p>We can look the <span class="math inline">1 − <em>B</em><em>i</em><em>a</em><em>s</em></span> as <span class="math inline">−<em>B</em><em>i</em><em>a</em><em>s</em> + 1</span>, it is a compensation for the lack of the leading 1 in a denormalized value.</p>
</blockquote>
<h3 id="special-values">Special Values</h3>
<p>When the bits in the exponent area are set to all 1s, there are 2 special form depending on whether the bits in the fraction area are set to all 0s.</p>
<ol type="1">
<li><p>When the fraction area are not all 0s, the value is NaN which means Not a Number.</p></li>
<li><p>When the fraction area are all 0s, the value is infinity. The value is either <span class="math inline">+∞</span> or <span class="math inline">−∞</span> depending on the sign bit.</p></li>
</ol>
<p>Here a some examples when <em>k</em> = 2 and <em>n</em> = 5:</p>
<table>
<thead>
<tr>
<th>Bit-level representaion</th>
<th>Value</th>
</tr>
</thead>
<tbody>
<tr>
<td>0 11 00000</td>
<td><span class="math inline">+∞</span></td>
</tr>
<tr>
<td>1 11 00000</td>
<td><span class="math inline">−∞</span></td>
</tr>
<tr>
<td>0 11 00100</td>
<td>NaN</td>
</tr>
<tr>
<td>1 11 00100</td>
<td>NaN</td>
</tr>
</tbody>
</table>
<h3 id="precision-and-rounding">Precision and Rounding</h3>
<p>The C programming language is using 32 bits to represent a <code>float</code> type, and 64 bits to represent a <code>double</code> type. Here is the detail for the representation.</p>
<table>
<thead>
<tr>
<th>Type</th>
<th>Sign</th>
<th>Exponent</th>
<th>Fraction</th>
</tr>
</thead>
<tbody>
<tr>
<td>float</td>
<td>1 bit</td>
<td>8 bit</td>
<td>23 bit</td>
</tr>
<tr>
<td>double</td>
<td>1 bit</td>
<td>11 bit</td>
<td>52 bit</td>
</tr>
</tbody>
</table>
<p>Limited by the memory space, there are 2 factors that can lead a lack of precision.</p>
<ol type="1">
<li><p>The number is so large that the exponent can not be represented. For example, the number <span class="math inline">2<sup>5000</sup></span> can not be represented even by the type <code>double</code>, because a <code>double</code> can only represent an exponent between <span class="math inline">1 − 2<sup>11 − 1</sup> + 1 = −1022</span> and <span class="math inline">2<sup>11</sup> − 2 − 2<sup>11 − 1</sup> + 1 = 1023</span>.</p></li>
<li><p>The number has too many digit so that the fraction bits is not enough to represent it. For example, the number <span class="math inline">0.1100110011001100110011000101<sub>2</sub></span> needs 27 bits to represent its fraction (the leading 1 can be left out), but a <code>float</code> only has 23 bits to represent the fraction.</p></li>
</ol>
<blockquote>
<p>Note</p>
<p>The effect of the exponent is to move the point to a different position of a floating-point number (that’s why it is called “floating-point”), that makes it possible to get a very large value. But since we can only set the value for a limited fraction, the precision of the possible value is also limited.</p>
<p>For example, when <em>k</em> = 8 and <em>n</em> = 3 we can simply represent <span class="math inline">2<sup>100</sup></span> by the representation:</p>
<p>0 11100011 000</p>
<p>But we can’t represent <span class="math inline">1.1111<sub>2</sub> × 2<sup>100</sup></span> since we can only control the first 3 bits actually in the hundred of 0s.</p>
</blockquote>
<p>When we face the precision problem, the only way we can choose is to round it. The default rule of rounding is called “Round-to-even”.</p>
<p>To explain the rule, consider a number which has a form like <span class="math inline">...<em>x</em><em>x</em><em>x</em>.<em>x</em><em>x</em><em>y</em><em>y</em><em>y</em><em>y</em>...</span>. The position we want to round is between the least x and the most y. A value is on halfway between two possibilities only if it has a form like <span class="math inline"><em>x</em><em>x</em><em>x</em>.<em>x</em><em>x</em>1000...</span>, that is the most y is 1 and followed by all 0s.</p>
<ol type="1">
<li><p>If the value is not on the halfway between two possibilities, round to the nearer one. For example, if we want to save 2 digit after the point, the number 1.01101 will round to 1.10 and the number 1.01001 will round to 1.01.</p></li>
<li><p>If the value is on the halfway between two possibilities, we tend to make the least digit before the position we want to round to 0. For example, if we want to save 2 digit after the point, the number 1.01100 will round to 1.10 and the number 1.10100 will round to 1.10.</p></li>
</ol>
<p>Because the last digit of a rounded number is always 0 (so that the number is even), the rule is called “round-to-even”.</p>
<blockquote>
<p>Why does it choose round-to-even instead of round-to-zero?</p>
<p>Because half of the numbers are even, a number will round upward about 50% of the time and round downward about 50% of the time. It can balance the loss caused by rounding.</p>
</blockquote>
<h2 id="result">Result</h2>
<p>Let’s go back to the issue, and get the IEEE 754 representation of <span class="math inline">0.3<sub>10</sub></span>.</p>
<p>Transfer <span class="math inline">0.3<sub>10</sub></span> to normalized binary representation:</p>
<p><span class="math display">1.00110011001100110011001... × 2<sup>−2</sup></span></p>
<p>We can notice that the binary representation of <span class="math inline">0.3<sub>10</sub></span> is an infinite number. So it will be rounded when converted to the IEEE 754 representation. Since it is bigger than halfway, it will round upward:</p>
<table>
<thead>
<tr>
<th>Sign</th>
<th>EXP</th>
<th>Fraction</th>
</tr>
</thead>
<tbody>
<tr>
<td>0</td>
<td>01111101</td>
<td>001 1001 1001 1001 1001 1010</td>
</tr>
</tbody>
</table>
<p>Translating the binary representation to hex, it should be <span class="math inline">3<em>e</em>99999<em>a</em><sub>16</sub></span>. We can validate it by the following program:</p>
<pre class="language-c line-numbers match-braces"><code>#include&lt;stdio.h&gt;
int main()
{
    float a = 0.3;
    printf(&quot;%x&quot;, *(int *)&amp;a);
    return 0;
}</code></pre>
<p>output:</p>
<pre class="language-none line-numbers match-braces"><code>3e99999a</code></pre>
<p>The result meets our expectations.</p>]]></content>
    </entry>
    <entry>
        <title type="html"><![CDATA[机器学习浅尝（一）——序言与分类]]></title>
        <id>https://xilong.site/post/Dabble_in_Machine_Learning_1_Prelude_and_Categories.html</id>
        <link rel="alternate" type="text/html" href="https://xilong.site/post/Dabble_in_Machine_Learning_1_Prelude_and_Categories.html" />
        <updated>2023-05-30T00:00:00Z</updated>
        <!-- Every post here opens with an abstract, which is what
             `abstract` holds and what `content` therefore starts after.
             A feed carries the whole article, so it needs both, in the
             order the page itself shows them. -->
        <content type="html"><![CDATA[<p>随着ChatGPT的出世，最近几年火得一塌糊涂的AI似乎终于掀开了历史书页的一角。身为一个技术人，我觉得是时候普及一些基础的AI知识了。</p>
<h2 id="序言这个系列在做什么">序言：这个系列在做什么</h2>
<p>这个系列是一个个人的AI领域知识扫盲过程的记录。鉴于自己贫瘠的知识储备与所剩无几的精力，无法涉足过深。因此这个系列的定位是粗略的建立起机器学习相关的知识框架，取名“浅尝”。</p>
<p>具体来说是跟随广受好评的<a href="https://www.bilibili.com/video/BV164411b7dx/?spm_id_from=333.1007.0.0&amp;vd_source=8f2c7ce799acf2166268d6f71a305aee">吴恩达机器学习</a>系列课程，途中记录下课程的内容与一些（估计不太多）自己的体会。由于精力有限，并没有选择更多的资料来对照学习，这个系列也可以说是这门课程的笔记。</p>
<h2 id="机器学习算法的分类">机器学习算法的分类</h2>
<p>机器学习算法分为<strong>监督学习</strong>与<strong>无监督学习</strong>两大类，关键区别为我们是否知道自己想要什么。</p>
<h3 id="监督学习">监督学习</h3>
<p>监督学习的模式为：给算法一组<code>{特征} -&gt; {结果}</code>的数据，之后让算法根据特征预测结果。视结果是连续量还是离散量，监督学习可细分为<strong>回归</strong>算法和<strong>分类</strong>算法两类。</p>
<h4 id="回归">回归</h4>
<p>例如要预测房价，我们已经有一些房产的特征，如面积，楼层等，以及对应的结果，即价格。回归算法使我们可以利用这些已知的信息建立一个模型，从而可以根据新房产的特征来预测其价格。</p>
<p>举一个极端理想化的例子。设想在某地存在一个小镇。小镇有一条秘密法律：任何房产的价格为其面积的两倍。由于这个规定被严格保密，外界无法获知。但小镇的房产信息是公开的，我们可以获取如下信息：</p>
<pre class="language-none line-numbers match-braces"><code>房产1：面积2，价格4
房产2：面积4，价格8</code></pre>
<p>假设现在我们知道一处还未标价的房产A，面积为10，要猜测它的价格。</p>
<p>此时可以根据已知信息发现，房产的价格似乎总是面积的两倍，因此我们建立一个模型：</p>
<pre class="language-none line-numbers match-braces"><code>Price(space) = 2 * space</code></pre>
<p>从而预测出房产A的价格为20。对这个例子而言，<strong>特征</strong>即为面积，<strong>结果</strong>就是价格。</p>
<p>同时我们发现，由于并不知道小镇的秘密法律，我们只能根据已知信息给出猜测模型，这使得我们预测的结果并不一定准确，如果我建立的模型为：</p>
<pre class="language-none line-numbers match-braces"><code>Price(space) = space^2 - 4 * space + 8</code></pre>
<p>它仍然符合我们已知的数据，但预测值将变为：68，相距甚远。</p>
<p>这里引出两个问题：</p>
<ol type="1">
<li><p>并非所有数据都能像这个例子这样浅显，面对更复杂的数据时我们应该<strong>如何建立模型</strong>。</p></li>
<li><p>符合已知数据的模型有多个时，<strong>如何选择更合适的模型</strong>。</p></li>
</ol>
<p>正如序言所说，这篇文章并不是一个教程，而是我的学习记录，因此我目前无法给出这两个问题的答案。在之后的学习中寻找吧。</p>
<h4 id="分类">分类</h4>
<p>分类算法与回归算法相似，都是<strong>根据特征建立模型来预测结果</strong>。两者的不同点在于，回归算法<strong>在连续的结果中算出一个近似结果</strong>，而分类算法<strong>在多个离散的结果中选出一个确定结果</strong>。</p>
<p>例如对于预测几率的模型，我们可以说结果是0.95。但对于一个分辨猫狗的模型，我们不能说结果是0.95的狗，而应该确切的给出结果：这是一条狗。</p>
<h3 id="无监督学习">无监督学习</h3>
<p>非监督学习的模式为：给算法一组数据，让算法帮我们分析出这些数据内含的关联。通常表现为<strong>聚类算法</strong>的形式。</p>
<h4 id="聚类">聚类</h4>
<p>聚类算法在根本上不同于监督学习，我们的目的不是某个作为结果的属性的值，而是想要借助机器从繁杂的数据中获取这个数据内在的关联。</p>
<p>聚类不同于分类算法主要在于我们事先是否知道有哪些分类。分类算法是由我们<strong>预设几个类别，让模型识别数据的特征并根据特征选择一个类别</strong>。而聚类算法是<strong>根据数据的特征，将相似的数据判定为一类</strong>。</p>
<p>例如给模型大量的新闻稿，要求它将这些新闻按主题聚类。</p>
<h2 id="小结">小结</h2>
<p>这篇文章确定了系列的目标，并大体描述了机器学习的分类。</p>
<p>你可能注意到了，我对分类算法与聚类算法的介绍比对回归算法的介绍简略的多。这其实是因为我写这篇文章时已经学习了回归算法的一些内容，因此理解比其它两个类别更多一些。</p>]]></content>
    </entry>
    <entry>
        <title type="html"><![CDATA[从零开始的Haskell（七）——折叠与幺半群]]></title>
        <id>https://xilong.site/post/Haskell_from_0_to_1_7_Fold_and_Monoids.html</id>
        <link rel="alternate" type="text/html" href="https://xilong.site/post/Haskell_from_0_to_1_7_Fold_and_Monoids.html" />
        <updated>2022-01-10T00:00:00Z</updated>
        <!-- Every post here opens with an abstract, which is what
             `abstract` holds and what `content` therefore starts after.
             A feed carries the whole article, so it needs both, in the
             order the page itself shows them. -->
        <content type="html"><![CDATA[<p>系列第七篇，介绍了更一般性的折叠以及幺半群。</p>
<h2 id="折叠又见折叠">折叠，又见折叠</h2>
<p>我们已经知道怎么折叠一个列表了，但我们也可以将折叠思想更一般性地用于其它数据类型。比如对于下面这个二叉树，考虑一些函数：</p>
<pre class="language-haskell line-numbers match-braces"><code>data Tree a = Empty
            | Node (Tree a) a (Tree a)
    deriving (Show, Eq)

leaf :: a -&gt; Tree a
leaf x = Node Empty x Empty</code></pre>
<p>写一个函数来计算树的节点数：</p>
<pre class="language-haskell line-numbers match-braces"><code>treeSize :: Tree a -&gt; Integer
treeSize Empty = 0
treeSize (Node l _ r) = 1 + treeSize l + treeSize r</code></pre>
<p>计算一个<code>Tree Integer</code>的数据总和：</p>
<pre class="language-haskell line-numbers match-braces"><code>treeSum :: Tree Integer -&gt; Integer
treeSum Empty = 0
treeSum (Node l x r) = x + treeSum l + treeSum r</code></pre>
<p>计算树的高度：</p>
<pre class="language-haskell line-numbers match-braces"><code>treeDepth :: Tree a -&gt; Integer
treeDepth Empty = 0
treeDepth (Node l _ r) = 1 + max (treeDepth l) (treeDepth r)</code></pre>
<p>将树内元素展开成一个列表：</p>
<pre class="language-haskell line-numbers match-braces"><code>flatten :: Tree a -&gt; [a]
flatten Empty = []
flatten (Node l x r) = flatten l ++ [x] ++ flatten r</code></pre>
<p>你是否从中看出一些相似的模式？对于上述每个函数，有：</p>
<ol type="1">
<li>接受一个树作为输入</li>
<li>对输入的树进行模式匹配</li>
<li>对于<code>Empty</code>节点，返回一个简单的值</li>
<li>对于<code>Node</code>节点：
<ol type="1">
<li>递归的处理左右子树</li>
<li>以某种方式组合递归的结果，并生成最终结果</li>
</ol></li>
</ol>
<p>作为一名好的程序员，我们总是希望将抽象出重复的模式。首先需要将各例子中变化的部分作为参数，它们是：</p>
<ol type="1">
<li>返回类型</li>
<li>空节点的值</li>
<li>组合递归调用的方式</li>
</ol>
<p>设树处理的类型为<code>a</code>，函数的返回类型为<code>b</code>，有：</p>
<pre class="language-haskell line-numbers match-braces"><code>treeFold :: b -&gt; (b -&gt; a -&gt; b -&gt; b) -&gt; Tree a -&gt; b
treeFold e _ Empty = e
treeFold e f (Node l x r) = f (treeFold e f l) x (treeFold e f r)</code></pre>
<p>有了这个折叠函数，我们就可以更轻易地定义上面的几个例子了：</p>
<pre class="language-haskell line-numbers match-braces"><code>treeSize&#39; :: Tree a -&gt; Integer
treeSize&#39; = treeFold 0 (\l _ r -&gt; l + 1 + r)

treeSum&#39; :: Tree Integer -&gt; Integer
treeSum&#39; = treeFold 0 (\l x r -&gt; l + x + r)

treeDepth&#39; :: Tree a -&gt; Integer
treeDepth&#39; = treeFold 0 (\l _ r -&gt; 1 + max l r)

flatten&#39; :: Tree a -&gt; [a]
flatten&#39; = treeFold [] (\l x r -&gt; l ++ [x] ++ r)</code></pre>
<p>我们也可以轻松实现其它的树折叠函数：</p>
<pre class="language-haskell line-numbers match-braces"><code>treeMax :: (Ord a, Bounded a) =&gt; Tree a -&gt; a
treeMax = treeFold minBound (\l x r -&gt; max l $ max x r)</code></pre>
<p>这样感觉就好多了，去除了大量重复模式，非常优雅。</p>
<h3 id="折叠表达式">折叠表达式</h3>
<p>回想下Homework5中的<code>ExprT</code>类型和相应的<code>eval</code>函数：</p>
<pre class="language-haskell line-numbers match-braces"><code>data ExprT = Lit Integer
           | Add ExprT ExprT
           | Mul ExprT ExprT

eval :: ExprT -&gt; Integer
eval (Lit i) = i
eval (Add a b) = eval a + eval b
eval (Mul a b) = eval a * eval b</code></pre>
<p>看着就欠抽象！来试试这样写：</p>
<pre class="language-haskell line-numbers match-braces"><code>exprTFold :: (Integer -&gt; b) -&gt; (b -&gt; b -&gt; b) -&gt; (b -&gt; b -&gt; b) -&gt; ExprT -&gt; b
exprTFold f _ _ (Lit i) = f i
exprTFold f g h (Add a b) = g (exprTFold f g h a) (exprTFold f g h b)
exprTFold f g h (Mul a b) = h (exprTFold f g h a) (exprTFold f g h b)

eval&#39; :: ExprT -&gt; Integer
eval&#39; = exprTFold id (+) (*)</code></pre>
<p>现在我们可以做一些别的事，比如计算表达式中数字的个数：</p>
<pre class="language-haskell line-numbers match-braces"><code>numLiterals :: ExprT -&gt; Int
numLiterals = exprTFold (const 1) (+) (+)</code></pre>
<h3 id="普适的折叠">普适的折叠</h3>
<p>这里透露的信息是我们可以为很多（并非全部）数据类型创建折叠操作。作用于<code>T</code>类型的折叠操作会为<code>T</code>的每个构造器取一个（高层面的）参数，考虑怎么把构造器中的数据类型转换成返回值的类型——直到所有递归过程被折叠成一个结果。</p>
<p>很多我们可能想为<code>T</code>实现的的函数在折叠操作下会很易于表达。</p>
<h2 id="幺半群monoids">幺半群（Monoids）</h2>
<p>离散数学里接触过幺半群的概念，定义如下：</p>
<ul>
<li>幺半群是一个带有二元运算<code>* : M * M -&gt; M</code>的集合<code>M</code>，其符合以下公理
<ul>
<li>结合律：对任意<code>M</code>内的元素<code>a</code>、<code>b</code>、<code>c</code>，有<code>(a * b) * c = a * (b * c)</code></li>
<li>单位元：存在<code>M</code>内的元素<code>e</code>，使任一存于<code>M</code>内的元素<code>a</code>满足<code>a * e = e * a = a</code></li>
<li>封闭性（内含于二元运算中）：对任意在<code>M</code>内的元素<code>a</code>、<code>b</code>，<code>a*b</code>也在<code>M</code>中</li>
</ul></li>
</ul>
<p>Haskell中幺半群是一种基本类型类，定义在<code>Data.Monoid</code>模块里：</p>
<pre class="language-haskell line-numbers match-braces"><code>class Monoid m where
    mempty  :: m
    mappend :: m -&gt; m -&gt; m

    mconcat :: [m] -&gt; m
    mconcat = foldr mappend mempty

(&lt;&gt;) :: Monoid m =&gt; m -&gt; m -&gt; m
(&lt;&gt;) = mappend</code></pre>
<p>其中<code>mempty</code>相当于单位元的定义，<code>mappend</code>与其符号简写<code>&lt;&gt;</code>为幺半群中的二元运算。<code>mconcat</code>用于将整个列表折叠成一个值，默认使用<code>foldr</code>来实现，但由于对某种特定的<code>Monoid</code>类型可能存在更高效的实现，模块中提供了它的定义供修改。</p>
<p>正如之前提到的幺半群的性质，对任何<code>Monoid</code>类型的值<code>x</code>、<code>y</code>、<code>z</code>有：</p>
<pre class="language-haskell line-numbers match-braces"><code>mempty &lt;&gt; x = x
x &lt;&gt; mempty = x
(x &lt;&gt; y) &lt;&gt; z = x &lt;&gt; (y &lt;&gt; z)</code></pre>
<h3 id="monoid-实例">Monoid 实例</h3>
<p>在知道这些概念后就会发现，<code>Monoid</code>无处不在。比如一个列表：</p>
<pre class="language-haskell line-numbers match-braces"><code>instance Monoid [a] where
    mempty  = []
    mappend = (++)</code></pre>
<p>考虑下会发现这是完美符合<code>Monoid</code>性质的。同理可以发现数值类型的加法和乘法也完美符合<code>Monoid</code>的性质。但要怎样分别实现数值加法和乘法的<code>Monoid</code>呢？我们不能在一个类型类中创建同一个类型的两个不同实例，即以下方法：</p>
<pre class="language-haskell line-numbers match-braces"><code>instance Num a =&gt; Monoid a where
    mempty  = 0
    mappend = (+)

instance Num a =&gt; Monoid a where
    mempty  = 0
    mappend = (*)</code></pre>
<p>是非法的，因为有重复定义。为解决这个问题，我们可以创建两个新类型作为数值类型的不同封装：</p>
<pre class="language-haskell line-numbers match-braces"><code>newtype Sum a = Sum a
    deriving (Eq, Ord, Num, Show)

getSum :: Sum a -&gt; a
getSum (Sum a) = a

instance Num a =&gt; Monoid (Sum a) where
    mempty  = Sum 0
    mappend = (+)

newtype Product a = Product a
    deriving (Eq, Ord, Num, Show)

getProduct :: Product a -&gt; a
getProduct (Product a) = a

instance Num a =&gt; Monoid (Product a) where
    mempty  = Product 1
    mappend = (*)</code></pre>
<blockquote>
<p>类型的定义方式：</p>
<p>data: ADT</p>
<p>newtype: 单构造器的零代价ADT</p>
<p>type: 类型别名</p>
</blockquote>
<p>在上述定义后，我们可以使用以下方式计算一个数列中所有元素的乘积：</p>
<pre class="language-haskell line-numbers match-braces"><code>lst :: [Integer]
lst = [1,5,8,23,423,99]

prod :: Integer
prod = getProduct . mconcat . map Product $ lst</code></pre>
<p>当然这个例子显得舍近求远，非常地蠢。但这个模式可以方便的说明<code>Monoid</code>的应用方式。</p>
<p>两个可以作为<code>Monoid</code>实例的类组成的<code>Pair</code>也可以作为<code>Monoid</code>的实例，如下：</p>
<pre class="language-haskell line-numbers match-braces"><code>instance (Monoid a, Monoid b) =&gt; Monoid (a, b) where
    mempty  = (mempty, mempty)
    (a,b) `mappend` (c,d) = (a `mappend` c, b `mappend` d)</code></pre>
<p>试图构造一个<code>Bool</code>类型的<code>Monoid</code>，如下：</p>
<pre class="language-haskell line-numbers match-braces"><code>newtype Or = Or {getOr :: Bool}
    deriving (Eq, Ord, Show, Read, Bounded)

instance Monoid Or where
    mempty = Or False
    Or x `mappend` Or y = Or $ x || y</code></pre>
<p>这个定义确实没错，但是无法通过语法检查。原因是<code>No instance for (Semigroup Or)</code>。</p>
<h2 id="补充半群semigroup">补充：半群（Semigroup）</h2>
<p>上面的报错信息意为<code>Or</code>类型不是<code>Semigroup</code>类型类的实例，而Semigroup是半群的意思。这是怎么回事呢？</p>
<p>我们知道，幺半群就是有单位元的半群，则半群定义为一个带有符合结合律的二元运算符<code>* : M * M -&gt; M</code>的集合。因此Haskell把幺半群的二元运算符部分抽象出来作为半群类型类，如下：</p>
<pre class="language-haskell line-numbers match-braces"><code>class Semigroup a where
    (&lt;&gt;) :: a -&gt; a -&gt; a</code></pre>
<p>而幺半群的真实定义则为：</p>
<pre class="language-haskell line-numbers match-braces"><code>class Semigroup a =&gt; Monoid a where
    mempty  :: a
    mappend :: a -&gt; a -&gt; a
    mappend = (&lt;&gt;)
    mconcat :: [a] -&gt; a
    mconcat = foldr mappend mempty</code></pre>
<p>关于<code>&lt;&gt;</code>与<code>mappend</code>的关系更准确的说法是，<code>mappend</code>是<code>&lt;&gt;</code>的别名。因而，<code>&lt;&gt;</code>才是主要定义，就是说一个类要成为<code>Monoid</code>的实例就必须也成为<code>Semigroup</code>的实例。则<code>Bool</code>类型的<code>Monoid</code>应定义为：</p>
<pre class="language-haskell line-numbers match-braces"><code>newtype Or = Or {getOr :: Bool}
    deriving (Eq, Ord, Show, Read, Bounded)

instance Semigroup Or where
    Or x &lt;&gt; Or y = Or $ x || y

instance Monoid Or where
    mempty = Or False

newtype And = And {getAnd :: Bool}
    deriving (Eq, Ord, Show, Read, Bounded)

instance Semigroup And where
    And x &lt;&gt; And y = And $ x &amp;&amp; y

instance Monoid And where
    mempty = And True</code></pre>
<p>甚至可以实现函数类型的<code>Monoid</code>：</p>
<pre class="language-haskell line-numbers match-braces"><code>newtype Dot a = Dot {run :: a -&gt; a}

instance Semigroup (Dot a) where
    Dot x &lt;&gt; Dot y = Dot $ x . y

instance Monoid (Dot a) where
    mempty = Dot id</code></pre>]]></content>
    </entry>
    <entry>
        <title type="html"><![CDATA[Haskell：理解惰性求值与运算符优先级]]></title>
        <id>https://xilong.site/post/Haskell_Gain_an_Understanding_of_Lazy_Evaluation_and_Operator_Precedence.html</id>
        <link rel="alternate" type="text/html" href="https://xilong.site/post/Haskell_Gain_an_Understanding_of_Lazy_Evaluation_and_Operator_Precedence.html" />
        <updated>2022-01-08T00:00:00Z</updated>
        <!-- Every post here opens with an abstract, which is what
             `abstract` holds and what `content` therefore starts after.
             A feed carries the whole article, so it needs both, in the
             order the page itself shows them. -->
        <content type="html"><![CDATA[<p>做 <a href="https://www.seas.upenn.edu/~cis194/spring13/hw/06-laziness.pdf">CIS 194 HomeWork6</a>时遇到了各种思维方面的困难。试图通过梳理它们加深对运算符优先级和惰性求值的理解。</p>
<h2 id="引言fibonacci数列">引言：Fibonacci数列</h2>
<p>斐波那契数列，相信大家都很熟悉了，每个人刚接触递归与动态规划的思想时候都会看到它的身影。其定义为：</p>
<pre class="language-none line-numbers match-braces"><code>fib(1) = 1
fib(2) = 1
fib(n) = fib(n - 1) + fib(n - 2), n &gt; 2</code></pre>
<p>这在Haskell中是很容易实现的：</p>
<pre class="language-haskell line-numbers match-braces"><code>fib :: Integer -&gt; Integer
fib 1 = 1
fib 2 = 1
fib n = fib (n - 1) + fib (n - 2)</code></pre>
<h2 id="fib函数的递推实现">fib函数的递推实现</h2>
<p>不难看出，上面的实现非常自然，几乎与数学方式给出的定义一样。然而大家可能都知道，这种定义方式的计算效率是很低的，在过程式语言中可以引出DP思想：</p>
<pre class="language-cpp line-numbers match-braces"><code>int fib(int n) {
    std::vector&lt;int&gt; fibs(n);
    fibs[0] = 1;
    fibs[1] = 1;
    for (int i = 2; i &lt; n; ++i) {
        fibs[i] = fibs[i - 1] + fibs[i - 2];
    }
    return fibs[n - 1];
}</code></pre>
<p>这样的计算方法将可能重复使用的资源记录了下来，使用少量空间换取了大量的时间。并且也很符合人的直觉。可以拆解成两步：</p>
<ol type="1">
<li>维护一个长度至少为n的数列。</li>
<li>取出数列中对应的元素。</li>
</ol>
<p>那么在Haskell这样的无副作用语言中如何实现对列表的维护呢？如果使用下面方式：</p>
<pre class="language-haskell line-numbers match-braces"><code>fibs :: [Integer]
fibs = map fib [1..]</code></pre>
<p>则不仅无法使用这个列表记录已使用的计算，反而每一步都要耗费大量的计算资源。这里如果根据直觉实现递推，或许会实现出这样的东西：</p>
<pre class="language-haskell line-numbers match-braces"><code>fibs :: [Integer]
fibs = map fib&#39; [1..]
    where
        fib&#39; 1 = 1
        fib&#39; 2 = 1
        fib&#39; n = fibs!!(n - 1) + fibs!!(n - 2)</code></pre>
<p>然而，这样会寻致计算<code>!!</code>的时候试图求出<code>fib</code>的值，因此会进入一个死循环。不可行。</p>
<p>那么我们在<a href="https://www.seas.upenn.edu/~cis194/spring13/lectures/06-laziness.html">Lecture 6</a>中见过的<code>Data.Array</code>可以完成这个任务吗？答案是不行，它仅仅是一个对列表的封装，本身不支持处理无限列表。且此处并不需要使用映射。</p>
<p>黔驴技穷了，上网搜索解法，发现可以使用<code>zipWith</code>实现如下：</p>
<pre class="language-haskell line-numbers match-braces"><code>fibs :: [Integer]
fibs = 1:1:zipWith (+) fibs (tail fibs)</code></pre>
<p>于是开始了我的迷惑之旅。</p>
<h2 id="惰性求值">惰性求值</h2>
<p>对于<code>fibs = 1:1:zipWith (+) fibs (tail fibs)</code>这种形式的定义，我简直闻所未闻。定义中不仅出现了自身，甚至出现了对自身的嵌套运算。将上式转换为C++形式可以帮助我们快速发现蹊跷：</p>
<pre class="language-cpp line-numbers match-braces"><code>// 1:1:zipWith (+) fibs (tail fibs) == (:) (1) ((:) (1) (zipWith (+) fibs (tail fibs)))
list cons(Num i, list tail);
list zipWith(operation op, list a, list b);
list tail(list l);
list fibs() {
    return cons(1, cons(1, zipWith(plus, fibs(), tail(fibs()))));
}</code></pre>
<p>可以发现一个很明显的问题，这个函数没有递归终止条件。而在C++这样的直接求值语言中，这会导致传参时无限递归，计算不出任何结果。然而对于惰性求值的Haskell而言，就不存在这个问题了，首先看看<code>zipWith</code>的定义：</p>
<pre class="language-Haskell line-numbers match-braces"><code>zipWith :: (a-&gt;b-&gt;c) -&gt; [a] -&gt; [b] -&gt; [c]
zipWith f = go
  where
    go [] _ = []
    go _ [] = []
    go (x:xs) (y:ys) = f x y : go xs ys</code></pre>
<p>由于这个函数没有用到如<code>!!</code>或<code>length</code>这类需要先将值计算出来的函数，符合惰性求值的作用条件，计算过程如下：</p>
<pre class="language-haskell line-numbers match-braces"><code>fibs = 1:1:zipWith (+) fibs (tail fibs)
 == 1:1:(go (1:xs) (1:ys))
 == 1:1:((1 + 1) : go xs ys)
 == 1:1:((1 + 1) : go (tail fibs) (tail (tail fibs)))
 ...</code></pre>
<p>可以总结出一条规律，要想使用惰性求值特性，就要使每一个计算步骤都不依赖完整的结果。</p>
<h2 id="谈谈运算符优先级">谈谈运算符优先级</h2>
<ul>
<li>Why not <code>fibs = 1:1:(zipWith (+) fibs (tail fibs))</code></li>
</ul>
<p>这里的答案是<code>:</code>运算符是<code>cons</code>函数的语法糖，而<code>[elements]</code>又是<code>:</code>的语法糖，关系如下：</p>
<pre class="language-haskell line-numbers match-braces"><code>[1,2,3] == 1:2:3:[] == cons 1 (cons 2 (cons 3 []))</code></pre>
<p>不难看出，为满足这个关系，<code>:</code>是一个右结合运算符。因此：</p>
<pre class="language-haskell line-numbers match-braces"><code>1:1:(zipWith (+) fibs (tail fibs))
== 1:(1:((zipWith (+) fibs (tail fibs))))
== 1:(1:(zipWith (+) fibs (tail fibs)))
== 1:1:zipWith (+) fibs (tail fibs)</code></pre>
<p>之所以可以将<code>zipWith (+) fibs (tail fibs)</code>看做一个整体，是因为前缀函数调用的优先级高于中缀函数。</p>
<p>而不可以将<code>zipWith (+) fibs (tail fibs)</code>写做<code>zipWith (+) fibs tail fibs</code>，则是因为前缀函数调用优先级相同，且从左向右开始分析。因此上式等价于：<code>(zipWith (+) fibs tail) fibs</code>。</p>
<ul>
<li>Why not <code>fibs = 1:1:zipWith (+) fibs $ tail fibs</code></li>
</ul>
<p>根据<code>$</code>运算符的作用是“<em>省略之后的括号</em>”来理解，这样写是可行的，然而这个理解是错误的。<code>$</code>运算符真正的作用是，将<strong>前后两部分都括上括号</strong>。因此上式转换为前缀写法后，错误就显而易见了，如下：</p>
<pre class="language-haskell line-numbers match-braces"><code>($) (1:1:zipWith (+) fibs) (tail fibs)
($) (cons 1 (cons 1 (zipWith (+) fibs))) (tail fibs)</code></pre>
<p>值得一提的是<code>$</code>的函数原型：</p>
<pre class="language-haskell line-numbers match-braces"><code>($) :: (a -&gt; b) -&gt; a -&gt; b
($) = id</code></pre>
<p>即接受一个函数，然后返回该函数本身。唯一的作用就是用其极低的运算优先级来省略多余的括号。没错，是极低的优先级，这有违直觉。因为直觉上似乎是：<em>“<code>$</code>运算符以极高的运算优先级为它的左右两边加上了括号”</em>。然而我们不妨思考一下，括号的意义正是优先运算，为了让自己的左右都先于自己运算，它的优先级必然很低。（事实上<code>$</code>的运算优先级是最低的一级，参见后附优先级表。）</p>
<p>考虑以下例子：</p>
<pre class="language-haskell line-numbers match-braces"><code>f :: a -&gt; b
g :: c -&gt; a

f g x == (f g) x
f $ g x /= ((f $) g) x
map + [1] /= map (+) [1]</code></pre>
<p>为什么同样是占据高优先级函数的参数位置，中缀运算符不会被当作参数传递呢？因为当我们使用中缀函数时，实际上表达式会被当作等价的前缀形式来处理，即：</p>
<pre class="language-haskell line-numbers match-braces"><code>f $ g x == ($) (f) (g x) == (f $) (g x) == f (g x) -- 注意：当转换为前缀形式后，由于所有的函数都成为了前缀函数，不再有优先级一说。
map + [1] == (+) (map) ([1]) == (map +) ([1]) -- 错误：函数(map +)参数类型与[]不匹配。</code></pre>
<p>上例也可看出，所谓的优先级只在中缀表达式到前缀表达式的转换中有效，即：</p>
<pre class="language-haskell line-numbers match-braces"><code>(f.g) x == ((.) f g) (x)
f.g $ x == ($) (f.g) (x) == ($) ((.) f g) (x)
1 + 2 * 3 + 4
  == (+) (1 + 2 * 3) (4)
  == (+) ((+) (1) (2 * 3)) (4)
  == (+) ((+) (1) ((*) 2 3)) 4</code></pre>
<p>这里又可看出一个有趣的规律：优先级不同的运算符先转换较低级的，同级的运算符则根据结合律来决定顺序（转换顺序与结合顺序相反）。即后运算的先转换。</p>
<p>这种将中缀函数转换成前缀的方式可以帮助我们理解两个内容：</p>
<ol type="1">
<li>运算符优先级。</li>
<li>引用中缀函数时要加上括号。</li>
</ol>
<h2 id="附运算符优先级表">附：运算符优先级表</h2>
<pre class="language-none line-numbers match-braces"><code>+--------+----------------------+-----------------------+-------------------+
| Prec-  |   Left associative   |    Non-associative    | Right associative |
| edence |      operators       |       operators       |    operators      |
+--------+----------------------+-----------------------+-------------------+
| 9      | !!                   |                       | .                 |
| 8      |                      |                       | ^, ^^, **         |
| 7      | *, /, `div`,         |                       |                   |
|        | `mod`, `rem`, `quot` |                       |                   |
| 6      | +, -                 |                       |                   |
| 5      |                      |                       | :, ++             |
| 4      |                      | ==, /=, &lt;, &lt;=, &gt;, &gt;=, |                   |
|        |                      | `elem`, `notElem`     |                   |
| 3      |                      |                       | &amp;&amp;                |
| 2      |                      |                       | ||                |
| 1      | &gt;&gt;, &gt;&gt;=              |                       |                   |
| 0      |                      |                       | $, $!, `seq`      |
+--------+----------------------+-----------------------+-------------------+</code></pre>
<ul>
<li>函数调用拥有更高的优先级，可以认为其优先级是10。</li>
</ul>]]></content>
    </entry>
    <entry>
        <title type="html"><![CDATA[字符串匹配之AC自动机]]></title>
        <id>https://xilong.site/post/String_Matching_Algorithms_AC_Automaton.html</id>
        <link rel="alternate" type="text/html" href="https://xilong.site/post/String_Matching_Algorithms_AC_Automaton.html" />
        <updated>2021-11-02T00:00:00Z</updated>
        <!-- Every post here opens with an abstract, which is what
             `abstract` holds and what `content` therefore starts after.
             A feed carries the whole article, so it needs both, in the
             order the page itself shows them. -->
        <content type="html"><![CDATA[<p>AC自动机是一种综合了Trie树与KMP算法思想的字符串匹配算法，特点是同时进行多个模式串的匹配。</p>
<h2 id="ac自动机介绍">AC自动机介绍</h2>
<p>AC自动机利用KMP([[字符串匹配之KMP]])的最长成功匹配思想对Trie树进行改造，使得搜索效率大幅提高，并且可以对多个模式串进行匹配。缺点是极大的空间复杂度，是一种空间换时间的算法。</p>
<h2 id="trie树">Trie树</h2>
<p>Trie树也就是字典树，可以提供高效的字符串查找。要构造一个Trie树，需要明确：</p>
<ol type="1">
<li>一个字母表，包括所有模式串中可能出现的字符。</li>
<li>至少一个模式串。</li>
</ol>
<p>构造过程为从根节点开始，对每个串的字符逐位判断，若存在字符相同的子节点则转移到子节点。否则创建一个新节点，并令其字符为当前字符。将每个串遍历结束时停留的节点标记为接受节点。下一个串仍从根节点开始构造。</p>
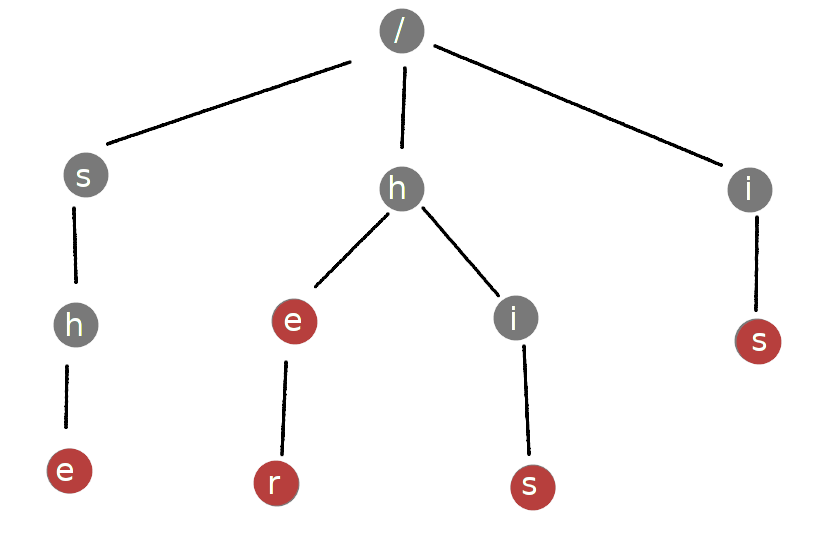
<p>比如字母表限定为“小写英文字母（a-z）”，模式串为{“she”,“he”,“her”,“his”,“is”}时，可以生成如下所示Trie树：</p>
<figure>
<img src="https://xilong.site/res/post-imgs/String_Matching_Algorithms_AC_Automaton/image-20211102120835270.png" alt="image-20211102120835270" />
<figcaption aria-hidden="true">image-20211102120835270</figcaption>
</figure>
<p>要判断一个串是否与某一模式串相同只需要从根节点开始，对待匹配串逐位判断，若存在与该位字符相同的子节点则转移，否则匹配失败。如果匹配结束时停留在接受节点则匹配成功。例如：</p>
<ul>
<li>待匹配串为”her”：
<ul>
<li>初始位置为根节点，匹配字符’h’，存在字符为’h’的子节点，转移到对应节点。</li>
<li>匹配字符’e’，存在，转移到对应节点。</li>
<li>匹配字符’r’，存在，转移到对应节点。</li>
<li>匹配完成，当前节点为接受节点，匹配成功。</li>
</ul></li>
<li>待匹配串为”sh”:
<ul>
<li>初始位置为根节点，匹配字符’s’，存在，转移到对应节点。</li>
<li>匹配字符’h’，存在，转移到对应节点。</li>
<li>匹配完成，当前节点不是接受节点，匹配失败。</li>
</ul></li>
<li>待匹配串为”rsg”:
<ul>
<li>初始位置为根节点，匹配字符’r’，不存在，匹配失败。</li>
</ul></li>
</ul>
<h2 id="多模式匹配">多模式匹配</h2>
<p>在Trie树中，一个节点表示的是从根节点到该点的路径对应的串。如上图树中最下层的’r’节点表示的是字符串”her”。考虑字符串”sher”，如果要求出各模式串在其中出现的次数，通常做法就是逐位与所有模式进行匹配：</p>
<ul>
<li>“sher”匹配{“she”,“he”,“her”,“his”,“is”}</li>
<li>“her”匹配{“she”,“he”,“her”,“his”,“is”}</li>
<li>“er”匹配{“she”,“he”,“her”,“his”,“is”}</li>
<li>“r”匹配{“she”,“he”,“her”,“his”,“is”}</li>
</ul>
<p>这里的匹配规则稍作改动，只要到达接受结点就算一次成功。也就是从匹配整个串变为匹配是否存在一个与模式相同的前缀。</p>
<p>问题是，匹配次数太多，且多数是不必要的。比如对”er”与”r”的10次（每个串分别与5个模式进行匹配）。以及”sher”对除”she”外的模式的4次匹配和”her”对”is”与”she”的2次匹配。在20次匹配中共有16次匹配是没有必要的，大大降低了匹配效率。</p>
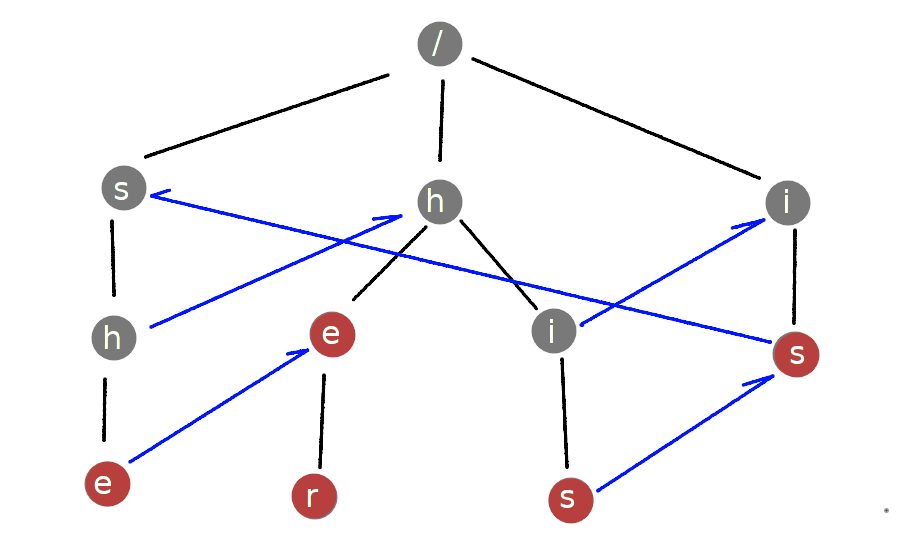
<p>在KMP思想的启发下，可以引入一个最长后缀的概念。当匹配失败时，转移到已匹配部分的最长后缀对应的节点继续匹配，就减少了不必要的匹配。</p>
<p>如对”sher”而言，匹配到”she”模式的末尾时位于第4层的’e’节点。匹配’r’时，无对应子节点而匹配失败，此时不从头开始，而是转移到第3层的’e’节点，其对应的”he”为”she”在该图中的最长后缀，此时继续匹配’r’，发现对应子节点，并转移到’r’。匹配结束，路径上的共有3个接受节点，分别对应”she”、“he”、“her”，这三个模式的匹配次数分别+1。</p>
<p>如果将每个节点的失败后转移节点标记出来，就形成了下图结构（蓝色箭头表示失败后转移节点，没有标记的则转移到根节点）：</p>
<figure>
<img src="https://xilong.site/res/post-imgs/String_Matching_Algorithms_AC_Automaton/image-20211102130728715.png" alt="image-20211102130728715" />
<figcaption aria-hidden="true">image-20211102130728715</figcaption>
</figure>
<h2 id="失配指针">失配指针</h2>
<p>上一节中的匹配方式就构成了AC自动机。AC自动机算法即是在Trie树的基础上加入了匹配失败的处理，使其达成了很高的多次匹配效率，主要用于匹配子串中各模式串出现的位置与次数。其中匹配失败处理就是通过失配指针实现的，即在每个节点中加入一个指针指向匹配失败后转移的节点。</p>
<p>失配指针可以使用如下方法得到：</p>
<pre class="language-none line-numbers match-braces"><code>// queue: 一个队列，保存节点指针
// root: 根节点
// 将根节点的fail指针设为null，并将其所有子节点入队
root-&gt;fail = null
for p in root.childs:
    queue.push(p)
// 层序遍历tire树
while !queue.empty():
    // 对当前节点，先将其fail值默认为root
    cur = queue.pop();
    cur-&gt;fail = root

    for p in cur.childs:
        queue.push(p)
    // 寻找其父节点的fail指针指向的节点的子节点
    // 找到的第一个与当前节点值相同的节点就是当前节点的最长后缀节点
    // 若没有相应的子节点，则迭代寻找fail的fail指针指向的节点。
    fail = cur-&gt;parent-&gt;fail
    while fail != null and cur-&gt;fail == root:
        for p in fail.childs:
            if p-&gt;value == cur-&gt;value:
                cur-&gt;fail = p
        fail = fail-&gt;fail</code></pre>
<h2 id="匹配过程">匹配过程</h2>
<pre class="language-none line-numbers match-braces"><code>// str:待匹配串
// root:自动机根节点
// 令cur指向根节点，并对str逐位匹配
cur = root
for i in (0, str.length()):
    // 如果当前节点不存在str[i]对应的子节点，则进入cur-&gt;fail
    // 循环直到存在对应节点或到达根节点
    auto index = Node::get_index(str[i])
    while cur-&gt;childs[index] == nullptr &amp;&amp; cur != root :
        cur = cur-&gt;fail
    // 如果仍没有对应节点，则退出此轮循环
    if cur-&gt;childs[index] == nullptr :
        continue
    // 进入到对应节点中，同时使用temp遍历该节点的所有后缀
    // 将路径上的所有接受节点对应模式出现次数+1
    cur = cur-&gt;childs[index]
    temp = cur
    while temp != nullptr :
        for p in temp-&gt;patterns :
            ++nums[p]
        temp = temp-&gt;fail</code></pre>
<h2 id="c实现">C++实现</h2>
<p>给出一个字母表为小写字母且不考虑内存泄露的简单实现：</p>
<pre class="language-cpp line-numbers match-braces"><code>class ACAutomaton {
public:
    ACAutomaton(const vector&lt;string&gt; &amp;patterns)
    : root(new Node(nullptr)), nums(patterns.size(), 0) {
        generate_tire(patterns);
        generate_fails();
    }

    void match(const string&amp; str) {
        auto cur = root;
        int i = 0;
        while (i &lt; str.length()) {
            auto index = Node::get_index(str[i]);
            while (cur-&gt;childs[index] == nullptr &amp;&amp; cur != root) {
                cur = cur-&gt;fail;
            }
            ++i;
            if (cur-&gt;childs[index] == nullptr) continue;
            cur = cur-&gt;childs[index];
            auto temp = cur;
            while (temp != nullptr) {
                for (auto p : temp-&gt;patterns) {
                    ++nums[p];
                }
                temp = temp-&gt;fail;
            }
        }
    }

    const vector&lt;int&gt; &amp;get_nums() const {
        return nums;
    }
private:
    struct Node {
        Node (Node *parent_)
        : value(0), parent(parent_), fail(nullptr) {}

        static int get_index(char c) {
            return c - &#39;a&#39;;
        }

        char value;
        vector&lt;int&gt; patterns;

        Node *parent;
        Node *fail;
        Node *childs[26] = {nullptr};
    };

    Node *root;
    vector&lt;int&gt; nums;

    void generate_tire(const vector&lt;string&gt; &amp;patterns) {
        for (int i = 0; i &lt; patterns.size(); ++i) {
            auto cur = root;
            for (auto c : patterns[i]) {
                auto index = Node::get_index(c);
                if (cur-&gt;childs[index] == nullptr) {
                    cur-&gt;childs[index] = new Node(cur);
                    cur-&gt;childs[index]-&gt;value = c;
                }
                cur = cur-&gt;childs[index];
            }
            cur-&gt;patterns.push_back(i);
        }
    }

    void generate_fails() {
        queue&lt;Node*&gt; q;
        root-&gt;fail = nullptr;
        for (int i = 0; i &lt; 26; ++i) {
            if (root-&gt;childs[i])
                q.push(root-&gt;childs[i]);
        }
        while (!q.empty()) {
            auto cur = q.front();
            q.pop();
            cur-&gt;fail = root;

            for (int i = 0; i &lt; 26; ++i) {
                if (cur-&gt;childs[i])
                    q.push(cur-&gt;childs[i]);
            }

            auto f = cur-&gt;parent-&gt;fail;
            while (f != nullptr &amp;&amp; cur-&gt;fail == root) {
                auto index = Node::get_index(cur-&gt;value);
                if (f-&gt;childs[index]) {
                    cur-&gt;fail = f-&gt;childs[index];
                }
                f = f-&gt;fail;
            }
        } // while !q.empty
    } // generate_fails
};</code></pre>]]></content>
    </entry>
    <entry>
        <title type="html"><![CDATA[字符串匹配之KMP]]></title>
        <id>https://xilong.site/post/String_Matching_Algorithms_KMP.html</id>
        <link rel="alternate" type="text/html" href="https://xilong.site/post/String_Matching_Algorithms_KMP.html" />
        <updated>2021-11-01T00:00:00Z</updated>
        <!-- Every post here opens with an abstract, which is what
             `abstract` holds and what `content` therefore starts after.
             A feed carries the whole article, so it needs both, in the
             order the page itself shows them. -->
        <content type="html"><![CDATA[<p>字符串匹配算法半壁江山之KMP算法。</p>
<h2 id="kmp算法介绍">KMP算法介绍</h2>
<p>KMP算法是一种利用模式串中的信息来尽可能减少与待匹配串的匹配次数从而大幅提高效率的算法。它的核心是一个<code>next</code>表，用以记录一次匹配失败后，下次匹配开始的位置。</p>
<h2 id="kmp匹配过程">KMP匹配过程</h2>
<p>如何生成<code>next</code>表是KMP的核心内容，但在此之前，不妨先看看KMP算法是如何工作的。</p>
<p>设模式串为”ABAABAC”，待匹配串为”ABABAABAABAC”。根据模式串生成的<code>next</code>表为：{0, 0, 1, 1, 2, 3, 0}。之后会介绍如何生成<code>next</code>表。这里先解释这个表的意义，<code>next[n] = k</code>意为<strong>在模式串前n位构成的子串中，其最长相等严格前后缀的长度为k。</strong></p>
<p>解释一下黑体字就是说，对于模式串“ABAABAC”而言，其前6位构成的子串是”ABAABA”。所谓的严格前/后缀就是指除了串本身的前/后缀：<code>{前/后缀} - {串本身}</code>。相等严格前后缀是指既是串的严格前缀也是串的严格后缀的子串，对于”ABAABA”而言，其相等严格前后缀有：“A”、“ABA”两个。最长相等严格前后缀显然就是”ABA”。</p>
<p>上面这段话就可以表示为<code>next[6] = 3</code>。</p>
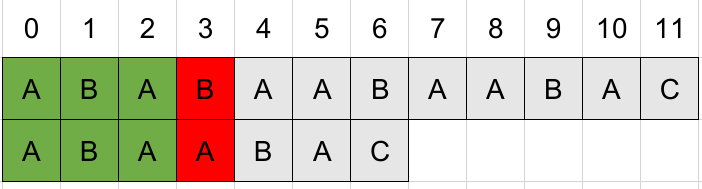
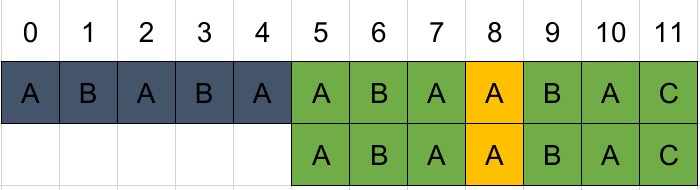
<p>从位置0开始匹配，结果如下：</p>
<figure>
<img src="https://xilong.site/res/post-imgs/String_Matching_Algorithms_KMP/image-20211101183430703.png" alt="image-20211101183430703" />
<figcaption aria-hidden="true">image-20211101183430703</figcaption>
</figure>
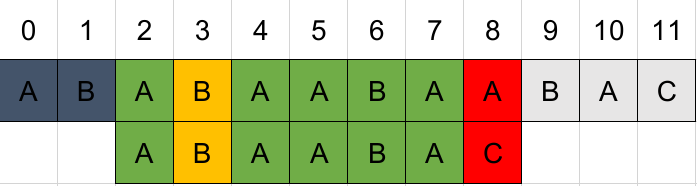
<p>成功匹配的位数是3，查询匹配表项<code>next[3] = 1</code>。也就是已匹配部分的末位与首位相等，因此可以直接将首位移到末位位置开始下一轮匹配：</p>
<figure>
<img src="https://xilong.site/res/post-imgs/String_Matching_Algorithms_KMP/image-20211101191242087.png" alt="image-20211101191242087" />
<figcaption aria-hidden="true">image-20211101191242087</figcaption>
</figure>
<p>成功匹配的位数是6，注意匹配并不是从位置2开始的，而是从位置3——上次匹配失败的位置开始，查询匹配表项<code>next[6] = 3</code>。说明已匹配部分前3位与后3位相等，将前3位移到后3位的位置开始下一轮匹配：</p>
<figure>
<img src="https://xilong.site/res/post-imgs/String_Matching_Algorithms_KMP/image-20211101190744058.png" alt="image-20211101190744058" />
<figcaption aria-hidden="true">image-20211101190744058</figcaption>
</figure>
<p>匹配成功。</p>
<p>注意到，所谓移动其实就是从模式串的下标<code>next[匹配成功位数]</code>开始，从失败位置继续匹配。</p>
<p>代码表示：</p>
<pre class="language-cpp line-numbers match-braces"><code>// str:待匹配串, pattern:模式串, next[pattern.size()]:失配表
vector&lt;int&gt; kmp(const string&amp; str, const string&amp; pattern) {
    vector&lt;int&gt; result;
    int j = 0;
    for (int i = 0; i &lt; str.size(); ++i) {
        // j与i匹配失败而j不为0时，说明有j - 1位匹配成功。
        // 尝试使用pattern[next[j - 1]]从失败位置继续匹配，直到
        //    1. j == 0
        //    2. 匹配成功
        while (j &gt; 0 &amp;&amp; pattern[j] != str[i]) {
            j = next[j - 1];
        }
        // 匹配成功则成功位数+1
        if (pattern[j] == str[i]) {
            ++j;
        }
        // 若匹配成功位数等于模式串大小，说明模式匹配成功，记录下这个位置。
        if (j == pattern.size()) {
            result.push_back(i - pattern.size() + 1);
            j = next[j - 1];
        }
    }
    return result;
}</code></pre>
<h2 id="next表生成">next表生成</h2>
<p>next表的生成方法可以理解成使用模式串去匹配自身。数学证明太过复杂按下不表，先上代码：</p>
<pre class="language-cpp line-numbers match-braces"><code>vector&lt;int&gt; next(const string &amp;str) {
    vector&lt;int&gt; result(str.length(), 0);
    int k = 0;
    for (int i = 1; i &lt; result.size(); ++i) {
        // k &gt; 0且匹配失败说明之前存在k - 1位的匹配成功。
        // 尝试使用str[result[k - 1]]与str[i]继续匹配
        while (k &gt; 0 &amp;&amp; str[k] != str[i]) {
            k = result[k - 1];
        }
        // 如果匹配成功，则说明str前i位这个子串的后k位与前k位相同
        // 即result[i] = k;
        if (str[k] == str[i]) {
            ++k;
        }
        result[i] = k;
    }
    return result;
}</code></pre>
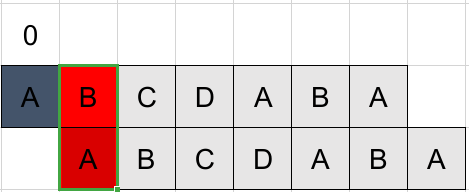
<p>可以看出与kmp匹配过程的代码非常相似，图解如下：</p>
<p>例P=“ABCDABA”</p>
<figure>
<img src="https://xilong.site/res/post-imgs/String_Matching_Algorithms_KMP/image-20211101211913745.png" alt="image-20211101211913745" />
<figcaption aria-hidden="true">image-20211101211913745</figcaption>
</figure>
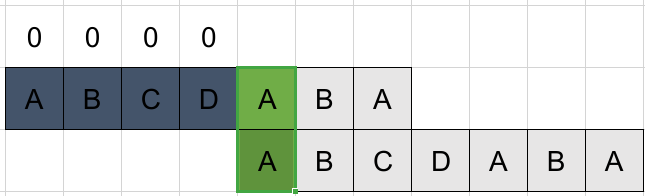
<p>因为严格前/后缀不能等于自身，因此从第2位开始匹配，并将第一位结果置0。可见匹配失败，且<code>k=0</code>，将此位结果置0，进入下一位。</p>
<figure>
<img src="https://xilong.site/res/post-imgs/String_Matching_Algorithms_KMP/image-20211101212012168.png" alt="image-20211101212012168" />
<figcaption aria-hidden="true">image-20211101212012168</figcaption>
</figure>
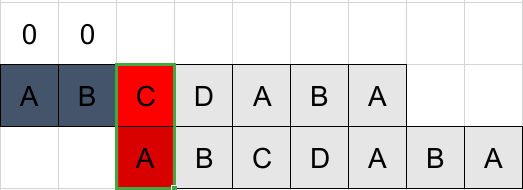
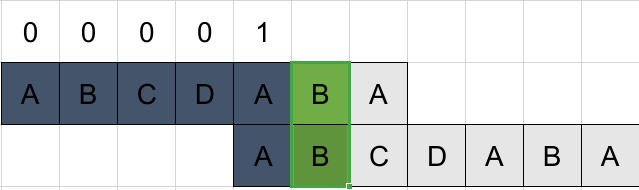
<p>依然不匹配，且<code>k=0</code>，置0进入下一位。</p>
<figure>
<img src="https://xilong.site/res/post-imgs/String_Matching_Algorithms_KMP/image-20211101212117026.png" alt="image-20211101212117026" />
<figcaption aria-hidden="true">image-20211101212117026</figcaption>
</figure>
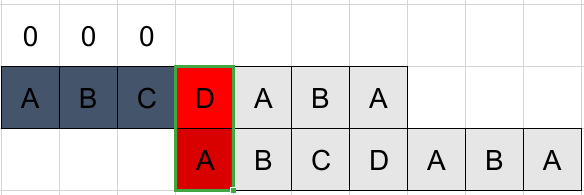
<p>还是不匹配，且<code>k=0</code>，置0进入下一位。</p>
<figure>
<img src="https://xilong.site/res/post-imgs/String_Matching_Algorithms_KMP/image-20211101212427058.png" alt="image-20211101212427058" />
<figcaption aria-hidden="true">image-20211101212427058</figcaption>
</figure>
<p>匹配，<code>++k</code>，并置<code>结果=k=1</code>。由于下一步比较时<code>k=1</code>增量与比较步长相同，看起来好像没有移动。</p>
<figure>
<img src="https://xilong.site/res/post-imgs/String_Matching_Algorithms_KMP/image-20211101212506554.png" alt="image-20211101212506554" />
<figcaption aria-hidden="true">image-20211101212506554</figcaption>
</figure>
<p>匹配，<code>++k</code>，并置<code>结果=k=2</code>。进入下一步。</p>
<figure>
<img src="https://xilong.site/res/post-imgs/String_Matching_Algorithms_KMP/image-20211101212649204.png" alt="image-20211101212649204" />
<figcaption aria-hidden="true">image-20211101212649204</figcaption>
</figure>
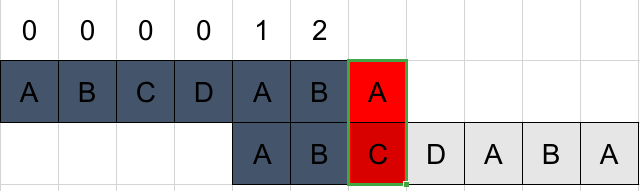
<p>不匹配，且<code>k &gt; 0</code>试图取<code>next[k - 1] = next[1] = 0</code>与该位比较。</p>
<figure>
<img src="https://xilong.site/res/post-imgs/String_Matching_Algorithms_KMP/image-20211101212832132.png" alt="image-20211101212832132" />
<figcaption aria-hidden="true">image-20211101212832132</figcaption>
</figure>
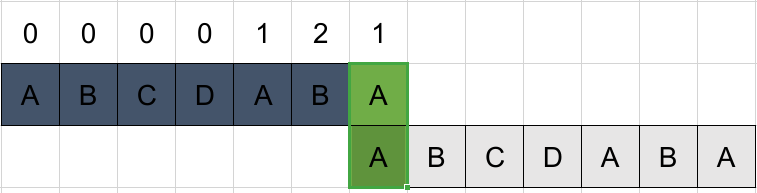
<p>匹配，且<code>k=0</code>，<code>++k</code>置<code>结果=k=1</code>。结束匹配过程。</p>
<p>最终结果<code>next={0,0,0,0,1,2,1}</code>。</p>]]></content>
    </entry>
    <entry>
        <title type="html"><![CDATA[红黑树概念解析与C++实现]]></title>
        <id>https://xilong.site/post/Conceptual_Analysis_of_Red-Black_Tree_and_a_Cpp_Implementation.html</id>
        <link rel="alternate" type="text/html" href="https://xilong.site/post/Conceptual_Analysis_of_Red-Black_Tree_and_a_Cpp_Implementation.html" />
        <updated>2021-09-23T00:00:00Z</updated>
        <!-- Every post here opens with an abstract, which is what
             `abstract` holds and what `content` therefore starts after.
             A feed carries the whole article, so it needs both, in the
             order the page itself shows them. -->
        <content type="html"><![CDATA[<p>整理了红黑树的性质与基本操作的C++实现</p>
<h2 id="基本概念">基本概念</h2>
<p>红黑树（Red Black Tree，简称R-B Tree）是一种特殊的二叉查找树([[二叉树的存储结构及其非层序遍历|二叉树]])。它的特殊性体现在：</p>
<ol type="1">
<li>每个节点都有颜色，可以是红色或黑色。</li>
<li>根节点是黑色。</li>
<li>每个叶子节点（NULL）是黑色。尤其注意这里的叶子节点指的是NULL。</li>
<li>红色节点的子节点必为黑色。</li>
<li>任一结点到其所有后代叶节点的路径中具有相同数目的黑色节点。</li>
</ol>
<p><em>特性5保证了任一路径不会超过最短路径的两倍，因而红黑树是接近平衡的二叉树。</em></p>
<h2 id="存储结构">存储结构</h2>
<p>一个红黑树节点可以使用三叉链表的形式实现为：</p>
<pre class="language-cpp line-numbers match-braces"><code>struct R_BNode {
    enum COLOR {BLACK = 0, RED = 1};

    explicit R_BNode(int data = 0, R_BNode::COLOR color = RED)
        : left_(Nil), right_(Nil), parent_(Nil)
        , color_(color), data_(data)  {}

    R_BNode *left_;
    R_BNode *right_;
    R_BNode *parent_;
    COLOR color_;
    int data_;

    static R_BNode *Nil;
};

R_BNode *R_BNode::Nil = new R_BNode(0, R_BNode::BLACK);</code></pre>
<p>这里为简化问题将data定为int类型，这并不会影响对红黑树的研究。如有需要可以使用类模板或<code>void*</code>等方式来实现泛型的红黑树。</p>
<p>定义红黑树类型为指向红黑树节点的指针。并创建一个静态变量<code>Nil</code>作为所有叶子节点的指代，这样做就可以把本不存在的叶子节点视为普通节点来处理了。</p>
<p>红黑树可以实现如下：</p>
<pre class="language-cpp line-numbers match-braces"><code>struct R_BTree {
    explicit R_BTree() : root_(R_BNode::Nil) {}

    R_BNode *root_;
};</code></pre>
<h2 id="基本操作旋转">基本操作：旋转</h2>
<h3 id="概念">概念</h3>
<p>当修改红黑树上的节点时，可能会破坏树的性质，使得树不再是红黑树。此时需要调整一些节点的颜色与指针结构，使树重新成为红黑树。</p>
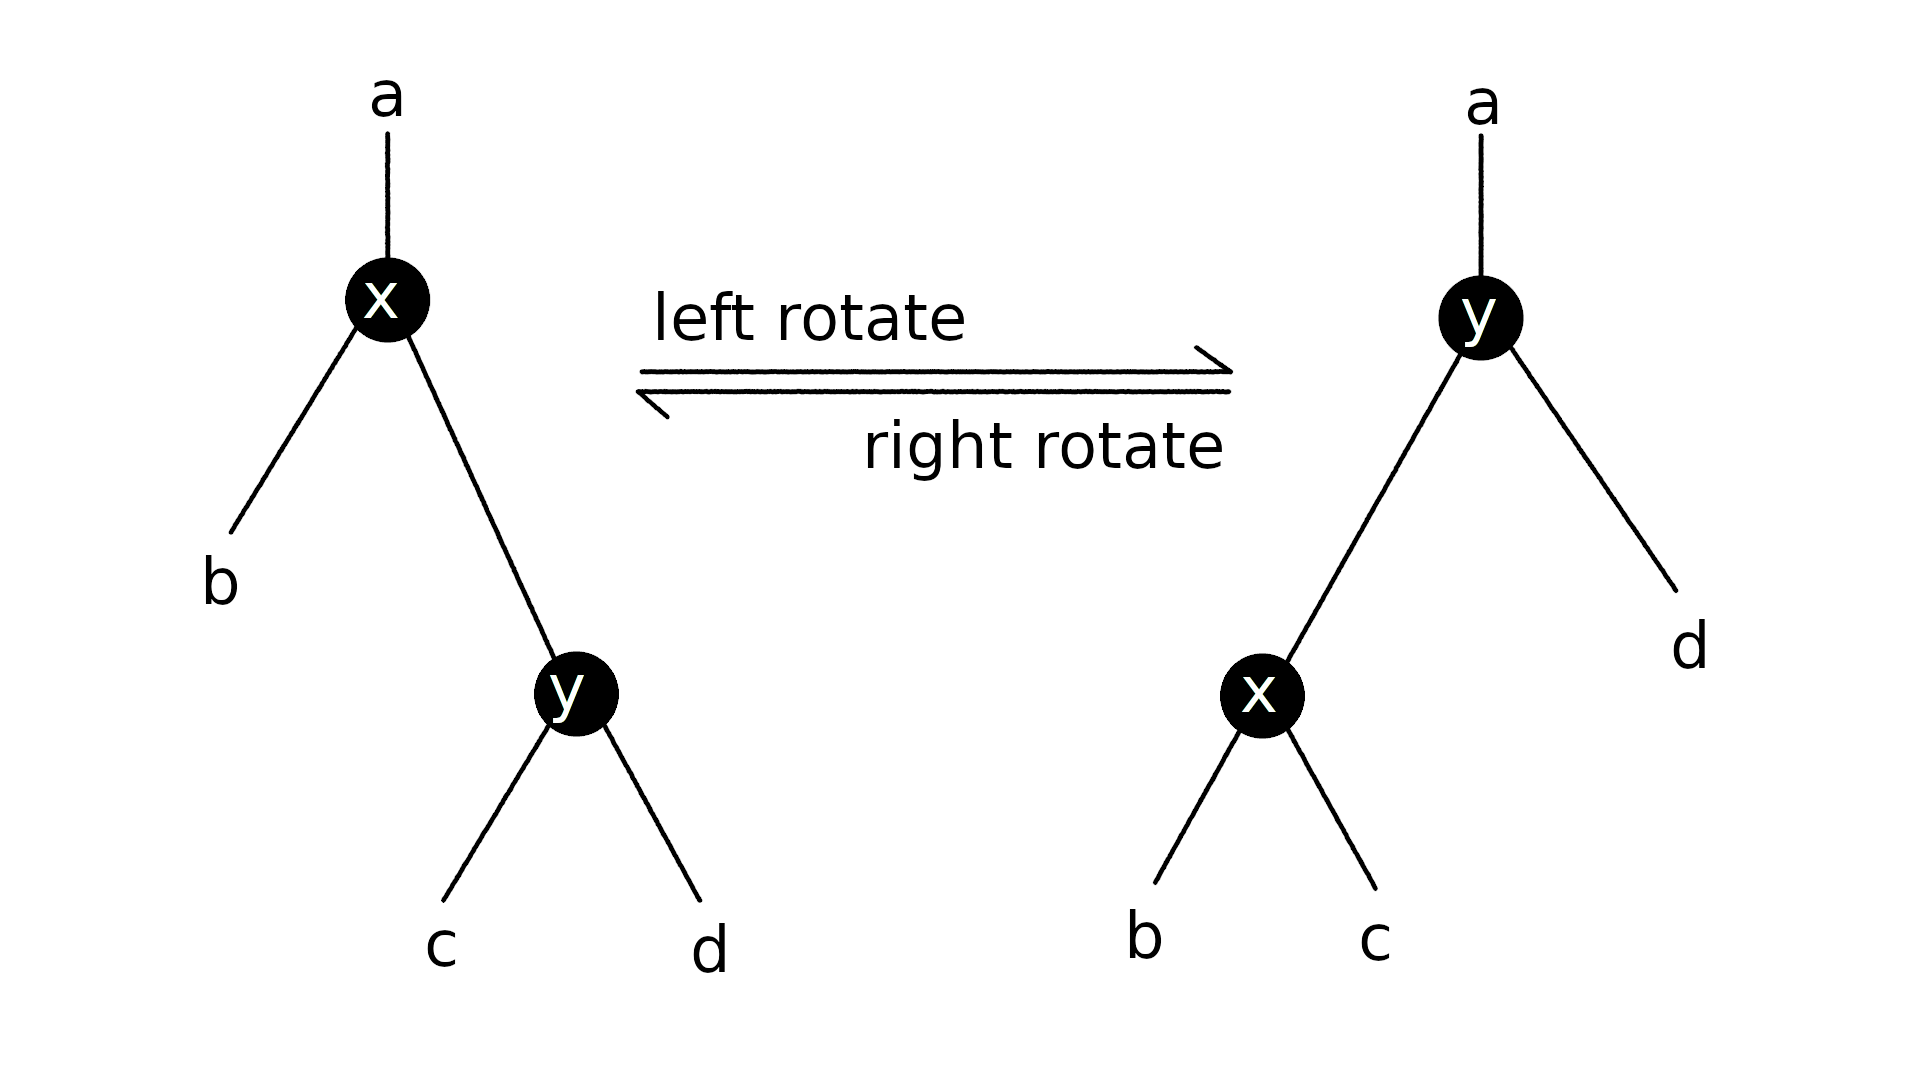
<p>其中对指针结构的调整就需要借助旋转操作，这是一种能保持二叉搜索树性质的局部操作。旋转分为左旋与右旋，下面以左旋为例介绍旋转操作：</p>
<p>任一右孩子不为Nil的结点x都可进行左旋操作，设其右孩子是y，则左旋后：</p>
<ol type="1">
<li>y成为子树新的根节点。</li>
<li>x在新子树中成为y的左孩子。</li>
<li>上述变化后，x的右孩子变成双亲了，空出一个位置，而y原来的左孩子无家可归，由此让y原来的左孩子成为x新的右孩子。</li>
</ol>
<p>而右旋是左旋的镜像操作。两种旋转如下图所示：</p>
<figure>
<img src="https://xilong.site/res/post-imgs/Conceptual_Analysis_of_Red-Black_Tree_and_a_Cpp_Implementation/rotate.png" alt="rotate" />
<figcaption aria-hidden="true">rotate</figcaption>
</figure>
<h3 id="实现">实现</h3>
<pre class="language-cpp line-numbers match-braces"><code>// 仅给出实现，声明可以自行添加到对应的类中
void R_BTree::LeftRotate(R_BNode *x) {
    if (x-&gt;right_ == R_BNode::Nil) throw &quot;Error while left rotate&quot;;

    auto y = x-&gt;right_;
    x-&gt;right_ = y-&gt;left_;
    if (y-&gt;left_ != R_BNode::Nil) {
        y-&gt;left_-&gt;parent_ = x;
    }

    y-&gt;parent_ = x-&gt;parent_;
    if (x-&gt;parent_ == R_BNode::Nil) {
        root_ = y;
    } else if (x == x-&gt;parent_-&gt;left_) {
        x-&gt;parent_-&gt;left_ = y;
    } else {
        x-&gt;parent_-&gt;right_ = y;
    }

    y-&gt;left_ = x;
    x-&gt;parent_ = y;
}

void R_BTree::RightRotate(R_BNode *x) {
    if (x-&gt;left_ == R_BNode::Nil) throw &quot;Error while right rotate&quot;;

    auto y = x-&gt;left_;
    x-&gt;left_ = y-&gt;right_;
    if (y-&gt;right_ != R_BNode::Nil) {
        y-&gt;right_-&gt;parent_ = x;
    }

    y-&gt;parent_ = x-&gt;parent_;
    if (x-&gt;parent_ == R_BNode::Nil) {
        root_ = y;
    } else if (x == x-&gt;parent_-&gt;left_) {
        x-&gt;parent_-&gt;left_ = y;
    } else {
        x-&gt;parent_-&gt;right_ = y;
    }

    y-&gt;right_ = x;
    x-&gt;parent_ = y;
}</code></pre>
<h2 id="基本操作插入">基本操作：插入</h2>
<p>红黑树是一种特殊的二叉查找树，因此插入节点时先按照二叉查找树的方法进行插入：</p>
<pre class="language-cpp line-numbers match-braces"><code>void R_BTree::Insert(int value) {
    auto y = R_BNode::Nil;
    auto x = root_;
    auto z = new R_BNode(value, R_BNode::RED);
    while (x != R_BNode::Nil) {
        y = x;
        if (value &lt; x-&gt;data_) {
            x = x-&gt;left_;
        } else {
            x = x-&gt;right_;
        }
    }
    z-&gt;parent_ = y;
    if (y == R_BNode::Nil) {
        root_ = z;
    } else if (z-&gt;data_ &lt; y-&gt;data_) {
        y-&gt;left_ = z;
    } else {
        y-&gt;right_ = z;
    }
    InsertFixup(z);
}</code></pre>
<p>这样一来我们可能破坏了树的结构，因此，我们寄希望于最后调用的<code>InsertFixup</code>函数。</p>
<p>如何实现<code>InsertFixup</code>函数呢？这就得慢慢分析：</p>
<blockquote>
<p>规则1：节点有颜色，且是红色或黑色。</p>
<p>规则3：叶子节点是黑色节点。</p>
</blockquote>
<p>这两条显然是不会违反的。</p>
<blockquote>
<p>规则5：任一结点到其所有后代叶节点的路径中具有相同数目的黑色节点。</p>
</blockquote>
<p>这就是我们插入的节点总是红色的原因，插入红色的结点并不影响树中原有路径中的黑色节点数目。因此不会违反规则5。</p>
<blockquote>
<p>规则2：根节点是黑色节点。</p>
</blockquote>
<p>当我们插入的节点作为根节点时，就违反了规则2。此时只要改变节点的颜色就可以修复红黑树。此时可以实现出：</p>
<pre class="language-cpp line-numbers match-braces"><code>void R_BTree::InsertFixup(R_BNode *z) {
    ...
    root_-&gt;color_ = R_BNode::BLACK;
}</code></pre>
<blockquote>
<p>规则4：红色节点的孩子一定是黑色节点。</p>
</blockquote>
<p>当插入节点的父节点是红色时，违反规则4。总共存在三种可能的情况：</p>
<h3 id="情况一叔节点是红色">情况一：叔节点是红色</h3>
<p>此时将叔节点与父节点都设为黑色，并把祖父节点设为红色。然后对祖父节点使用<code>InsertFixup</code>函数即可。因为对祖父节点的任何子孙节点，都必然途径祖父节点，以及父节点、叔节点中的一个。将父节点与叔节点都设成黑色等于所有路径的黑色节点数加一，而将祖父节点设为红色等于所有路径的黑色节点数减一。因此不会违反规则5。同时这样将规则4的违反提升到了更高的层次去处理，这样至多处理h（h为树高）次。</p>
<pre class="language-cpp line-numbers match-braces"><code>void R_BTree::InsertFixup(R_BNode *z) {
    while (z-&gt;parent_-&gt;color_ == R_BNode::RED) {
        if (z-&gt;parent_ == z-&gt;parent_-&gt;parent_-&gt;left_) {
            auto y = z-&gt;parent_-&gt;parent_-&gt;right_;
            // case 1
            if (y-&gt;color_ == R_BNode::RED) {
                z-&gt;parent_-&gt;color_ = R_BNode::BLACK;
                y-&gt;color_ = R_BNode::BLACK;
                z-&gt;parent_-&gt;parent_-&gt;color_ = R_BNode::RED;
                z = z-&gt;parent_-&gt;parent_;
                continue;
            }
            ...
        } else {
            auto y = z-&gt;parent_-&gt;parent_-&gt;left_;
            // case 1
            if (y-&gt;color_ == R_BNode::RED) {
                z-&gt;parent_-&gt;color_ = R_BNode::BLACK;
                y-&gt;color_ = R_BNode::BLACK;
                z-&gt;parent_-&gt;parent_-&gt;color_ = R_BNode::RED;
                z = z-&gt;parent_-&gt;parent_;
                continue;
            }
            ...
        }
    }
    root_-&gt;color_ = R_BNode::BLACK;
}</code></pre>
<h3 id="情况二叔节点是黑色且z与父节点异侧">情况二：叔节点是黑色，且z与父节点异侧</h3>
<p>所谓同侧，就是说z相对于父节点的方向和父节点相对于祖父节点的方向相同。如都是左孩子或都是右孩子。异侧则反之。</p>
<p>此时可以通过对父节点的一次旋转将情况二转化为情况三。</p>
<h3 id="情况三叔节点是黑色且z与父节点同侧">情况三：叔节点是黑色，且z与父节点同侧</h3>
<p>此时对祖父节点进行一次与情况二反向的旋转即可修复红黑树。</p>
<p>以一个不同侧且父节点为左孩子的情况为例：</p>
<figure>
<img src="https://xilong.site/res/post-imgs/Conceptual_Analysis_of_Red-Black_Tree_and_a_Cpp_Implementation/insert.png" alt="insert" />
<figcaption aria-hidden="true">insert</figcaption>
</figure>
<p>如上图，对c而言，叔节点是Nil，为黑色。且c是b的右孩子，而b是a的左孩子，因此c与父节点不同侧，即为情况2。</p>
<p>此时要想使bc同侧，只需对b进行左旋，并将b当做插入节点重新考虑。显然一次左旋过后，b的叔节点为Nil，为黑色。且与父节点c同侧。即为情况3。</p>
<p>此时只需交换父节点与祖父节点的颜色，并对祖父节点进行右旋，即可完成对红黑树的修复。</p>
<p><strong>注意：上述旋转方向是父节点为左孩子时的情况，对于父节点为右孩子的情况，需要进行镜像操作，即左右互换。</strong></p>
<p>最终实现为：</p>
<pre class="language-cpp line-numbers match-braces"><code>void R_BTree::InsertFixup(R_BNode *z) {
    while (z-&gt;parent_-&gt;color_ == R_BNode::RED) {
        if (z-&gt;parent_ == z-&gt;parent_-&gt;parent_-&gt;left_) {
            auto y = z-&gt;parent_-&gt;parent_-&gt;right_;
            // case 1
            if (y-&gt;color_ == R_BNode::RED) {
                z-&gt;parent_-&gt;color_ = R_BNode::BLACK;
                y-&gt;color_ = R_BNode::BLACK;
                z-&gt;parent_-&gt;parent_-&gt;color_ = R_BNode::RED;
                z = z-&gt;parent_-&gt;parent_;
                continue;
            } else if (z == z-&gt;parent_-&gt;right_) {
                //case 2
                z = z-&gt;parent_;
                LeftRotate(z);
            }
            // case 3
            z-&gt;parent_-&gt;color_ = R_BNode::BLACK;
            z-&gt;parent_-&gt;parent_-&gt;color_ = R_BNode::RED;
            RightRotate(z-&gt;parent_-&gt;parent_);
        } else {
            auto y = z-&gt;parent_-&gt;parent_-&gt;left_;
            // case 1
            if (y-&gt;color_ == R_BNode::RED) {
                z-&gt;parent_-&gt;color_ = R_BNode::BLACK;
                y-&gt;color_ = R_BNode::BLACK;
                z-&gt;parent_-&gt;parent_-&gt;color_ = R_BNode::RED;
                z = z-&gt;parent_-&gt;parent_;
                continue;
            } else if (z == z-&gt;parent_-&gt;left_) {
                //case 2
                z = z-&gt;parent_;
                RightRotate(z);
            }
            // case 3
            z-&gt;parent_-&gt;color_ = R_BNode::BLACK;
            z-&gt;parent_-&gt;parent_-&gt;color_ = R_BNode::RED;
            LeftRotate(z-&gt;parent_-&gt;parent_);
        }
    }
    root_-&gt;color_ = R_BNode::BLACK;
}</code></pre>
<h2 id="基本操作删除">基本操作：删除</h2>
<p>要删除一个节点，首先要定义一个辅助操作，用以使用一个节点去替换另一个节点的位置。</p>
<pre class="language-cpp line-numbers match-braces"><code>// 使用v去替换u
void R_BTree::Transplant(R_BNode *u, R_BNode *v) {
    if (u-&gt;parent_ == R_BNode::Nil) {
        root_ = v;
    } else if (u == u-&gt;parent_-&gt;left_) {
        u-&gt;parent_-&gt;left_ = v;
    } else {
        u-&gt;parent_-&gt;right_ = v;
    }
    v-&gt;parent_ = u-&gt;parent_;
}</code></pre>
<p>删除一个节点的操作与二叉搜索树相似，当目标节点只有两个以下孩子时，使用它的孩子替换它自身。当目标节点存在两个孩子时则比较麻烦，需要找出目标节点的后继，并使用这个后继替换自身。</p>
<pre class="language-cpp line-numbers match-braces"><code>void R_BTree::Delete(R_BNode *z) {
    auto y = z;
    auto y_origin_color = z-&gt;color_;
    R_BNode *x = nullptr;
    if (z-&gt;left_ == R_BNode::Nil) {
        x = z-&gt;right_;
        Transplant(z, z-&gt;right_);
    } else if (z-&gt;right_ == R_BNode::Nil) {
        x = z-&gt;left_;
        Transplant(z, z-&gt;left_);
    } else {
        y = z-&gt;right_;
        while (y-&gt;left_ != R_BNode::Nil) {
            y = y-&gt;left_;
        }
        y_origin_color = y-&gt;color_;
        x = y-&gt;right_;
        if (y-&gt;parent_ != z) {
            Transplant(y, y-&gt;right_);
            y-&gt;right_ = z-&gt;right_;
            y-&gt;right_-&gt;parent_ = y;
        }
        Transplant(z, y);
        y-&gt;left_ = z-&gt;left_;
        y-&gt;left_-&gt;parent_ = y;
        y-&gt;color_ = z-&gt;color_;
    }
    if (y_origin_color == R_BNode::BLACK) {
        DeleteFixup(x);
    }
}</code></pre>
<p>这段程序中，y用来标记删除或移动的节点。x用来标记y在移动或删除之前的位置。如果y是红色节点，那么移动或删除y并不会破坏红黑树的性质。因为：</p>
<ol type="1">
<li>树的黑高（只计算黑色节点时的高度）没有改变。</li>
<li>y移动到z的位置并继承了z的颜色，而z的位置与颜色在删除操作前是合法的，因此y不会改变该位置合法性。</li>
<li>如果y为红色，则y不是根结点，因此根结点仍为黑色。</li>
</ol>
<p>现在考虑对破坏的修复，如果y黑色，将导致3个问题：</p>
<ol type="1">
<li>如果y是原来的根节点，而继承它位置的节点是红色，则违反了性质2。</li>
<li>如果x和x.p是红色的，则违反了性质4。</li>
<li>移动y导致先前树中所有包含y的简单路径中黑色节点的数目减一，导致了所有y的祖先节点都不符合性质5。</li>
</ol>
<p>解决办法是将占有了y原来位置的节点x视为还有一层额外的黑色，这使得性质5成立，但因为现在的x要么是红黑色（颜色属性为红）要么是双重黑色（颜色属性为黑），又违反了性质1。注意这里所说的额外黑色是针对x节点的，并不反应在节点的颜色属性上。</p>
<p>对于x，如果：</p>
<ol type="1">
<li>x是红黑色，则可以将x着为黑色。</li>
<li>x是根结点，则可以简单的消去一层黑色，什么也不做。</li>
</ol>
<pre class="language-cpp line-numbers match-braces"><code>void R_BTree::DeleteFixup(R_BNode *x) {
    if(x == root_ || x-&gt;color_ == R_BNode::RED) {
        x-&gt;color_ = R_BNode::BLACK;
        return;
    }
}</code></pre>
<p>此时要修复红黑树，需要分成4种情况：</p>
<h3 id="情况1x的兄弟节点m为红色">情况1：x的兄弟节点m为红色</h3>
<p>此时由于m的两个子节点都为黑色，可以改变m和父节点的颜色，然后对父节点进行一次旋转。并令x的新兄弟节点为新的m，这样情况就转移到了2、3或4。</p>
<figure>
<img src="https://xilong.site/res/post-imgs/Conceptual_Analysis_of_Red-Black_Tree_and_a_Cpp_Implementation/delete1.png" alt="delete1" />
<figcaption aria-hidden="true">delete1</figcaption>
</figure>
<p>此时可以实现为：</p>
<pre class="language-cpp line-numbers match-braces"><code>void R_BTree::DeleteFixup(R_BNode *x) {
    if(x == root_ || x-&gt;color_ == R_BNode::RED) {
        x-&gt;color_ = R_BNode::BLACK;
        return;
    }
    if (x == x-&gt;parent_-&gt;left_) {
        auto m = x-&gt;parent_-&gt;right_;
        // case 1
        if (m-&gt;color_ == R_BNode::RED) {
            m-&gt;color_ = R_BNode::BLACK;
            x-&gt;parent_-&gt;color_ = R_BNode::RED;
            LeftRotate(x-&gt;parent_);
            m = x-&gt;parent_-&gt;right_;
        }
        ...
    } else {
        auto m = x-&gt;parent_-&gt;left_;
        // case 1
        if (m-&gt;color_ == R_BNode::RED) {
            m-&gt;color_ = R_BNode::BLACK;
            x-&gt;parent_-&gt;color_ = R_BNode::RED;
            RightRotate(x-&gt;parent_);
            m = x-&gt;parent_-&gt;left_;
        }
        ...
    }
}</code></pre>
<h3 id="情况2x的兄弟节点m为黑色且m的两个子节点都为黑色">情况2：x的兄弟节点m为黑色，且m的两个子节点都为黑色</h3>
<p>此时由于x是双重黑色，而m与其两个子节点构成了两层黑色，因此可以从x与m上分别消去一层黑色，使得x为黑色，而m为红色。并令x-&gt;parent_为新的x，并对其进行<code>DeleteFixup</code>。</p>
<figure>
<img src="https://xilong.site/res/post-imgs/Conceptual_Analysis_of_Red-Black_Tree_and_a_Cpp_Implementation/delete2.png" alt="delete2" />
<figcaption aria-hidden="true">delete2</figcaption>
</figure>
<p>此时由于重复调用，改变之前的程序结构：</p>
<pre class="language-cpp line-numbers match-braces"><code>void R_BTree::DeleteFixup(R_BNode *x) {
    while(x != root_ &amp;&amp; x-&gt;color_ != R_BNode::RED) {
       if (x == x-&gt;parent_-&gt;left_) {
           auto m = x-&gt;parent_-&gt;right_;
           // case 1
           if (m-&gt;color_ == R_BNode::RED) {
               m-&gt;color_ = R_BNode::BLACK;
               x-&gt;parent_-&gt;color_ = R_BNode::RED;
               LeftRotate(x-&gt;parent_);
               m = x-&gt;parent_-&gt;right_;
           }
           // case 2
           if (m-&gt;left_-&gt;color_ == R_BNode::BLACK
               &amp;&amp; m-&gt;right_-&gt;color_ == R_BNode::BLACK) {
               m-&gt;color_ = R_BNode::RED;
               x = x-&gt;parent_;
               continue;
           }
           ...
        } else {
           auto m = x-&gt;parent_-&gt;left_;
           // case 1
           if (m-&gt;color_ == R_BNode::RED) {
               m-&gt;color_ = R_BNode::BLACK;
               x-&gt;parent_-&gt;color_ = R_BNode::RED;
               RightRotate(x-&gt;parent_);
               m = x-&gt;parent_-&gt;left_;
           }
           // case 2
           if (m-&gt;left_-&gt;color_ == R_BNode::BLACK
               &amp;&amp; m-&gt;right_-&gt;color_ == R_BNode::BLACK) {
               m-&gt;color_ = R_BNode::RED;
               x = x-&gt;parent_;
               continue;
           }
           ...
        }
    }
     x-&gt;color_ = R_BNode::BLACK;
}</code></pre>
<h3 id="情况3x的兄弟节点m为黑色且m的异侧孩子为红色同侧孩子为黑色">情况3：x的兄弟节点m为黑色，且m的异侧孩子为红色，同侧孩子为黑色</h3>
<p>此时交换m与异侧孩子的颜色，并进行旋转。使m的异侧孩子成为x新的兄弟节点，m成为新m的同侧孩子。这样就转化成了情况4。</p>
<figure>
<img src="https://xilong.site/res/post-imgs/Conceptual_Analysis_of_Red-Black_Tree_and_a_Cpp_Implementation/delete3.png" alt="delete3" />
<figcaption aria-hidden="true">delete3</figcaption>
</figure>
<p>实现为：</p>
<pre class="language-cpp line-numbers match-braces"><code>void R_BTree::DeleteFixup(R_BNode *x) {
    while(x != root_ &amp;&amp; x-&gt;color_ != R_BNode::RED) {
       if (x == x-&gt;parent_-&gt;left_) {
           auto m = x-&gt;parent_-&gt;right_;
           // case 1
           if (m-&gt;color_ == R_BNode::RED) {
               m-&gt;color_ = R_BNode::BLACK;
               x-&gt;parent_-&gt;color_ = R_BNode::RED;
               LeftRotate(x-&gt;parent_);
               m = x-&gt;parent_-&gt;right_;
           }
           // case 2
           if (m-&gt;left_-&gt;color_ == R_BNode::BLACK
               &amp;&amp; m-&gt;right_-&gt;color_ == R_BNode::BLACK) {
               m-&gt;color_ = R_BNode::RED;
               x = x-&gt;parent_;
               continue;
           } else if (m-&gt;left_-&gt;color_ == R_BNode::RED
                     &amp;&amp; m-&gt;right_-&gt;color_ == R_BNode::BLACK) {
               // case 3
               m-&gt;color_ = R_BNode::RED;
               m-&gt;left_-&gt;color_ = R_BNode::BLACK;
               RightRotate(m);
               m = x-&gt;parent_-&gt;right_;
           }

           ...
        } else {
           auto m = x-&gt;parent_-&gt;left_;
           // case 1
           if (m-&gt;color_ == R_BNode::RED) {
               m-&gt;color_ = R_BNode::BLACK;
               x-&gt;parent_-&gt;color_ = R_BNode::RED;
               RightRotate(x-&gt;parent_);
               m = x-&gt;parent_-&gt;left_;
           }
           // case 2
           if (m-&gt;left_-&gt;color_ == R_BNode::BLACK
               &amp;&amp; m-&gt;right_-&gt;color_ == R_BNode::BLACK) {
               m-&gt;color_ = R_BNode::RED;
               x = x-&gt;parent_;
               continue;
           } else if (m-&gt;right_-&gt;color_ == R_BNode::RED
                     &amp;&amp; m-&gt;left_-&gt;color_ == R_BNode::BLACK) {
               // case 3
               m-&gt;color_ = R_BNode::RED;
               m-&gt;right_-&gt;color_ = R_BNode::BLACK;
               LeftRotate(m);
               m = x-&gt;parent_-&gt;left_;
           }
           ...
        }
    }
     x-&gt;color_ = R_BNode::BLACK;
}</code></pre>
<h3 id="情况4x的兄弟节点为黑色且m的同侧孩子为红色">情况4：x的兄弟节点为黑色，且m的同侧孩子为红色。</h3>
<p>使m为父节点的颜色，并将父节点与m的同侧孩子设为黑色。对父节点进行旋转，使m成为新的取代父节点的位置，并设x为根节点。即可修复红黑树。</p>
<figure>
<img src="https://xilong.site/res/post-imgs/Conceptual_Analysis_of_Red-Black_Tree_and_a_Cpp_Implementation/delete4.png" alt="delete4" />
<figcaption aria-hidden="true">delete4</figcaption>
</figure>
<p>此时得出了最终实现：</p>
<pre class="language-cpp line-numbers match-braces"><code>void R_BTree::DeleteFixup(R_BNode *x) {
    while(x != root_ &amp;&amp; x-&gt;color_ != R_BNode::RED) {
       if (x == x-&gt;parent_-&gt;left_) {
           auto m = x-&gt;parent_-&gt;right_;
           // case 1
           if (m-&gt;color_ == R_BNode::RED) {
               m-&gt;color_ = R_BNode::BLACK;
               x-&gt;parent_-&gt;color_ = R_BNode::RED;
               LeftRotate(x-&gt;parent_);
               m = x-&gt;parent_-&gt;right_;
           }
           // case 2
           if (m-&gt;left_-&gt;color_ == R_BNode::BLACK
               &amp;&amp; m-&gt;right_-&gt;color_ == R_BNode::BLACK) {
               m-&gt;color_ = R_BNode::RED;
               x = x-&gt;parent_;
               continue;
           } else if (m-&gt;left_-&gt;color_ == R_BNode::RED
                     &amp;&amp; m-&gt;right_-&gt;color_ == R_BNode::BLACK) {
               // case 3
               m-&gt;color_ = R_BNode::RED;
               m-&gt;left_-&gt;color_ = R_BNode::BLACK;
               RightRotate(m);
               m = x-&gt;parent_-&gt;right_;
           }
           // case 4
           m-&gt;color_ = x-&gt;parent_-&gt;color_;
           x-&gt;parent_-&gt;color_ = R_BNode::BLACK;
           m-&gt;right_-&gt;color_ = R_BNode::BLACK;
           LeftRotate(x-&gt;parent_);
           x = root_;
        } else {
           auto m = x-&gt;parent_-&gt;left_;
           // case 1
           if (m-&gt;color_ == R_BNode::RED) {
               m-&gt;color_ = R_BNode::BLACK;
               x-&gt;parent_-&gt;color_ = R_BNode::RED;
               RightRotate(x-&gt;parent_);
               m = x-&gt;parent_-&gt;left_;
           }
           // case 2
           if (m-&gt;left_-&gt;color_ == R_BNode::BLACK
               &amp;&amp; m-&gt;right_-&gt;color_ == R_BNode::BLACK) {
               m-&gt;color_ = R_BNode::RED;
               x = x-&gt;parent_;
               continue;
           } else if (m-&gt;right_-&gt;color_ == R_BNode::RED
                     &amp;&amp; m-&gt;left_-&gt;color_ == R_BNode::BLACK) {
               // case 3
               m-&gt;color_ = R_BNode::RED;
               m-&gt;right_-&gt;color_ = R_BNode::BLACK;
               LeftRotate(m);
               m = x-&gt;parent_-&gt;left_;
           }
           // case 4
           m-&gt;color_ = x-&gt;parent_-&gt;color_;
           x-&gt;parent_-&gt;color_ = R_BNode::BLACK;
           m-&gt;left_-&gt;color_ = R_BNode::BLACK;
           LeftRotate(x-&gt;parent_);
           x = root_;
        }
    }
     x-&gt;color_ = R_BNode::BLACK;
}</code></pre>
<h2 id="总结">总结</h2>
<p>红黑树是一种特殊的二叉搜索树，因此适用二叉搜索树的所有不改变树结构的操作。而对于改变了红黑树结构的操作则需要牢记，主要分为旋转、插入和删除。</p>]]></content>
    </entry>
    <entry>
        <title type="html"><![CDATA[基于C++的Java入门笔记]]></title>
        <id>https://xilong.site/post/Quick_Start_with_JAVA_Base_on_Cpp.html</id>
        <link rel="alternate" type="text/html" href="https://xilong.site/post/Quick_Start_with_JAVA_Base_on_Cpp.html" />
        <updated>2021-09-19T00:00:00Z</updated>
        <!-- Every post here opens with an abstract, which is what
             `abstract` holds and what `content` therefore starts after.
             A feed carries the whole article, so it needs both, in the
             order the page itself shows them. -->
        <content type="html"><![CDATA[<p>Java的语法和C++实在是很相似，这一方面方便了C++选手们上手Java，另一方面也使得我们在使用Java的时候总是串语法。不得不写篇文章总结一下Java的语法差异。</p>
<h2 id="基本概念">基本概念</h2>
<p>Java分为三个版本：SE（Standard Edition）、EE（Enterprise Edition）和ME（Micro Edition）。</p>
<p>Java有三个重要工具：JRE（Java Runtime Environment）、JDK（Java Development Kit）和JVM（Java Virtual Machine）。其中JDK是开发中使用到的工具集；JRE是运行Java程序所必需的环境，它包括了JVM和一些类库等文件。</p>
<p>Java程序后缀为<code>.java</code>通过将其编译为后缀<code>.class</code>的字节码文件，交由JVM运行。</p>
<h2 id="语言特性">语言特性</h2>
<p>Java是一个静态强类型语言。即一个变量声明后就不可以改变类型，并且语言只允许有限的隐式类型转换，它仅支持小类型向大类型的隐式类型转换，换言之，不存在精度丢失的问题。</p>
<p>同时Java中并不存在指针类型，对于大类型的处理策略是<strong>默认为引用</strong>，同时语言带有GC系统。这大大减少了程序员的心智负担，但同时也带来了深浅拷贝这样的需要留意的问题。</p>
<p>同C++相比，Java牺牲了不少运行效率。因此具体场所使用Java还是C++还需自行斟酌。不过这个时代需要极高性能的场所正在渐渐减少，且语言性能带来的提升很多时候比不上一个更优秀的算法带来的提升。</p>
<p>总体而言，Java是一门非常实用的语言，能带来更高的开发效率和更少的折磨。</p>
<h2 id="程序结构">程序结构</h2>
<p>Java中的任何函数或变量都必须定义在类里，不允许出现类外的全局变量。</p>
<p>Java程序以一个函数签名为<code>public static void main(String args[]) {}</code>的函数为入口。这个函数同样要定义在一个类里。</p>
<h3 id="编译单元">编译单元</h3>
<p>一个<code>.java</code>文件就是一个编译单元，每个编译单元中只能有一个<code>public</code>类。这个<code>public</code>类的名字必须与<code>.java</code>文件的名字相同。编译单元中的其它类由于不能声明为<code>public</code>，只能在编译单元内访问与使用。</p>
<h3 id="包package">包(Package)</h3>
<p>Java并不存在头文件源文件之分，所有类都定义在<code>.java</code>文件中。这样的结构会引发一个经典问题——命名冲突，于是Java引入了<code>包(Package)</code>的概念，同时引入了<code>import</code>关键字用以指定一个包中的类的简称。</p>
<p>系统中会为每个包建立文件夹，以避免文件重名。</p>
<p>这其实和C++的<code>namespace</code>与<code>using</code>比较相似。不过存在一些区别：</p>
<ol type="1">
<li>包可以嵌套，但是每个包的命名空间是独立的。也就是说不存在C++中可以访问上层命名空间中的名字的情况。</li>
<li><code>import</code>只取<code>using</code>的声明这一层含义，并不能给类型起别名。</li>
</ol>
<p>使用：</p>
<pre class="language-java line-numbers match-braces"><code>// 编译单元开头声明，表示该编译单元属于此包
package name1[.name2.name3 ... .namen];

import name1[.name2.name3 ... .classname]; // 使用classname代替其全称。
import name1[.name2.name3 ... .*]; //对包内所有public类，使用类名代替全称。</code></pre>
<p>同时，由于包之间是独立的，默认包中的类将不能被其它包中的类访问。</p>
<h2 id="基础语法差异">基础语法差异</h2>
<h3 id="类型">类型</h3>
<p><code>char</code>是一个16位的Unicode字符，表示一字节长的类型叫<code>byte</code>。</p>
<p><code>boolean</code>类型并非数值类型，其值为<code>true</code>或<code>false</code>，不可以进行算数运算。</p>
<p>自动类型转换仅出现在不损失精度的运算中，大类型转小类型要使用强制类型转换，语法与C类似。</p>
<h3 id="运算符">运算符</h3>
<p><code>&lt;&lt;</code>: 丢弃最高位，0补最低位。</p>
<p><code>&gt;&gt;</code>: 符号位不变，高补符号位。</p>
<p><code>&gt;&gt;&gt;</code>：忽略符号位，0补最高位。</p>
<p><code>instanceof</code>：二元中缀运算符，检测左边对象是否为右边指定类型。</p>
<h3 id="修饰符">修饰符</h3>
<p><code>default</code>：什么也不写，同一包内可见。</p>
<p><code>public</code>：所有包可见。</p>
<p><code>private</code>：同一类可见。不能修饰外部类。</p>
<p><code>protected</code>：同一包内的类可见，也对不同包中的子类可见。不能修饰外部类。</p>
<p><code>static</code>：用以声明独立于对象（实例）的变量与函数。不可以修饰局部变量。</p>
<p><code>final</code>：变量不能变、函数不能重写、类不能继承。</p>
<p><code>abstract</code>：声明抽象方法与抽象类，与<code>final</code>冲突，有抽象方法的类一定是抽象类。</p>
<p><code>synchronized</code>：同一时间仅能被一个线程访问。</p>
<p><code>transient</code>：使变量跳过序列化。</p>
<p><code>volatile</code>：用来修饰需线程同步的变量。</p>
<h3 id="表达式和语句">表达式和语句</h3>
<p>不产生任何副作用的表达式不是语句。</p>
<pre class="language-java line-numbers match-braces"><code>int i = 0;
i;  // 非法，表达式没有任何副作用。
i++; // 合法，改变了i的值。</code></pre>
<h3 id="函数方法">函数/方法</h3>
<pre class="language-java line-numbers match-braces"><code>&lt;修饰符&gt; 返回值类型 方法名(参数) {
    ...
    return value;
}</code></pre>
<h3 id="类">类</h3>
<pre class="language-java line-numbers match-braces"><code>&lt;修饰符&gt; 类名 {
    ...
} // 花括号后没有分号</code></pre>
<p>构造函数名称与类名相同。</p>
<p>析构函数统一为<code>protected void finalize() {...}</code>。</p>
<p><code>this</code>是自身的引用。<code>super</code>是直接基类的引用。</p>
<h2 id="面向对象">面向对象</h2>
<p>Java作为一门面向对象语言，引入了一些特性来提供更好的面向对象支持。除了基本类型的对象外，对象一律使用<code>new</code>来声明。因为有GC机制，并不需要使用<code>delete</code>来手动释放对象。</p>
<p>Java中没有提供指针，为了解决类的拷贝开销过大问题，默认使用引用的方式来使用类。换言之，用<code>new</code>声明的对象都可以看作限制版的指针。传参的时候就要注意实际上传的是值还是引用。</p>
<p>这时就出现了一个问题，要使用引用类型的副本可以手动拷贝一份，可是要使用值类型的引用时怎么办呢？比如一个简单的交换：</p>
<pre class="language-cpp line-numbers match-braces"><code>// 使用C++可以使用引用与指针两种方式实现。
void swap(int &amp;a, int &amp;b) {
    int tmp = a;
    a = b;
    b = tmp;
}

void swap(int *a, int *b) {
    int tmp = *a;
    *a = *b;
    *b = tmp;
}</code></pre>
<p>而Java里既不能使用引用也不能使用指针，就比较棘手。只能曲线救国，将基本类型封装到引用类型里，比如一个类或者数组：</p>
<pre class="language-java line-numbers match-braces"><code>class Pair {
    public Pair(int fst_, int snd_) {
        fst = fst_;
        snd = snd_;
    }
    int fst;
    int snd;
}
// 此时可以使用Pair传递两个值并交换了。
void swap(Pair p) {
    int tmp = p.fst;
    p.fst = p.snd;
    p.snd = tmp;
}
// 但这样写并不如直接在Pair类里写成员函数自然。
class Pair {
    ...
    void swap() {
        int tmp = fst;
        fst = snd;
        snd = tmp;
    }
}</code></pre>
<p>这样看来传基本类型的引用基本上是一个伪需求。</p>
<h3 id="数组">数组</h3>
<p>数组使用<code>type[] var = new type[size]</code>来声明。等号左边也可以写成C风格的<code>type var[]</code>，但不推荐。也可以使用<code>type[] var = {...}</code>的方式来更方便的使用。</p>
<p>数组提供<code>length</code>成员保存大小。</p>
<p>数组的一些常用操作以<code>static</code>方法的方式提供在<code>java.util.Arrays</code>类中。</p>
<h3 id="继承">继承</h3>
<p>Java不支持多继承，即一个类只能有一个父类。子类继承父类的非<code>private</code>方法。子类使用<code>extends</code>关键字继承父类。</p>
<p>Java中所有类都是<code>java.lang.Object</code>类的子类。</p>
<h3 id="重写与重载">重写与重载</h3>
<p>子类可以重写父类的函数，可以理解为所有函数都是虚函数，而<code>abstract</code>函数相当于纯虚函数。</p>
<h3 id="抽象类与接口">抽象类与接口</h3>
<p>含有任何<code>abstract</code>函数的类或被显式声明为<code>abstract</code>的类为抽象类，抽象类不能被实例化。</p>
<p>接口使用<code>interface</code>声明，是一个抽象方法的集合。接口可以使用<code>extends</code>来继承其它接口，允许多继承。</p>
<pre class="language-java line-numbers match-braces"><code>[可见度] interface [名称] [extends 其它接口名] {
    // 抽象方法，隐式指定为public abstract，同时也只能是这种类型。
    // 变量，隐式指定为public static final，同时只能是这种类型。
}</code></pre>
<p>类可以通过<code>implements</code>关键字实现接口。抽象类可以不实现接口中的方法，但普通类必须全部实现。</p>
<h2 id="异常处理">异常处理</h2>
<p>使用<code>try-catch-finally</code>语句块来处理异常：</p>
<pre class="language-java line-numbers match-braces"><code>try {
} catch (异常类型 变量名) {
} finally {
} // catch数量大于等于1个，finally是可选的，无论是否发生异常都会执行。</code></pre>
<p>程序中使用<code>throw</code>抛出异常，一个可能抛出异常的函数要使用<code>throws</code>声明可能抛出的异常的类型。</p>
<pre class="language-java line-numbers match-braces"><code>public void test() throws RuntimeException {
    throw new RuntimeException();
}</code></pre>
<h2 id="泛型">泛型</h2>
<h3 id="声明">声明</h3>
<p>泛型这个概念是C++的模板带来的，因此声明语法上也大差不差。但有两点不同：</p>
<ol type="1">
<li>参数只能是类型，不能是值。</li>
<li>参数必须是引用类型， 不能是基础类型。</li>
</ol>
<p><strong>泛型类/接口</strong></p>
<pre class="language-java line-numbers match-braces"><code>class name &lt;T1, T2,...,Tn&gt; {...}

interface name &lt;T1, T2,...,Tn&gt; {...}</code></pre>
<p><strong>泛型函数</strong></p>
<pre class="language-java line-numbers match-braces"><code>public &lt;T&gt; T func(T obj) {}</code></pre>
<h3 id="类型擦除">类型擦除</h3>
<p>Java的泛型是使用类型擦除的方式实现的，运行时丢失所有类型信息。因此不能使用与类型有关的操作，如：转型、<code>instanceof</code>和<code>new</code>。这也意味着，泛型类的类型参数不能协变地向上转型。</p>
<pre class="language-java line-numbers match-braces"><code>Integer ---&gt; Object
ArrayList&lt;Integer&gt; ---&gt; List&lt;Integer&gt;
List&lt;Integer&gt; -x--&gt; List&lt;Object&gt;</code></pre>
<p><code>Integer</code>继承了<code>Object</code>，可以转为<code>Object</code>。<code>ArrayList</code>继承了<code>List</code>，可以转为<code>List</code>。但<code>List&lt;Integer&gt;</code>不能转为<code>List&lt;Object&gt;</code>。</p>
<p>因为泛型类并不存在独有的Class对象，即不存在<code>List&lt;Object&gt;.class</code>或<code>List&lt;Integer&gt;.class</code>，编译器会将两者都视为<code>List.class</code>。</p>
<h3 id="类型边界">类型边界</h3>
<p>可以使用<code>extends</code>限制类型必须是某个类的子类或实现了哪些接口：</p>
<pre class="language-java line-numbers match-braces"><code>&lt;T extends A &amp; B &amp; C&gt; // 可以有多个限制，使用&amp;隔开。只有第一个限制可以是类，其它的必须是接口。</code></pre>
<h3 id="类型通配符">类型通配符</h3>
<p>使用泛型类实例时可以通过通配符匹配类型，如：</p>
<pre class="language-java line-numbers match-braces"><code>List&lt;?&gt;; // 可以是任何类型
List&lt;? extends A&gt;; // 匹配A的子类或实现（通配符的extends只支持单个边界，不支持&amp;交叉类型）
List&lt;? super S&gt; // 匹配S的父类</code></pre>
<p>可以使用通配符实现向上转型：</p>
<pre class="language-java line-numbers match-braces"><code>List&lt;Integer&gt; intList1 = new ArrayList&lt;&gt;();
List&lt;Number&gt;  numList1 = intList1; // Error

List&lt;? extends Integer&gt; intList2 = new ArrayList&lt;&gt;();
List&lt;? extends Number&gt;  numList2 = intList2; // OK</code></pre>]]></content>
    </entry>
    <entry>
        <title type="html"><![CDATA[从零开始的Haskell（六）——惰性求值]]></title>
        <id>https://xilong.site/post/Haskell_from_0_to_1_6_Lazy_Evaluation.html</id>
        <link rel="alternate" type="text/html" href="https://xilong.site/post/Haskell_from_0_to_1_6_Lazy_Evaluation.html" />
        <updated>2021-09-15T00:00:00Z</updated>
        <!-- Every post here opens with an abstract, which is what
             `abstract` holds and what `content` therefore starts after.
             A feed carries the whole article, so it needs both, in the
             order the page itself shows them. -->
        <content type="html"><![CDATA[<p>系列第六篇，介绍惰性求值。</p>
<p>经过了前几篇的折磨，是时候介绍惰性求值了。</p>
<h2 id="直接求值">直接求值</h2>
<p>在讨论惰性求值之前首先来了解一下直接求值。在直接求值方式下，参数在传入函数之前就已经计算过了，传入函数的是计算结果。考虑如下函数：</p>
<pre class="language-haskell line-numbers match-braces"><code>f x y = x + 2</code></pre>
<p>在直接求值的语言中，<code>f 5 (29^35792)</code>会先分别计算出<code>5</code>和<code>29^35792</code>的值，然后才将这两个值传入函数中进行处理。对于我们这个函数而言，这样做显然浪费了计算<code>29^35792</code>耗费的计算资源。因为我们根本没有使用参数<code>y</code>。</p>
<p>那么为什么要使用直接求值呢？一个显著的好处是直接求值可以很方便的预测处理表达式的时机，对于有副作用的语言而言，比如C++中：</p>
<pre class="language-cpp line-numbers match-braces"><code>f (x(), y());</code></pre>
<p>可以确保在函数<code>f</code>调用之前已经对<code>x()</code>与<code>y()</code>函数进行了处理，比如更改全局变量的值。因此我们可以使程序的行为和我们的预期相符。</p>
<h2 id="副作用和纯净">副作用和纯净</h2>
<p>所谓的副作用就是指表达式计算时对该表达式之外的事物造成了影响。这里的关键是对外界事物的影响是时间敏感的。比如：</p>
<ul>
<li>更改全局变量：当全局变量的值改变时可能会对其它表达式的结果造成影响。</li>
<li>在屏幕上打印内容：需要一个确定的打印顺序。</li>
<li>读取文件或网络内容：文件中的内容会影响表达式的结果。</li>
</ul>
<p>就像我们之前看到的，惰性求值使得确定事情何时发生变得很难。因此如果引入副作用将会使得程序非常不直观。这就是Haskell没有副作用的历史原因，当时设计者想设计一门惰性求值语言，但他很快意识到只有禁止表达式产生副作用才可能实现。</p>
<p>但是没有副作用的语言几乎没有什么用。你能做的唯一一件事就是使用你的程序去翻译和计算表达式。你不能获取任何用户输入或是读写文件，也不能在屏幕上输出任何东西。Haskell的设计者面对的挑战是设计一种严格且规范的方式去允许一部分副作用，并且不能影响到基础语言部分的纯净。他们最终搞出来一个叫做<code>IO monad</code>的东西，这个我们之后再说。</p>
<h2 id="惰性求值">惰性求值</h2>
<p>现在我们已经知道了什么是直接求值，是时候看看惰性求值长什么样了。在惰性求值方式下，对函数参数的计算会尽可能地拖延：只有在必须用到它们的值的时候才计算它们。当向函数传递一个参数的时候，它们被整个打包（这个包称为thunk），以未计算表达式的方式传入。这过程中不作任何实际处理。</p>
<p>举例来说，计算<code>f 5 (29^35792)</code>时，第二个参数被简单的打包成thunk并且不做任何实际的计算，并且<code>f</code>会被立刻调用。因为<code>f</code>实际上根本没用到第二个参数，这个thunk会被GC系统直接抛弃。</p>
<h2 id="模式匹配驱动计算">模式匹配驱动计算</h2>
<p>所以一个表达式什么时候才必须进行计算呢？一个关键是看它什么时候被使用，但实际上这并不是最重要的区别。考虑下面的例子：</p>
<pre class="language-haskell line-numbers match-braces"><code>f1 :: Maybe a -&gt; [Maybe a]
f1 m = [m, m]

f2 :: Maybe a -&gt; [a]
f2 Nothing = []
f2 (Just x) = [x]</code></pre>
<p>这里的<code>f1</code>与<code>f2</code>都使用了它们的参数，但其中有很大的区别。<code>f1</code>并不在乎参数是个什么东西，只要把它整个地丢进列表里就行了。而<code>f2</code>就必须知道参数的值，来决定如何处理参数。</p>
<p>另一个关键是，thunk只会被计算到足够使用的程度，比如说<code>safeHead [3 ^ 500, 49]</code>会得到结果<code>Just (3^500)</code>，而不会接着计算<code>3 ^ 500</code>（属实够懒的……）。至于这个<code>3 ^ 500</code>之后会不会被计算，取决于这个thunk的使用方式。</p>
<p>一个方便记忆的口诀就是本节标题：<strong>模式匹配驱动计算</strong>。两个重点：</p>
<ul>
<li>表达式仅在被模式匹配时计算。</li>
<li>表达式仅计算到足够当前模式使用的程度。</li>
</ul>
<p>来看一个更有趣的例子，<code>take 3 (repeat 7)</code>。作为参考，<code>take</code>和<code>repeat</code>的定义如下：</p>
<pre class="language-haskell line-numbers match-braces"><code>repeat :: a -&gt; [a]
repeat x = x : repeat x

take :: Int -&gt; [a] -&gt; [a]
take n _ | n &lt;= 0 = []
take _ [] = []
take n (x:xs) = x : take (n - 1) xs</code></pre>
<p>来一步一步地考虑这个式子：</p>
<pre class="language-haskell line-numbers match-braces"><code>take 3 (repeat 7) -- 首先对take的第一个模式进行匹配，3 &lt;= 0为False，因此第一个模式不匹配，此时尝试匹配第二模式，这里需要知道第二个参数是不是空列表，因此我们必须展开repeat 7。但我们是惰性求值，所以先展开一步看看。
take 3 (7 : repeat 7) -- 这里已经足够看出第二个参数不是空列表了，所以不用继续展开，尝试匹配第三个模式，匹配。因此使用第三个表达式进行处理。注意（3-1）还不需要计算。
7 : take (3 - 1) (repeat 7) -- 尝试对第一个模式进行匹配，判断(3 - 1) &lt;= 0时需要对（3 - 1）进行计算。
7 : take 2 (repeat 7) -- 2 &lt;= 0为False，试图匹配第二个模式，过程不再赘述。
7 : take 2 (7 : repeat 7)
7 : 7 : take (2 - 1) (repeat 7)
7 : 7 : take 1 (repeat 7)
7 : 7 : take 1 (7 : repeat 7)
7 : 7 : 7 : take (1 - 1) (repeat 7)
7 : 7 : 7 : take 0 (repeat 7) -- 0 &lt;= 0为True，匹配第一个模式。
7 : 7 : 7 : []</code></pre>
<p>注意，虽然逻辑上一个表达示是这样步步展开的，但大多数Haskell的编译器实现会使用一些更有效率的方式进行处理，以提高性能。</p>
<h2 id="惰性求值带来的影响">惰性求值带来的影响</h2>
<p>惰性求值带来了一些有趣、无处不在而又不甚明显的影响，试说明几例。</p>
<h3 id="纯净">纯净</h3>
<p>正如之前所说，惰性求值特性迫使了我们选择纯净（除非你不想要程序员活了）。</p>
<h3 id="理解空间消耗">理解空间消耗</h3>
<p>惰性求值也有其缺点，其中之一就是很难估算程序对空间资源的消耗。考虑下例：</p>
<pre class="language-haskell line-numbers match-braces"><code>-- 给出标准库foldl定义作为参考
foldl :: (b -&gt; a -&gt; b) -&gt; b -&gt; [a] -&gt; b
foldl _ z []  = z
foldl f z (x:xs) = foldl f (f z x) xs</code></pre>
<p>来看看如何处理<code>foldl (+) 0 [1,2,3]</code>：</p>
<pre class="language-haskell line-numbers match-braces"><code>foldl (+) 0 [1,2,3]
= foldl (+) (0+1) [2,3]
= foldl (+) ((0+1)+2) [3]
= foldl (+) (((0+1)+2)+3) []
= (((0+1)+2)+3)
= ((1+2)+3)
= (3+3)
= 6</code></pre>
<p>这个式子一开始被处理为一个大的thunk<code>(((0+1)+2)+3)</code>并且没有进行实际上的运算，然后最终才由thunk计算出一个数值。这里至少存在两个问题，其一是将一个列表转换成一个类似列表的东西并没有任何价值。其二是处理这样的thunk将会消耗很多空间资源，比如在计算<code>1+2</code>时要先将<code>3</code>推入栈中。在这样的小例子中可能看不出什么消耗，但在处理大列表时这样的空间消耗是非常巨大的。</p>
<p>这个问题的解决方案是使用<code>foldl'</code>，它是一个更接近直接求值的<code>foldl</code>实现，因此不会构建出一个巨大的thunk：</p>
<pre class="language-haskell line-numbers match-braces"><code>foldl&#39; (+) 0 [1,2,3]
= foldl&#39; (+) (0 + 1) [2,3]
= foldl&#39; (+) 1 [2,3]
= foldl&#39; (+) (1 + 2) [3]
= foldl&#39; (+) 3 [3]
= foldl&#39; (+) (3 + 3) []
= foldl&#39; (+) 6 []
= 6</code></pre>
<h3 id="短路运算符">短路运算符</h3>
<p>对C++和Java比较熟悉的话，一定知道其中<code>&amp;&amp;</code>和<code>||</code>运算符的短路现象。对于这样的直接求值语言而言，函数的参数在传入之前应该先计算。显然短路是不符合这个特性的，因此短路其实是这些语言的一个特例。</p>
<p>而对于Haskell，短路就显得非常自然了，比如<code>(&amp;&amp;)</code>函数定义如下：</p>
<pre class="language-haskell line-numbers match-braces"><code>(&amp;&amp;) :: Bool -&gt; Bool -&gt; Bool
True  &amp;&amp; x = x
False &amp;&amp; _ = False</code></pre>
<p>同时也有一个不短路的版本<code>&amp;&amp;!</code>，定义为：</p>
<pre class="language-haskell line-numbers match-braces"><code>(&amp;&amp;!) :: Bool -&gt; Bool -&gt; Bool
True  &amp;&amp;! True  = True
True  &amp;&amp;! False = False
False &amp;&amp;! True  = False
False &amp;&amp;! False = False</code></pre>
<h3 id="用户定义的控制结构">用户定义的控制结构</h3>
<p>基于与上面的短路同样的思路，我们可以定义自己的用户控制结构。大多数语言有内置的<code>if</code>语句，而在Haskell中可以简单的将<code>if</code>定义为一个函数，定义如下：</p>
<pre class="language-haskell line-numbers match-braces"><code>if&#39; :: Bool -&gt; a -&gt; a -&gt; a
if&#39; True  x _ = x
if&#39; False _ y = y</code></pre>
<p>然而Haskell还是存在一个内置的<code>if</code>语句，可能是语言设计者觉得大家需要吧。不过<code>if</code>在Haskell中并没有许多用处，最好还是使用模式匹配和哨卫。</p>
<p>我们也能定议其它的控制结构，这些会在讨论<code>monad</code>时展开。</p>
<h3 id="无限数据结构">无限数据结构</h3>
<p>由于惰性求值特性，我们可以定义无限的数据结构，比如<code>repeat 7</code>这样的无限列表，或是一个完整的记录状态空间的树（比如棋类游戏）。由于我们只会计算使用到的部分，这样的定义并不会带来额外的负担。</p>
<h3 id="管道全麦编程">管道/全麦编程</h3>
<p>之前我们说过使用管道的形式组合小函数成获得更好的内存性能，现在可以解释为什么了。因为管道中的每个小函数的值在传递给下一个函数时都会被计算出来。因此对内存的浪费局限在了一个小的范围内。</p>
<h3 id="动态规划">动态规划</h3>
<p>惰性求值给我们带来了更方便的动态规划技术。通常我们使用动态规划时要小心考虑状态表的求值顺序，如果顺序错了就将得到一个完全错误的结果。</p>
<p>然而，我们可以使用惰性求值特性来让Haskell运行时为我们选择求值顺序。比如对于经典的0-1背包问题，我们可以这样解决：</p>
<pre class="language-haskell line-numbers match-braces"><code>import Data.Array

knapsack01 :: [Double]   --物品价值
           -&gt; [Integer]  --物品重量
           -&gt; Integer    --背包载量
           -&gt; Double     --最大价值
knapsack01 vs ws maxW = m!(numItems - 1, maxW)
    where numItems = length vs
          m = array ((-1, 0), (numItems - 1, maxW)) $
                [((-1, w), 0) | w &lt;- [0 .. maxW]] ++
                [((i, 0), 0) | i &lt;- [0 .. numItems - 1]] ++
                [((i, w), best)
                    | i &lt;- [0 .. numItems - 1]
                    , w &lt;- [1 .. maxW]
                    , let best
                           | ws!!i &gt; w = m!(i - 1, w)
                           | otherwise = max (m!(i - 1, w))
                                          (m!(i - 1, w - ws!!i) + vs!!i)
                ]</code></pre>
<p>为了理解这个程序，首先解释一下<code>array</code>，其作用为封装一个指定范围内索引到值的映射列表，并提供运算符<code>!</code>实现方便的<code>k-v</code>映射，用法为：</p>
<pre class="language-haskell line-numbers match-braces"><code>-- array key范围 映射列表
-- array (min, max) [(index, value)]
array :: Ix i =&gt; (i, i) -&gt; [(i, e)] -&gt; Array i e
-- 如下例生成一个索引范围从1到10的映射，每个索引对应的值为索引值+1
a = array (1, 10) [(i, i + 1) | i &lt;- [1..10]]
-- 取该映射中的一个value时，使用array！key的方式，如
a!1 == 2
-- 似乎等效于直接对列表进行如下操作
l = [(i, i + 1) | i &lt;- [1..10]]
snd $ l!!0 == 2</code></pre>
<p>再回顾一下0-1背包问题，问题描述为:</p>
<blockquote>
<p>给定n个物品与一个最大载重为maxW的背包。每个物品的重量w与价值v各不相同，可以选定任意物品装入背包，但背包中物品重量总和不可超过背包的最大载重。求背包最多可以装入多少价值的物品。</p>
</blockquote>
<p>而解决思路可以概括为：</p>
<blockquote>
<p>maxV(i, w)视作前i个物品在限重w时的最大价值。此时，如果没有将第i个物品加入背包，则其值等于maxV(i - 1, w)；如果将第i个物品加入了背包，其值则等于maxV(i - 1, w - ws[i]) + vs[i]。因此，只要选择两种情况下值比较大的作为maxV(i,w)的值就可以确保这个值是最优解。</p>
<p>同时要注意，如果当前物品重量超过了背包最大载重，则只有不加入背包一个选择。</p>
</blockquote>
<p>现在来逐步解析这个程序：</p>
<pre class="language-haskell line-numbers match-braces"><code>import Data.Array

knapsack01 :: [Double]   --物品价值
           -&gt; [Integer]  --物品重量
           -&gt; Integer    --背包载量
           -&gt; Double     --最大价值
-- 我们知道了m是一个Array类型，!运算可以取其对应索引的值
-- m (i, w)这个形式即是之前所说的maxV(i,w)，求前n个物品的在限重w下的最大价值
-- 这里numItems - 1是因为数组下标从0开始，第一个物品对应的i值为0
knapsack01 vs ws maxW = m!(numItems - 1, maxW)
    where numItems = length vs
          -- 这里构建一个二维数组作状态表
          -- 索引范围是(-1, 0)到(numItems - 1, maxW)
          m = array ((-1, 0), (numItems - 1, maxW)) $
                -- 对边界条件初始化，所有0个物品与载重为0是情况取值都为0
                [((-1, w), 0) | w &lt;- [0 .. maxW]] ++
                [((i, 0), 0) | i &lt;- [0 .. numItems - 1]] ++
                -- 定义一般情况的映射关系
                [((i, w), best)
                    | i &lt;- [0 .. numItems - 1]
                    , w &lt;- [1 .. maxW]
                    -- 这里就是上面说的对两种情况的比较
                    , let best
                           | ws!!i &gt; w = m!(i - 1, w)
                           | otherwise = max (m!(i - 1, w))
                                          (m!(i - 1, w - ws!!i) + vs!!i)
                ]</code></pre>
<p>这样看除了语法陌生一点外似乎并没有什么太特别的地方，为了对比，给出这个问题的C++实现：</p>
<pre class="language-cpp line-numbers match-braces"><code>#include &lt;vector&gt;

using namespace std;

double knapsack01(const vector&lt;double&gt; &amp;vs, const vector&lt;int&gt; &amp;ws
                , int maxW) {

    auto numItems = vs.size();

    // 留出物品数与载重为0的情况所需空间
    auto m = vector(numItems + 1, vector&lt;double&gt;(maxW + 1, 0));

    for (int i = 1; i &lt;= numItems; ++i) {
        for (int w = 1; w &lt;= maxW; ++w) {
            auto unadd = m[i - 1][w];

            // 由于物品数量从1开始，物品属性下标从0开始，当前物品索引应为i-1
            auto index = i - 1;
            if (ws[index] &gt; w) {
                m[i][w] = unadd;
                continue;
            }

            auto added = m[i - 1][w - ws[index]] + vs[index];
            m[i][w] = (added &gt; unadd) ? added : unadd;
        }
    }
    return m[numItems][maxW];
}</code></pre>
<p>亲自动手写出这两个程序，就会发现C++程序要格外地考虑状态表的求值顺序。另一方面，C++程序在运行时要浪费许多计算资源在可能根本没用到的状态上（然而还是比较快）。而Haskell在这些方面的心智负担要小得多。</p>]]></content>
    </entry>
    <entry>
        <title type="html"><![CDATA[从零开始的Haskell（五）——更多多态与类型类]]></title>
        <id>https://xilong.site/post/Haskell_from_0_to_1_5_More_Polymorphism_and_Type_Classes.html</id>
        <link rel="alternate" type="text/html" href="https://xilong.site/post/Haskell_from_0_to_1_5_More_Polymorphism_and_Type_Classes.html" />
        <updated>2021-09-10T00:00:00Z</updated>
        <!-- Every post here opens with an abstract, which is what
             `abstract` holds and what `content` therefore starts after.
             A feed carries the whole article, so it needs both, in the
             order the page itself shows them. -->
        <content type="html"><![CDATA[<p>系列第五篇，介绍更强的多态性和类型类。</p>
<p>Haskell关于多态性的一个广为人知的特点是参数多态，即一个多态函数对任何类型的输入都应该有一个一致的行为。这个特性导致了许多有趣的隐患，对程序开发者和多态函数的使用者皆有影响。</p>
<h2 id="参数化">参数化</h2>
<p>考虑如下类型：</p>
<pre class="language-haskell line-numbers match-braces"><code>a -&gt; a -&gt; a</code></pre>
<p>记住<code>a</code>是一个能代表任何类型的类型变量。哪些函数是这种类型？下面这个函数怎么样？</p>
<pre class="language-haskell line-numbers match-braces"><code>f :: a -&gt; a -&gt; a
f x y = x &amp;&amp; y</code></pre>
<p>这个函数是无法工作的，即使它符合语法。因为无法通过类型检查。我们可以获取以下报错信息：</p>
<pre class="language-none line-numbers match-braces"><code>• Couldn&#39;t match expected type ‘Bool’ with actual type ‘a’
  ‘a’ is a rigid type variable bound by
    the type signature for:
      f :: forall a. a -&gt; a -&gt; a
    at test.hs:1:1-12
• In the first argument of ‘(&amp;&amp;)’, namely ‘x’
  In the expression: x &amp;&amp; y
  In an equation for ‘f’: f x y = x &amp;&amp; y</code></pre>
<p>无法工作的原因是多态函数的调用者可以选择类型，而这个我们——函数的实现者——已经选择了一个特定的类型（Bool），但我们仍可能接收到一个<code>String</code>，或<code>Int</code>甚至是一个用户自定义类型。因此这个函数无法工作，换言之，你可以将类型声明视为一个保证，<code>a-&gt;a-&gt;a</code>保证这个函数无论接收了什么类型的参数都可以正常工作。</p>
<p>为了处理这种情况，我们或许为想到类似这样的处理方式：</p>
<pre class="language-none line-numbers match-braces"><code>f a1 a2 = case (typeOf a1) of
   Int  -&gt; a1 + a2
   Bool -&gt; a1 &amp;&amp; a2
   _    -&gt; a1</code></pre>
<p>这里<code>f</code>为特定类型定义特定的行为，我们可以使用C++实现出一个这样的函数：</p>
<pre class="language-cpp line-numbers match-braces"><code>#include &lt;type_traits&gt;
#include &lt;iostream&gt;

using std::is_same;
using std::cout;
using std::endl;

template &lt;typename T&gt;
T f(T a1, T a2) {
    if (is_same&lt;T, int&gt;::value) {
        return a1 + a2;
    } else if (is_same&lt;T, bool&gt;::value) {
        return a1 &amp;&amp; a2;
    }
    return a1;
}

int main() {
    cout &lt;&lt; f(2, 3) &lt;&lt; &quot; &quot;;
    cout &lt;&lt; f(true, false) &lt;&lt; &quot; &quot;;
    cout &lt;&lt; f(2.1, 3.0) &lt;&lt; endl;
    return 0;
}

// 运行结果为： 5 0 2.1</code></pre>
<p>但这种方式在Haskell中是行不通的，Haskell并没有类似<code>is_same</code>的类型检查函数，这主要是因为Haskell是一种静态强类型语言，在通过编译期类型检查后Haskell就不再保留任何类型信息了。同时我们即将看到一个更好的理由。</p>
<p>C++与Java中对多态的支持主要是通过泛型提供的，而泛型编程这一思想正是受到Haskell的启发而诞生的。言归正传，什么样的函数可以是<code>a -&gt; a -&gt; a</code>类型的？其实只有两个函数可以：</p>
<pre class="language-haskell line-numbers match-braces"><code>f1 :: a -&gt; a -&gt; a
f1 x y = x

f2 :: a -&gt; a -&gt; a
f2 x y = y</code></pre>
<p>来做一个参数化游戏！考虑以下的多态类型，确定每种类型可能具有的行为方式。</p>
<ul>
<li><p><code>a -&gt; a</code></p>
<p>这类型的函数仅可能是接受一个参数并返回参数本身的函数。</p></li>
<li><p><code>a -&gt; b</code></p>
<p>这类型的函数很难写出来，因为它的含义不是“接受一个任意类型的参数并<strong>任意返回一个类型</strong>的值”，而是“接受一个任意类型的参数并<strong>返回一个任意类型</strong>的值”。也就是说这个返回值必须能被视作任意类型。</p>
<p>可能只有<code>f _ = undefined</code>与<code>f x = f x</code>符合这个要求。</p></li>
<li><p><code>a -&gt; b -&gt; a</code></p>
<p>这个函数可以是一个返回第一个参数并抛弃第二个参数的的函数，如<code>const</code>。</p></li>
<li><p><code>[a] -&gt; [a]</code></p>
<p>操作列表但不操作元素的函数皆可，比如<code>f xs = [head xs]</code>。</p></li>
<li><p><code>(b -&gt; c) -&gt; (a -&gt; b) -&gt; (a -&gt; c)</code></p>
<p><code>f g h = \x -&gt; g(h x)</code>，即<code>.</code>运算符。也就是对函数进行操作，但不对具体类型进行操作即可。</p></li>
<li><p><code>(a -&gt; a) -&gt; a -&gt; a</code></p>
<p>由于函数的返回类型和参数类型相同，符合要求的函数可以是一个自己定义自己的函数，如：<code>f = f</code>。</p></li>
</ul>
<p>经过这几个例子的思考，你可能会发现，想要实现多态性，就不要对元素进行任何操作。因为你要接受一个任意类型的参数，而无论什么操作，总会有不支持的类型。这并不只是一个约束，同时是一个非常强大的保护。这样严格的类型系统使得函数的使用者可以更放心的调用函数，同时也使得一个函数的类型说明包含了足够大致了解一个函数的信息。</p>
<p>比如你看到一个<code>a -&gt; a</code>类型的函数就可以肯定这个函数接受任意接收一个类型的值并返回一个同类型的值，而无需担心其它影响。而一个函数签名为<code>T func(T)</code>的C++函数则无法提供如此担保，你可能会担心这个函数对全局状态产生影响，或是传入的类型不对导致程序崩溃。</p>
<p>等等，既然如此，<code>+</code>是怎么实现的？对<code>Integer</code>的加法和对<code>Double</code>的加法完全是两回事，难道不需要判断类型吗？事实上确实不需要判断类型，但也并非什么魔法，看一下<code>+</code>的定义：</p>
<pre class="language-haskell line-numbers match-braces"><code>(+) :: Num a =&gt; a -&gt; a -&gt; a</code></pre>
<p>又见<code>=&gt;</code>，还有前面看起来像一个ADT的奇怪符号<code>Num a</code>。还有其它几个函数：</p>
<pre class="language-haskell line-numbers match-braces"><code>(==) :: Eq a   =&gt; a -&gt; a -&gt; Bool
(&lt;)  :: Ord a  =&gt; a -&gt; a -&gt; Bool
show :: Show a =&gt; a -&gt; String</code></pre>
<p>所以这些符号是什么意思？</p>
<h2 id="类型类">类型类</h2>
<p>揭晓答案的时候到了，<code>Num</code>、<code>Eq</code>、<code>Ord</code>和<code>Show</code>都是类型类，并且使用了类型类的函数称为“类型类多态”。类型类是对函数接受的类型的约束，它表示定义了指定操作的类型的集合。同时类型类多态函数仅为符合类型类定义的类型工作。</p>
<p>通俗点说，C++等语言中的函数无论什么参数都得先请进来看看，不合适再请出去，或者一个想不开就崩溃了。而Haskell的函数做为一等公民比较霸道，可以事先对参数类型作一个要求，并且让那些达不到要求的参数爬。这个要求就是类型类，例如<code>Eq</code>的定义如下：</p>
<pre class="language-haskell line-numbers match-braces"><code>class Eq a where
  (==) :: a -&gt; a -&gt; Bool
  (/=) :: a -&gt; a -&gt; Bool</code></pre>
<p>这个定义可以这么理解：一个接受一个参数的类型类<code>Eq</code>，符合<code>Eq</code>要求的类型必须定义两个操作：<code>==</code>和<code>/=</code>。比如要使<code>Int</code>成为<code>Eq</code>的实例，就必须定义函数<code>(==) :: Int -&gt; Int -&gt; Bool</code>和<code>(/=) :: Int -&gt; Int -&gt; Bool</code>。再看看<code>(==)</code>的定义：</p>
<pre class="language-haskell line-numbers match-braces"><code>(==) :: Eq a =&gt; a -&gt; a -&gt; Bool</code></pre>
<p>这个定义理解为：一个类型如果是<code>Eq</code>的实例，那么对两个参数进行比较并返回比较结果，如果参数不是<code>Eq</code>的实例则解释期报错。一个普通多态函数保证对任何类型生效，而一个类型类多态函数仅保证对类型类实例类生效。</p>
<p>需要注意的是，当调用<code>(==)</code>时，编译器根据类型选择使用哪个实例。这个机制与C++中的多态比较类似，即根据类型选择合适的实例。</p>
<p>为了更好的掌握类型类的概念，我们来构建一个ADT并使其成为<code>Eq</code>的实例。</p>
<pre class="language-haskell line-numbers match-braces"><code>data Foo = F Int | G Char

instance Eq Foo where
  (F i1) == (F i2) = i1 == i2
  (G c1) == (G c2) = c1 == c2
  _ == _ = False

  foo1 /= foo2 = not (foo1 == foo2)</code></pre>
<p>定义了<code>==</code>还要定义<code>/=</code>。我们可以修改一下<code>Eq</code>的定义，来为<code>/=</code>定义一个默认实现模式。</p>
<pre class="language-haskell line-numbers match-braces"><code>class Eq a where
  (==) :: a -&gt; a -&gt; Bool
  (/=) :: a -&gt; a -&gt; Bool
  x /= y = not (x == y)</code></pre>
<p>这样就可以仅定义<code>==</code>，由默认实现模式去生成<code>/=</code>的定义。实际上<code>Eq</code>的定义如下：</p>
<pre class="language-haskell line-numbers match-braces"><code>class Eq a where
  (==), (/=) :: a -&gt; a -&gt; Bool
  x == y = not (x /= y)
  x /= y = not (x == y)</code></pre>
<p>这个定义可以使我们只用定义<code>==</code>与<code>/=</code>中的任意一个，但要小心，如果我们一个也没定义就会导致一个无限循环。</p>
<p>对于<code>Eq</code>与其它几个比较特殊的类型类，GHC可以为我们自动生成它们的实例，就像我们之前使用过的那样：</p>
<pre class="language-haskell line-numbers match-braces"><code>data Foo&#39; = F&#39; Int | G&#39; Char
  deriving (Eq, Ord, Show)</code></pre>
<h3 id="类型类与面向对象接口">类型类与面向对象接口</h3>
<p>类型类可能看起来与面向对象语言中的接口比较相似，但它更为强大，体现在：</p>
<ol type="1">
<li><p>接口的实例类一但定义就必须实现所有接口，而类型类可以被每个类型自由组合。</p></li>
<li><p>类型类在处理多类型时更为强大，目前Java没有简单的方法可以做到：</p>
<pre class="language-haskell line-numbers match-braces"><code>class Blerg a b where
  blerg :: a -&gt; b -&gt; Bool</code></pre></li>
<li><p>并且类型类可以更方便的处理多元运算，如：</p>
<pre class="language-haskell line-numbers match-braces"><code>class Num a where
  (+) :: a -&gt; a -&gt; a</code></pre>
<p>而在Java或C++中，对多元运算符的重载总是以某一个类型为主，比较尴尬。</p></li>
</ol>
<h3 id="其它标准类型类">其它标准类型类</h3>
<p><code>Ord</code>：确保类型可以被完全排序，在C++中的常见做法是实现<code>&lt;</code>运算符。</p>
<p><code>Num</code>：数字类型，使得类型可以进行加减法等运算。一个非常重要的事情是，数字常量也是类型类多态：</p>
<pre class="language-haskell line-numbers match-braces"><code>Prelude&gt; :t 5
5 :: Num a =&gt; a</code></pre>
<p>这意味着5可以被用作任何数字类型，包括自己定义的类型。</p>
<p><code>Show</code>：定义模式show，将值转换为<code>String</code>类型。</p>
<p><code>Read</code>：<code>Show</code>的逆运算。</p>
<p><code>Integral</code>：表示整数类型，如<code>Int</code>和<code>Integer</code>。</p>
<h3 id="类型类实例">类型类实例</h3>
<p>这一节我们来定义一个自己的类型类，如下：</p>
<pre class="language-haskell line-numbers match-braces"><code>class Listable a where
  toList :: a -&gt; [Int]</code></pre>
<p><code>Listable</code>类型类表示可以转换为<code>Int</code>列表的类型。首先，<code>Int</code>和<code>Bool</code>都可以简单的转换为一个只有一个元素的列表：</p>
<pre class="language-haskell line-numbers match-braces"><code>instance Listable Int where
  toList x = [x]

instance Listable Bool where
  toList True = [1]
  toList False = [0]</code></pre>
<p>我们无需对<code>[Int]</code>类型进行转换：</p>
<pre class="language-haskell line-numbers match-braces"><code>instance Listable [Int] where
  toList = id</code></pre>
<p>最后，我们也可以将一个自定义类型转换为<code>[Int]</code>列表：</p>
<pre class="language-haskell line-numbers match-braces"><code>data Tree a = Empty | Node a (Tree a) (Tree a)

instance Listable (Tree Int) where
  toList Empty = []
  toList (Node x l r) = toList l ++ [x] ++ toList r</code></pre>
<p>我们可以使用<code>Listable</code>的特性定义其它函数，如：</p>
<pre class="language-haskell line-numbers match-braces"><code>sumL :: Listable a =&gt; a -&gt; Int
sumL x = sum (toList x)</code></pre>
<p><code>sumL</code>只为<code>Listable</code>类型工作，那么下面的函数呢？</p>
<pre class="language-haskell line-numbers match-braces"><code>foo x y = sum (toList x) == sum (toList y) || x &lt; y</code></pre>
<p><code>foo</code>的类型为：</p>
<pre class="language-haskell line-numbers match-braces"><code>foo :: (Listable a, Ord a) =&gt; a -&gt; a -&gt; Bool</code></pre>
<p>即它的参数类型必须同时是<code>Listable</code>和<code>Ord</code>的实例。</p>
<p>最后，来看一个复杂点的实例：</p>
<pre class="language-haskell line-numbers match-braces"><code>instance (Listable a, Listable b) =&gt; Listable (a, b) where
  toList (x, y) = toList x ++ toList y</code></pre>
<p>只要类型变量在函数定义中，我们就可以为它指定类型类。注意，这个函数并不是递归函数，调用的<code>toList x</code>与<code>toList y</code>是其它类型的实例，而不是该函数本身。</p>]]></content>
    </entry>
    <entry>
        <title type="html"><![CDATA[从零开始的Haskell（四）——高阶编程与类型接口]]></title>
        <id>https://xilong.site/post/Haskell_from_0_to_1_4_Higher-order_Programming_and_Type_Inference.html</id>
        <link rel="alternate" type="text/html" href="https://xilong.site/post/Haskell_from_0_to_1_4_Higher-order_Programming_and_Type_Inference.html" />
        <updated>2021-09-06T00:00:00Z</updated>
        <!-- Every post here opens with an abstract, which is what
             `abstract` holds and what `content` therefore starts after.
             A feed carries the whole article, so it needs both, in the
             order the page itself shows them. -->
        <content type="html"><![CDATA[<p>不幸遭遇飞机延误，候机室写下系列第四篇，主题是高阶编程与类型接口。</p>
<h2 id="匿名函数lambda表达式">匿名函数（lambda表达式）</h2>
<p>设想一下这样的函数，功能仅仅是简单的：保留数列中大于100的数。如：</p>
<pre class="language-haskell line-numbers match-braces"><code>greaterThan100 :: [Integer] -&gt; [Integer]
greaterThan100 [1,2,300,4,245] = [300,245]</code></pre>
<p>我们可以使用很棒的方法实现：</p>
<pre class="language-haskell line-numbers match-braces"><code>gt100 :: Integer -&gt; Bool
gt100 x = x &gt; 100

greaterThan100 :: [Integer] -&gt; [Integer]
greaterThan100 xs = filter gt100 xs</code></pre>
<p>但我们可能并不希望定义<code>gt100</code>这样的只使用一次的函数。此时就可以使用lambda表达式来代替<code>gt100</code>：</p>
<pre class="language-haskell line-numbers match-braces"><code>greaterThan100_new :: [Integer] -&gt; [Integer]
greaterThan100_new xs = filter (\x -&gt; x &gt; 100) xs</code></pre>
<p>其中<code>\x -&gt; x &gt; 100</code>就是一个lambda表达式，它也可以有多个参数，如：</p>
<pre class="language-haskell line-numbers match-braces"><code>-- 结果为6
(\x y z -&gt; x + y + z) 1 2 3</code></pre>
<p>lambda已经足够简单了，但这个函数还有一种更好的写法：</p>
<pre class="language-haskell line-numbers match-braces"><code>greaterThan100_newer :: [Integer] -&gt; [Integer]
greaterThan100_newer xs = filter (&gt;100) xs</code></pre>
<p>这里的<code>(&gt;100)</code>是一个操作片段，操作片段允许我们使用一个函数的部分调用。对于任意一个二元操作符<code>?</code>：<code>(?y)</code>等价于<code>\x -&gt; x?y</code>；<code>(y?)</code>等价于<code>\x -&gt; y?x</code>。即将缺少的部分作为函数的参数。例如：</p>
<pre class="language-haskell line-numbers match-braces"><code>(&gt;100) 110 -- True
(100&gt;) 110 -- False
map (*2) [1,2,3] -- [2,4,6]</code></pre>
<h2 id="函数组成">函数组成</h2>
<p>试写出一个类型为<code>(b -&gt; c) -&gt; (a -&gt; b) -&gt; (a -&gt; c)</code>的函数。首先我们能知道这个函数的两个参数都是函数，并且该函数的返回值也是一个函数。首先我们给出类型签名：</p>
<pre class="language-haskell line-numbers match-braces"><code>foo :: (b -&gt; c) -&gt; (a -&gt; b) -&gt; (a -&gt; c)</code></pre>
<p>试着写出函数的参数：</p>
<pre class="language-haskell line-numbers match-braces"><code>foo f g = ...</code></pre>
<p>由于返回值是一个函数，我们可以使用lambda表达式来实现：</p>
<pre class="language-haskell line-numbers match-braces"><code>foo f g = \x -&gt; ...</code></pre>
<p>根据类型签名可以看出<code>x</code>先由<code>g</code>处理再由<code>f</code>处理就得到了类型为<code>c</code>的值，因此有：</p>
<pre class="language-haskell line-numbers match-braces"><code>foo f g = \x -&gt; f (g x)</code></pre>
<p>思考一下，这个函数有什么用？答案是组合两个函数。Haskell中这样的操作是非常常用的，因此语言内置了这个操作，用操作符<code>.</code>表示，上式可写为：<code>f.g</code>。</p>
<p>题外话，在引入了函数式范式后，C++也能实现类似操作了（什么叫头号粉丝啊，战术后仰.jpg）：</p>
<pre class="language-cpp line-numbers match-braces"><code>#include &lt;functional&gt;

using std::function;

template&lt;typename a, typename b, typename c&gt;
function&lt;c(a)&gt; foo(const function&lt;c(b)&gt; &amp;f, const function&lt;b(a)&gt; &amp;g) {
    return [f, g](a x) {
        return f(g(x));
    };
}</code></pre>
<p>可见C++在这方面已经挺不错了，不过与真正的函数式编程语言相比仍有些距离。</p>
<p>言归正传，<code>.</code>操作乍看起来好像没什么用，但下面这个例子会为其用途提供一个有力的说明：</p>
<pre class="language-haskell line-numbers match-braces"><code>test :: [Integer] -&gt; Bool
test xs = even (length (greaterThan100 xs))
-- 可以写作
test&#39; :: [Integer] -&gt; Bool
test&#39; = even.length.greaterThan100</code></pre>
<p>去掉了层层叠叠的括号和有些累缀的参数后，看起来优雅多了。<code>.</code>运算将函数<code>test'</code>的定义表示为了几个小函数的组合。接下来让我们再看看<code>.</code>运算：</p>
<pre class="language-haskell line-numbers match-braces"><code>Prelude&gt; :t (.)
(.) :: (b -&gt; c) -&gt; (a -&gt; b) -&gt; a -&gt; c</code></pre>
<p>疑点出现了：返回值为什么不是<code>(a -&gt; c)</code>?</p>
<h2 id="柯里化">柯里化</h2>
<p>回顾我们的函数定义，如：</p>
<pre class="language-haskell line-numbers match-braces"><code>f :: Int -&gt; Int -&gt; Int
f x y = 2*x + y</code></pre>
<p>还记得之前说过使用连续的<code>-&gt;</code>作为参数与返回值的声明背后有非常<del>暖心</del>优雅的理由吗？现在就是揭晓谜底的时刻了，先说结论：<strong>Haskell中的任何函数都接收一个参数</strong>。等等，难道上面刚定义的函数<code>f</code>不是接收了<code>x</code>和<code>y</code>两个参数吗？确实不是，实际上<code>f</code>是接收<code>x</code>作为参数，同时返回一个<code>Int -&gt; Int</code>型的函数，<code>y</code>是作为这个返回函数的参数被接收的。实际上就是lambda演算，之后会单独写一篇文章介绍lambda演算。也就是说，函数<code>f</code>的定义等价于：</p>
<pre class="language-haskell line-numbers match-braces"><code>f :: Int -&gt; (Int -&gt; Int)</code></pre>
<p>由于<code>-&gt;</code>符合右结合律，因此上式括号可以不写。这也解释了上一节末尾的疑问。同时，函数调用符合左结合律，因此：</p>
<pre class="language-haskell line-numbers match-braces"><code>f x y = ((f x) y)</code></pre>
<p>思考一下，<code>f x</code>的类型是一个<code>Int -&gt; Int</code>型的函数，而表达式中这个函数又接受了<code>y</code>返回一个<code>Int</code>。整个运算过程就是将参数逐个输入到对应的函数中，因此使用<code>-&gt;</code>符号来声明函数再贴切不过了。</p>
<h2 id="函数的部分应用">函数的部分应用</h2>
<p>函数的部分调用本质上就是对柯里化的应用，但永远记住每个函数本质上只有一个参数，因此我们<strong>只能对函数的第一个参数进行部分应用</strong>。唯一的例外是中缀函数，正如之前的例子所示，可以对中缀函数两个参数中的任何一个进行部分应用。</p>
<p>由于只能对第一个参数进行部分应用，因此我们的参数顺序应该遵循由普通到特殊的规则。即最容易相同的参数放在最前面。</p>
<h2 id="全麦编程">全麦编程</h2>
<p>记得一开始介绍过的全麦编程概念吗？站在整体的角度思考问题，考虑如何处理整个列表而不是处理列表中的元素，就像全麦面粉一样，直接对麦子打粉而不考虑脱壳。现在是时候体会下全麦风格的威力了，考虑下面程序：</p>
<pre class="language-haskell line-numbers match-braces"><code>foobar :: [Integer] -&gt; Integer
foobar [] = 0
foobar (x:xs)
    | x &gt; 3 = (7 * x + 2) + foobar xs
    | otherwise = foobar xs</code></pre>
<p>这个程序的功能看起来很直观，但并不是良好的Haskell风格，主要存在两点问题：</p>
<ol type="1">
<li>一个程序同时处理了过多的事务。</li>
<li>代码工作得太底层了。</li>
</ol>
<p>我们可以将其功能实现为：</p>
<pre class="language-haskell line-numbers match-braces"><code>foobar&#39; :: [Integer] -&gt; Integer
foobar&#39; = sum . map (\x -&gt; 7 * x + 2) . filter (&gt;3)</code></pre>
<p>这样的实现将很多只做好一件事的小函数组合起来，使得函数更加清晰与直观。</p>
<h2 id="折叠">折叠</h2>
<p>增加了许多知识后，我们可以讨论上一节中被搁置的折叠操作了。先来直观体会折叠操作：</p>
<pre class="language-haskell line-numbers match-braces"><code>sum&#39; :: [Integer] -&gt; Integer
sum&#39; [] = 0
sum&#39; (x:xs) = x + sum&#39; xs

product&#39; :: [Integer] -&gt; Integer
product&#39; [] = 1
product&#39; (x:xs) = x * product&#39; xs

length&#39; :: [a] -&gt; Int
length&#39; [] = 0
length&#39; (x:xs) = 1 + length&#39; xs</code></pre>
<p>这三个函数的共性是什么？是通过某种方式将元素们组合成一个最终结果。我们可以将其抽象为：</p>
<pre class="language-haskell line-numbers match-braces"><code>fold :: b -&gt; (a -&gt; b -&gt; b) -&gt; [a] -&gt; b
fold z f [] = z
fold z f (x:xs) = f x (fold z f xs)</code></pre>
<p>此时函数运算过程可以做如下展开：</p>
<pre class="language-haskell line-numbers match-braces"><code>fold z f [a,b,c] == f a (f b (f c z))
-- 写成中缀形式可能更好理解
fold z f [a,b,c] == a `f` (b `f` (c `f` z))</code></pre>
<p>看出来了吗？<code>fold</code>函数是把一个列表最右边的两个元素进行组合，并使用组合后的元素代替原来的两个函数，直到列表为空。</p>
<p>有了这个函数，之前的几个函数就可以写为：</p>
<pre class="language-haskell line-numbers match-braces"><code>sum&#39;&#39; = fold 0 (+)
product&#39;&#39; = fold 1 (*)
length&#39;&#39; = fold 0 (\_ s -&gt; s + 1)</code></pre>
<p>观察<code>\_ s -&gt; s + 1</code>，可以消去两边的<code>s</code>，化为<code>\_ -&gt; (+1)</code>。</p>
<p>另一种思路是使用<code>const</code>函数。<code>const</code>函数的类型为<code>a-&gt;b-&gt;a</code>，效果是输入两个参数，并返回第一个参数作为结果（即丢弃第二个参数），和C++的const关键字完全不是一回事。</p>
<p><code>\_ s -&gt; s + 1</code>的作用显然是丢弃第一个参数，并返回第二个参数+1后的值。可写为<code>const (+1)</code>。</p>
<p>解说一下：<code>const (+1)</code>是一个对<code>const</code>的部分应用，即使用<code>(+1)</code>作为<code>const</code>的第一个参数，此时这个部分应用变成了接受一个参数并返回<code>(+1)</code>的函数。不要忘记<code>(+1)</code>本身也是一个部分应用，其类型为<code>a -&gt; a</code>，则<code>const (+1)</code>的类型就是<code>b -&gt; a -&gt; a</code>。符合了我们<code>fold</code>函数对参数<code>f</code>的要求。</p>
<p>具体举例，对于<code>f 2 3</code>，有：</p>
<pre class="language-haskell line-numbers match-braces"><code>-- f = \_ s -&gt; s + 1
f 2 3 == 3 + 1 == 4
-- f = \_ -&gt; (+1)
f 2 3 == (+1) 3 == 4
-- f = const (+1)
f 2 3 == const (+1) 2 3 == (+1) 3 == 4</code></pre>
<p>作为一个常用的函数，<code>fold</code>在<code>Prelude</code>中当然也有定义，即为<code>foldr</code>。<code>Prelude</code>中依赖于<code>foldr</code>定义的函数有：</p>
<pre class="language-haskell line-numbers match-braces"><code>length :: [a] -&gt; Int
sum :: Num a =&gt; [a] -&gt; a
product :: Num a =&gt; [a] -&gt; a
and :: [Bool] -&gt; Bool
or :: [Bool] -&gt; Bool
any :: (a -&gt; Bool) -&gt; [a] -&gt; Bool
all :: (a-&gt; Bool) -&gt; [a] -&gt; Bool</code></pre>
<p>你可能会对<code>=&gt;</code>感到陌生，这个符号我们会在下一节进行介绍。</p>
<p>还有一个<code>foldl</code>函数，表示从左边折叠，与<code>foldr</code>的区别如下：</p>
<pre class="language-haskell line-numbers match-braces"><code>foldr f z [a,b,c] = a `f` (b `f` (c `f` z))
foldl f z [a,b,c] = ((z `f` a) `f` b) `f` c</code></pre>
<p>注意<code>foldr</code>和<code>foldl</code>的参数顺序与我们的<code>fold</code>函数不同。</p>
<p>一般来说我们还可以使用<code>Data.List</code>模块中的<code>foldl'</code>函数，它是<code>foldl</code>的一个更高性能的实现。</p>]]></content>
    </entry>
    <entry>
        <title type="html"><![CDATA[从零开始的Haskell（三）——递归模式、多态和Prelude]]></title>
        <id>https://xilong.site/post/Haskell_from_0_to_1_3_Recursion_patterns_polymorphism_and_the_Prelude.html</id>
        <link rel="alternate" type="text/html" href="https://xilong.site/post/Haskell_from_0_to_1_3_Recursion_patterns_polymorphism_and_the_Prelude.html" />
        <updated>2021-09-03T00:00:00Z</updated>
        <!-- Every post here opens with an abstract, which is what
             `abstract` holds and what `content` therefore starts after.
             A feed carries the whole article, so it needs both, in the
             order the page itself shows them. -->
        <content type="html"><![CDATA[<p>这是系列的第三篇，主要对Haskell中的递归模式、多态性和Prelude进行介绍。学习本篇内容可以大幅减少代码的重复现象。</p>
<p>之前的学习可能会使你产生Haskell程序员会花费大量的时间去编写复杂的递归函数。其实有经验的Haskell程序员几乎不使用递归函数。</p>
<p>为什么会这样呢？因为递归函数实质上是对递归模式的反复处理。通过将这些递归的模式抽象出来，封装成库，就使得程序员免于过多的与底层细节纠缠，从而在更高的层次进行思考——这就是全麦编程思想的目标。</p>
<h2 id="递归模式">递归模式</h2>
<p>一个关于<code>Int</code>类型的列表可以定义为：</p>
<pre class="language-haskell line-numbers match-braces"><code>data IntList = Empty | Cons Int IntList
  deriving Show</code></pre>
<p>我们可能对这个列表进行哪些操作呢？可能有这些：</p>
<ul>
<li>对每一个元素分别进行某种操作。</li>
<li>基于某种判断保留列表中的一些元素并抛弃其它元素。</li>
<li>通过某种方式对列表中的元素进行“概括”，如获取所有元素的最大值，总和，乘积等。</li>
</ul>
<h3 id="映射map">映射（Map）</h3>
<p>考虑第一种操作，对每个元素进行特定操作，即为映射操作。比如对每个元素取绝对值，可以写成如下形式：</p>
<pre class="language-haskell line-numbers match-braces"><code>absAll :: IntList -&gt; IntList
absAll Empty = Empty
absAll (Cons x xs) = Cons (abs x) (absAll xs)</code></pre>
<p>如果要对每个元素做平方运算呢？可以写成如下形式：</p>
<pre class="language-haskell line-numbers match-braces"><code>squareAll :: IntList -&gt; IntList
squareAll Empty = Empty
squareAll (Cons x xs) = Cons (x*x) (squareAll xs)</code></pre>
<p>有没有发现些许违和感？是的，这两个函数实在太像了，看起来非常啰嗦。我们可以用一个<code>Int-&gt;Int</code>类型的函数来指定这些操作，并且使用一个接受对应参数的函数来处理列表：</p>
<pre class="language-haskell line-numbers match-braces"><code>square :: Int -&gt; Int
square x = x * x

mapIntList :: (Int -&gt; Int) -&gt; IntList -&gt; IntList
mapIntList _ Empty = Empty
mapIntList func (Cons x xs) = Cons (func x) (mapIntList func xs)</code></pre>
<p>此时就可以通过：</p>
<pre class="language-haskell line-numbers match-braces"><code>-- list是一个IntList
mapIntList abs list
mapIntList square list</code></pre>
<p>来分别实现<code>absAll</code>和<code>squareAll</code>的功能了。</p>
<h3 id="筛选filter">筛选（Filter）</h3>
<p>考虑第二种操作，即通过某种判断保留列表中的一些元素并抛弃其它元素，即为筛选。比如仅保留列表中的偶数：</p>
<pre class="language-haskell line-numbers match-braces"><code>evenOnly :: IntList -&gt; IntList
evenOnly Empty = Empty
evenOnly (Cons x xs)
    | even x = Cons x (evenOnly xs)
    | otherwise = evenOnly xs</code></pre>
<p>同样，我们可以对这种操作进行抽象，令它成为一个接受<code>(Int -&gt; Bool)</code>类型与<code>IntList</code>类型参数的函数：</p>
<pre class="language-haskell line-numbers match-braces"><code>filterIntList :: (Int -&gt; Bool) -&gt; IntList -&gt; IntList
filterIntList _ Empty = Empty
filterIntList func (Cons x xs)
    | func x = Cons x (filterIntList func xs)
    | otherwise = filterIntList func xs</code></pre>
<p>此时即可通过下面代码实现<code>evenOnly</code>的功能了：</p>
<pre class="language-haskell line-numbers match-braces"><code>-- list是一个IntList
filterIntList even list</code></pre>
<h3 id="折叠fold">折叠（Fold）</h3>
<p>第三种操作，获取一个列表的某种“概括”，即为折叠操作。我们将在下一篇对折叠操作进行详细讨论。</p>
<h2 id="多态">多态</h2>
<p>通过上一节递归模式的抽象，我们可以漂亮的处理对<code>Int</code>列表的映射与筛选了。然而，我们要如何处理一个<code>Integer</code>、<code>Bool</code>、<code>String</code>甚至是<code>一个String的栈的树的列表的列表</code>的列表呢？如果为每个类型都写出对应的实现，那么你会发现除了操作的类型外这些函数完全一样。为了解决这个问题，我们需要使用Haskell中的多态。</p>
<h3 id="多态的数据类型">多态的数据类型</h3>
<pre class="language-haskell line-numbers match-braces"><code>data List t = E | C t (List t)</code></pre>
<p>这里的<code>t</code>叫做类型变量，可以表示任何类型，<strong>类型变量必须以小写字母开头</strong>。</p>
<h3 id="多态函数">多态函数</h3>
<p>有了多态的数据类型，我们就可以写出多态的函数了。比如一个接收任何类型列表的折叠：</p>
<pre class="language-haskell line-numbers match-braces"><code>filterList _ E = E
filterList func (C x xs)
    | func x = C x (filterList func xs)
    | otherwise = filterList func xs</code></pre>
<p>那么filterList的类型是什么呢？通过ghci查询结果如下：</p>
<pre class="language-haskell line-numbers match-braces"><code>:t filterList
filterList :: (t -&gt; Bool) -&gt; List t -&gt; List t</code></pre>
<p>可见一个多态数据类型在使用时也要接受一个类型变量作为参数。如：</p>
<pre class="language-haskell line-numbers match-braces"><code>a :: List Bool
a = C True (C False (C True E))</code></pre>
<h2 id="prelude">Prelude</h2>
<p><a href="https://hackage.haskell.org/package/base-4.15.0.0/docs/Prelude.html">Prelude</a>是一个所有Haskell程序都默认包括的模块，定义了很多常用的多态数据类型和多态函数。例如<code>filter</code>和<code>map</code>就是<code>filterList</code>和<code>map</code>在<code>Prelude</code>中的对应版本。另外，<code>Data.List</code>模块中定义了大量其它处理列表的函数。</p>
<p>此外，一个常用的多态数据类型是<code>Maybe</code>，定义为：</p>
<pre class="language-haskell line-numbers match-braces"><code>data Maybe a = Nothing | Just a</code></pre>
<p>一个<code>Maybe</code>类型可以是<code>Nothing</code>或一个类型的值，模块<code>Data.Maybe</code>中定义了关于<code>Maybe</code>的操作。</p>
<h2 id="全函数与偏函数">全函数与偏函数</h2>
<p>考虑一个<code>[a] -&gt; a</code>类型的函数，如<code>head</code>。它返回一个列表的首元素，如果它接受一个空列表，就会出错。这样无法处理所有合法参数的函数，就被称为偏函数。对应地，一个无论参数取值如何都能正常工作的函数称为全函数。</p>
<h3 id="偏函数转化为全函数">偏函数转化为全函数</h3>
<p>比如<code>head</code>的实现如下：</p>
<pre class="language-haskell line-numbers match-braces"><code>head :: [a] -&gt; a
head (x : _) = x</code></pre>
<p><code>head</code>作为一个不安全的函数是不应该出现在<code>Prelude</code>里的，这是一个失误。我们应该尽可能地不用偏函数。如果要将head转化为一个全函数，只需使用上面的<code>Maybe</code>：</p>
<pre class="language-haskell line-numbers match-braces"><code>headSafe :: [a] -&gt; Maybe a
headSafe [] = Nothing
headSafe (x : _) = Just x</code></pre>
<p>尽可能地使用全函数可以大大减少我们犯错的可能。</p>]]></content>
    </entry>
    <entry>
        <title type="html"><![CDATA[C 结构体内存对齐]]></title>
        <id>https://xilong.site/post/C_Memory_Alignment_of_Struct.html</id>
        <link rel="alternate" type="text/html" href="https://xilong.site/post/C_Memory_Alignment_of_Struct.html" />
        <updated>2021-08-11T00:00:00Z</updated>
        <!-- Every post here opens with an abstract, which is what
             `abstract` holds and what `content` therefore starts after.
             A feed carries the whole article, so it needs both, in the
             order the page itself shows them. -->
        <content type="html"><![CDATA[<p>梳理一下结构体的内存对齐规则</p>
<h2 id="内存对齐是什么为什么要进行内存对齐">内存对齐是什么？为什么要进行内存对齐？</h2>
<p>现代计算机以字节为单位划分内存空间，但大多不是以字节为单位存取内存的。一次存取往往涉及多个字节，这个大小称为存取粒度。存取粒度通常与系统有关，如32位系统存取粒度大多为4字节，而64位系统的存取粒度大多为8字节。</p>
<p>对于这个结构体：</p>
<pre class="language-c line-numbers match-braces"><code>struct foo {
    char c;
    int  a; // 假定int占用4字节
};</code></pre>
<p>可以看出，它的成员大小总和为5字节。但通常这个结构体的大小会被填充到8字节。原因如下：</p>
<p>考虑不对齐字节的情况，如果结构体地址为0x00，则c的地址为0x00，a的地址为0x01。此时一个存取粒度为4字节的机器要取出a，需要以下几步。</p>
<pre class="language-none line-numbers match-braces"><code>┌─┬────┐        1.取地址0x00开始的4字节，并保留需要的数据0x01、0x02、0x03
│c│a   │        2.取地址0x04开始的4字节，并保留需要的数据0x04
└─┴────┘        3.将上两步获取的数据合并，计算出a的值
 0|1234</code></pre>
<p>这样的过程对计算机来说是很麻烦的，而如果进行字节对齐，则结构体地址和c的地址依然是0x00，而a的地址移到了0x04，此时一个存取粒度为4字节的机器可以直接取出a的值。</p>
<pre class="language-none line-numbers match-braces"><code>┌───────┬───────┐    直接取地址0x04开始的4字节即可取出a的值。
│c      │a      │
└───────┴───────┘
0 1 2 3 4 5 6 7</code></pre>
<p>由此不难看出，所谓的内存对齐就是为了便于机器存取而根据存取粒度对内存布局的调整。</p>
<h2 id="内存对齐的规则">内存对齐的规则</h2>
<h3 id="规则1结构体内部成员的地址一定是自身大小的整数倍否则就进行对齐">规则1：结构体内部成员的地址一定是自身大小的整数倍，否则就进行对齐。</h3>
<p>比如上面的例子中，int类型大小为4字节，而0x01并不是4字节的整数倍，因此对齐到0x04。</p>
<p>考虑下面结构体：</p>
<pre class="language-c line-numbers match-braces"><code>struct foo1 {
    int  a; // 假定int为4字节
    char c;
};</code></pre>
<p>根据规则1：a的地址为0x00，不需对齐；c的地址为0x04，是char类型大小的整数倍，也不需对齐。于是该结构体的大小应当是5字节。</p>
<p>但此时，对于数组：</p>
<pre class="language-c line-numbers match-braces"><code>foo1 arr[2];</code></pre>
<p>其内存布局为如下，此时若想取出<code>arr[1].a</code>，则有：</p>
<pre class="language-none line-numbers match-braces"><code>┌───────┬─┬──────┬─┐    1.由于arr[1].a的地址为0x05，则需要先取出0x04开始的4个字节，
│a      │c│a     │c│      并保留0x05、0x06、0x07。
└───────┴─┴──────┴─┘    2.然后取出0x08开始的4字节，并保留0x08
0 1 2 3 4 5 6 7 8 9     3.将上两步数据合并计算出arr[1].a的值。</code></pre>
<p>这又回到了没有对齐的情况了，因此为了避免这种情况，引入了规则2：</p>
<h3 id="规则2结构体的大小为其最大成员大小的整数倍若其最大成员大小大于存取粒度则结构体的大小为存取粒度的整数倍否则就在结构体末尾补齐">规则2：结构体的大小为其最大成员大小的整数倍，若其最大成员大小大于存取粒度，则结构体的大小为存取粒度的整数倍，否则就在结构体末尾补齐。</h3>
<p>在此规则下，结构体foo1的大小应为8字节。需要注意，结构体中最大成员并不包括结构体成员，如：</p>
<pre class="language-c line-numbers match-braces"><code>// 假定int占4字节
struct byte8 {
    int a;
    int b;
};

struct foo2 {
    byte8 a;
    char  b;
};

struct foo3 {
    long long a;
    char b;
};</code></pre>
<p>此时foo2的最大成员并不是看做整体的byte8的8字节，而是byte8与foo2中的基础成员中的最大成员，此处为int。因此foo2对4字节对齐，大小为12字节。而foo3的最大成员为long long，对8字节对齐，大小为16字节。</p>]]></content>
    </entry>
    <entry>
        <title type="html"><![CDATA[CMakeLists.txt编写入门]]></title>
        <id>https://xilong.site/post/Quick_Start_with_CMakeListstxt.html</id>
        <link rel="alternate" type="text/html" href="https://xilong.site/post/Quick_Start_with_CMakeListstxt.html" />
        <updated>2021-08-02T00:00:00Z</updated>
        <!-- Every post here opens with an abstract, which is what
             `abstract` holds and what `content` therefore starts after.
             A feed carries the whole article, so it needs both, in the
             order the page itself shows them. -->
        <content type="html"><![CDATA[<p>整理一下CMakeLists的相关知识。</p>
<h2 id="语法">语法</h2>
<p>听说CMake已经被证明图灵完备了，不过它的语法还是很简单的，由命令、变量和注释组成。</p>
<p>注释：以<code>#</code>开头的行即为注释。</p>
<p>命令：包括命令名和一个括号括起来的参数列表。形式如下：</p>
<pre class="language-Cmake line-numbers match-braces"><code>command(arg1 arg2 ...) # 参数以空格分隔</code></pre>
<p>变量：由命令生成或CMake环境定义，使用<code>$</code>和<code>{}</code>来引用变量：</p>
<pre class="language-cmake line-numbers match-braces"><code>${SOMEVAR} # 变量的值
SOMEVAR    # 字面值</code></pre>
<p>CMakeList.txt是逐行解析的，因此变量的定义应在使用之前。</p>
<p>好了，现在你已经学会CMake了。了解几个常用命令和变量就可以使用了。</p>
<h2 id="基础命令与变量">基础命令与变量</h2>
<p><code>cmake_minimum_required(&lt;version&gt;)</code>：指定CMake的最小版本号。</p>
<p><code>project(&lt;name&gt;)</code>：指定工程名称。</p>
<p><code>include_directories(&lt;dir1&gt; &lt;dir2&gt; ...)</code>：指定include目录。</p>
<ul>
<li>变量<code>CMAKE_SOURCE_DIR</code>：表示工程顶层目录。</li>
</ul>
<p><code>aux_source_directory(&lt;dir&gt; &lt;var&gt;)</code>：将一个目录中所有源文件赋予一个变量。</p>
<p><code>add_executable(&lt;target&gt; &lt;source1&gt; &lt;source2&gt; ...)</code>：构建可执行文件，第一个参数为文件名称，后面的参数为源文件列表。</p>
<p>有了这几条命令，我们就可以编写一个能用的CMakeList.txt文件了：</p>
<pre class="language-cmake line-numbers match-braces"><code>cmake_minimum_required(3.1)
project(HelloWorld)
include_directories(${CMAKE_SOURCE_DIR}/include)
aux_source_directory(${CMAKE_SOURCE_DIR}/src DIR_SRC)
add_executable(helloworld ${DIR_SRC})</code></pre>
<h2 id="控制流命令">控制流命令</h2>
<ul>
<li>if</li>
</ul>
<pre class="language-cmake line-numbers match-braces"><code>if(condition)
...
elseif(condition)
...
else()
...
endif()</code></pre>
<ul>
<li>while</li>
</ul>
<pre class="language-cmake line-numbers match-braces"><code>while(condition)
...
endwhile()</code></pre>
<ul>
<li>foreach</li>
</ul>
<pre class="language-cmake line-numbers match-braces"><code>foreach(var arg1 arg2 ...)
...
endforeach(var)</code></pre>
<h2 id="常用命令">常用命令</h2>
<p><code>set(var value)</code>：为变量赋值。</p>
<p><code>add_definitions(-Dxxxx1 -Dxxxx2 ...)</code>：向编译器添加-D定义，此时代码内的<code>#ifdef xxxx ... #endif</code>代码块生效。</p>
<p><code>add_dependencies(target-name depend-target1 ...)</code>：添加依赖目标。</p>
<p><code>add_library(name [STATIC|SHARED] src1 src2...)</code>：创建库，如果未指定库类型则默认构建STATIC库，可以通过定义变量<code>BUILD_SHARED_LIBS</code>改为默认构建SHARED库。</p>
<p><code>target_link_libraries(target-name lib1 lib2 ...)</code>：为target链接库。</p>
<p><code>add_subdirectory(subdir)</code>：添加子目录，使用子目录的CMakeLists.txt构建子目录中的文件。</p>
<p><code>add_test(testname execname arg1 arg2...)</code>：添加测试，execname可以是任何可执行文件的名称。在生成makefile后可以使用<code>make test</code>来进行测试。</p>
<p><code>enable_testing()</code>：开启测试开关，没有这条指令则任何add_test指令都是无效的。</p>
<p><code>find_library(var NAMES name1 name2 ... PATHS path1 path2 ...)</code>：在path中查找基础名称为name的库，并将其完整路径赋予变量var。</p>
<p><code>find_path(var file path1 path2 ...)</code>：在path中查找file，并将path路径赋予变量var。</p>
<h2 id="常用变量">常用变量</h2>
<p><code>CMAKE_BINARY_DIR</code> = <code>PROJECT_BINARY_DIR</code> = <code>&lt;projectname&gt;_BINARY_DIR</code>：可执行文件生成目录。</p>
<p><code>CMAKE_SOURCE_DIR</code> = <code>PROJECT_SOURCE_DIR</code> = <code>&lt;projectname&gt;_SOURCE_DIR</code>：工程顶层目录。</p>
<p><code>CMAKE_CURRENT_SOURCE_DIR</code>：当前文件（可以是子文件夹的CMakeLists.txt）所在目录。</p>
<p><code>CMAKE_CURRENT_BINARY_DIR</code>：当前文件产生的可执行文件目录。</p>
<p><code>CMAKE_CURRENT_LIST_FILE</code>：调用此变量的CMakeLists.txt的完整路径。</p>
<p><code>CMAKE_CURRENT_LIST_LINE</code>：此变量所在的行。</p>
<p><code>CMAKE_MODULE_PATH</code>：模块的路径。</p>
<p><code>EXECUTABLE_OUTPUT_PATH</code>：可执行文件的存放路径。</p>
<p><code>LIBRARY_OUTPUT_PATH</code>：库文件的存放路径。</p>
<p><code>CMAKE_MAJOR_VERSION</code>：主版本号。</p>
<p><code>CMAKE_MINOR_VERSION</code>：次版本号。</p>
<p><code>CMAKE_PATCH_VERSION</code>：补丁等级。</p>
<p><code>CMAKE_SYSTEM</code>：系统名称。</p>
<p><code>CMAKE_SYSTEM_NAME</code>：不含版本的系统名。</p>
<p><code>CMAKE_SYSTEM_PROCESSOR</code>：处理器名称。</p>
<p><code>UNIX</code>：在unix环境下为TRUE。</p>
<p><code>WIN32</code>：在win32环境下为TRUE。</p>]]></content>
    </entry>
    <entry>
        <title type="html"><![CDATA[STL容器备忘总结]]></title>
        <id>https://xilong.site/post/STL_Containers_Memo_Summary.html</id>
        <link rel="alternate" type="text/html" href="https://xilong.site/post/STL_Containers_Memo_Summary.html" />
        <updated>2021-07-21T00:00:00Z</updated>
        <!-- Every post here opens with an abstract, which is what
             `abstract` holds and what `content` therefore starts after.
             A feed carries the whole article, so it needs both, in the
             order the page itself shows them. -->
        <content type="html"><![CDATA[<p>使用容器总有几个细节记不清，梳理一番以作备忘。</p>
<h2 id="容器类型">容器类型</h2>
<h3 id="顺序容器">顺序容器</h3>
<table>
<thead>
<tr>
<th>顺序容器</th>
<th>描述</th>
</tr>
</thead>
<tbody>
<tr>
<td>vector</td>
<td>可变大小数组，快速随机访问，快速尾部增删。</td>
</tr>
<tr>
<td>deque</td>
<td>双端队列，快速随机访问，快速头尾增删。</td>
</tr>
<tr>
<td>list</td>
<td>双向列表，双向顺序访问，快速任意增删。</td>
</tr>
<tr>
<td>forward_list</td>
<td>单向列表，单向顺序访问，快速任意增删。</td>
</tr>
<tr>
<td>array</td>
<td>固定大小数组，快速随机访问，不可增删。</td>
</tr>
<tr>
<td>string</td>
<td>与vector性质相似，专门保存字符。</td>
</tr>
</tbody>
</table>
<table>
<thead>
<tr>
<th>顺序容器适配器</th>
<th>描述</th>
</tr>
</thead>
<tbody>
<tr>
<td>stack</td>
<td>栈</td>
</tr>
<tr>
<td>queue</td>
<td>队列</td>
</tr>
<tr>
<td>priority_queue</td>
<td>优先队列</td>
</tr>
</tbody>
</table>
<h3 id="关联容器">关联容器</h3>
<table>
<thead>
<tr>
<th>关联容器</th>
<th>描述</th>
</tr>
</thead>
<tbody>
<tr>
<td>map</td>
<td>关联数组，保存key-value对。</td>
</tr>
<tr>
<td>unordered_map</td>
<td>map的无序版本。</td>
</tr>
<tr>
<td>set</td>
<td>只保存key的容器。</td>
</tr>
<tr>
<td>unordered_set</td>
<td>set的无序版本。</td>
</tr>
<tr>
<td>multimap</td>
<td>key可重复出现的map。</td>
</tr>
<tr>
<td>unordered_multimap</td>
<td>multimap的无序版本。</td>
</tr>
<tr>
<td>multiset</td>
<td>key可重复出现的set。</td>
</tr>
<tr>
<td>unordered_multiset</td>
<td>multiset的无序版本。</td>
</tr>
</tbody>
</table>
<p>有序关联容器要求key值类型必须定义&lt;运算符。无序关联容器则要求key值定义==运算符。</p>
<h2 id="容器操作">容器操作</h2>
<h3 id="通用操作">通用操作</h3>
<h4 id="类型别名">类型别名</h4>
<p><code>iterator</code>: 容器的迭代器类型。</p>
<p><code>const_iterator</code>: 迭代器的只读版本。</p>
<p><code>size_type</code>: 无符号整数类型，保存最大容器大小。</p>
<p><code>difference_type</code>: 带符号整数类型，保存两个迭代器间的距离。</p>
<p><code>value_type</code>: 元素类型。</p>
<p><code>reference</code>: 元素的左值类型，含义为value_type&amp;。</p>
<p><code>const_reference</code>: 元素的const左值类型，含义为const value_type&amp;。</p>
<h4 id="构造函数">构造函数</h4>
<p><code>C c;</code>：默认构造函数，构造一个空容器。</p>
<p><code>C c1(c2)</code>：构造c2的拷贝c1。</p>
<p><code>C c(b, e)</code>：构造c并将迭代器b和e之间的元素拷贝到c。</p>
<p><code>C c{a, b, c, d, e...}</code>：列表初始化c。</p>
<h4 id="赋值与swap">赋值与swap</h4>
<p><code>c1 = c2</code>：将c1中的元素替换为c2中的元素。</p>
<p><code>c = {a, b, c, d...}</code>：将c中的元素替换为列表中的元素（array不可用）。</p>
<p><code>a.swap(b)</code>, <code>swap(a, b)</code>：交换a,b中的元素。</p>
<h4 id="大小">大小</h4>
<p><code>c.size()</code>：c中元素数目。</p>
<p><code>c.max_size()</code>：c最大可保存元素数目。</p>
<p><code>c.empty()</code>：c是否为空。</p>
<h4 id="增删元素array不可用">增删元素（array不可用）</h4>
<p><code>c.insert(args)</code>：将args中的元素拷贝进c。</p>
<p><code>c.emplace(inits)</code>：使用inits构造c中的一个元素。inits必需与元素的构造函数匹配。</p>
<p><code>c.erase(args)</code>：删除c中的指定元素。</p>
<p><code>c.clear()</code>：删除c中所有元素，返回void。</p>
<h4 id="关系运算符">关系运算符</h4>
<p><code>==</code>，<code>!=</code>：所有容器都支持。</p>
<p><code>&lt;</code>，<code>&lt;=</code>，<code>&gt;</code>，<code>&gt;=</code>：除无序关联容器外都支持。</p>
<h4 id="获取迭代器">获取迭代器</h4>
<p><code>c.begin()</code>，<code>c.end()</code>：返回首迭代器和尾后迭代器。</p>
<p><code>c.cbegin()</code>，<code>c.cend()</code>：返回const迭代器。</p>
<h4 id="反向迭代器不支持forward_list">反向迭代器(不支持forward_list)</h4>
<p><code>reverse_iterator</code>：按逆序寻址元素的迭代器</p>
<p><code>const_reverse_iterator</code>：反向迭代器的只读版本。</p>
<p><code>c.rbegin()</code>，<code>c.rend()</code>：返回尾迭代器和首前迭代器。</p>
<p><code>c.crbegin()</code>，<code>c.crend()</code>：返回const反向迭代器。</p>
<h3 id="顺序容器操作">顺序容器操作</h3>
<p><strong>总是可以使用两个迭代器的范围表示多个已存在元素，用(n, t)或{a, b, c…}表示多个新元素。将这三种表示方法称为range</strong></p>
<h4 id="构造函数-1">构造函数</h4>
<p><code>C seq(n)</code>：一个包含n个元素的顺序容器。</p>
<p><code>C seq(range)</code>：一个元素为range的顺序容器。</p>
<h4 id="赋值">赋值</h4>
<p><code>seq.assign(range)</code>：将seq中元素替换为迭代器range中的元素，b和e不可指向seq中的元素。</p>
<h4 id="关系运算符-1">关系运算符</h4>
<p>两个大小相等且对位元素相等的顺序容器相等。</p>
<p>顺序容器a是另一个顺序容器b的前缀子序列时，a &lt; b。</p>
<p>否则，以两容器中第一对不相等的元素的大小关系作为结果。</p>
<h4 id="增删元素array不支持">增删元素（array不支持）</h4>
<ul>
<li>forward_list有专有的emplace、insert和erase操作。</li>
<li>forward_list不支持push_back、emplace_back和pop_back。</li>
<li>vector和string不支持push_front、emplace_front和pop_front。</li>
</ul>
<p><code>c.push_back(t)</code>，<code>c.emplace_back(inits)</code>：在尾部创建一个元素。</p>
<p><code>c.push_front(t)</code>，<code>c.emplace_front(inits)</code>：在首部创建一个元素。</p>
<p><code>c.insert(p, t)</code>，<code>c.emplace(p, inits)</code>：在迭代器p位置之前添加一个元素，返回新元素的迭代器。</p>
<p><code>c.insert(p, range)</code>：在p之前添加n个值为t的元素。返回第一个新元素的迭代器。</p>
<p><strong>任何添加操作都会导致指向容器内元素的迭代器、指针和引用失效。</strong></p>
<p><code>c.pop_back()</code>：删除c的尾元素，c为空时UB。</p>
<p><code>c.pop_front()</code>：删除c的首元素，c为空时UB。</p>
<p><code>c.erase(p)</code>：删除迭代器p指向的元素，返回下一个元素的迭代器。p为尾后迭代器时UB。</p>
<p><code>c.erase(b, e)</code>：删除迭代器b, e范围内的所有元素，返回下一个元素的迭代器。</p>
<p><code>c.clear()</code>：删除所有元素，返回void。</p>
<p><strong>删除deque中除首尾元素的任何元素会导致迭代器、指针和引用失效。</strong></p>
<p><strong>删除vector或string中的元素会导致删除点之后的迭代器、指针和引用失效。</strong></p>
<h4 id="访问元素">访问元素</h4>
<ul>
<li>at和下标操作不适用于任何list。</li>
<li>back不适用forward_list。</li>
</ul>
<p><code>c.back()</code>：返回c中尾元素的引用。c为空时UB。</p>
<p><code>c.front()</code>：返回c中首元素的引用。c为空时UB。</p>
<p><code>c[n]</code>，<code>c.at(n)</code>：返回下标为n的元素的引用。[下标]越界UB。at(下标)越界抛出一个out_of_range异常。</p>
<h4 id="改变容器大小">改变容器大小</h4>
<p><code>c.resize(n)</code>：将容器大小调整为n，若缩小则丢弃多余元素，增大则添加新元素。</p>
<p><code>c.resize(n, t)</code>：若增大则添加值为t的新元素。</p>
<h4 id="forward_list特有操作">forward_list特有操作</h4>
<p><code>lst.before_begin()</code>：返回首前迭代器，不可解引用。</p>
<p><code>lst.cbefore_begin()</code>：返回首前迭代器的只读版本。</p>
<p><code>lst_insert_after(p, args)</code>，<code>emplace_after(p, inits)</code>：在p后添加元素，参数形式与通用的insert相同。</p>
<p><code>lst_erase_after(p)</code>，<code>lst_erase_after(p, e)</code>：删除p之后的一个或一段元素，返回下一个位置。</p>
<h4 id="缓存操作">缓存操作</h4>
<p><code>c.shrink_to_fit()</code>：将实际内存占用减少为与size()相同。只适用于vector，string和deque。</p>
<p><code>c.capacity()</code>：已分配的实际内存可以保存多少元素。只适用于vector和string。</p>
<p><code>c.reserve(n)</code>：分配至少能容纳n个元素的空间。只适用于vector和string。</p>
<h4 id="string特有操作">string特有操作</h4>
<h5 id="截取">截取</h5>
<p><code>string s(cp, n)</code>：cp指向数组中前n个字符。</p>
<p><code>string s(s2, pos, len = string::npos)</code>：字符串s2从下标pos开始的len个字符，默认取到s2末尾。下标越界则UB。</p>
<p><code>s.substr(pos = 0, n = s.size() - pos)</code>：返回s从下标pos开始的n个字符的拷贝。</p>
<h5 id="搜索">搜索</h5>
<p>string提供了六个不同的搜索函数，每个函数又有4个重载版本。它们成功时返回匹配位置的下标，失败则返回<code>string::npos</code>。返回数类型都是<code>string::size_type</code>，是无符号整数类型。</p>
<p><code>s.find(args)</code>：args第一次出现的位置。</p>
<p><code>s.rfind(args)</code>：args最后一次出现的位置。</p>
<p><code>s.find_first_of(args)</code>：args中任一字符第一次出现的位置。</p>
<p><code>s.find_last_of(args)</code>：args中任一字符最后一次出现的位置。</p>
<p><code>s.find_first_not_of(args)</code>：第一次出现不属于args中的字符的位置。</p>
<p><code>s.find_last_not_of(args)</code>：最后一次出现不属于args中的字符的位置。</p>
<p>args为以下四种形式之一：</p>
<p><code>c, pos</code>：从pos处开始查找字符c，pos默认为0。</p>
<p><code>str, pos</code>：从pos处开始查找字符串str，pos默认为0。</p>
<p><code>cp, pos</code>：从pos处开始查找C风格字符串指针cp，pos默认为0。</p>
<p><code>cp, pos, n</code>：从pos开始查找指针cp指向的数组的前n个字符。pos和n皆无默认值。</p>
<h5 id="匹配">匹配</h5>
<p><code>s.compare(args)</code>：跟据比较结果等于，小于或大于args，返回0，负数或正数。</p>
<p>args为以下形式之一：</p>
<p><code>s2</code>：与字符串s2比较。</p>
<p><code>pos1, n1, s2</code>：从pos1开始的n1个字符与s2比较。</p>
<p><code>pos1, n1, s2, pos2, n2</code>：从pos1开始的n1个字符与s2中从pos2开始的n2的字符比较。</p>
<p><code>cp</code>：与C风格字符串cp比较。</p>
<p><code>pos1, n1, cp</code>：从pos1开始的n1个字符与cp比较。</p>
<p><code>pos1, n1, cp, n2</code>：从pos1开始的n1个字符与从cp开始的n2个字符比较。</p>
<h5 id="数值转换">数值转换</h5>
<p><code>to_string(val)</code>：返回val的string表示。</p>
<p><code>sto{type}(s, p, b)</code>：返回s起始的子串的数值，由type指定返回值类型。b表示进制，默认为10。p是size_t指针，用来保存第一个非数值字符的下标，默认为0，即不保存下标。type可以为：i (int)、l (long)、ul (unsigned long)、ll (long long)、ull (unsigned long long)。</p>
<p><code>sto{type}(s, p)</code>：基本同上，返回浮点数，不能指定进制。type可以为：f (float)、d (double)、ld (long double)。</p>
<h4 id="容器适配器操作">容器适配器操作</h4>
<p><code>container_type</code>：实现适配器的底层容器类型。</p>
<ul>
<li><p>stack</p>
<p><code>s.pop()</code>：删除栈顶元素。</p>
<p><code>s.push(item)</code>：压入元素item的拷贝或移动。</p>
<p><code>s.emplace(args)</code>：压入由args构造的元素。</p>
<p><code>s.top()</code>：返回栈顶元素。</p></li>
<li><p>queue &amp; priority_queue</p>
<p>// 通用</p>
<p><code>q.pop()</code>：删除queue的首元素或priority_queue最高优先级的元素。</p>
<p><code>q.push(item)</code>：加入元素item的拷贝或移动。</p>
<p><code>q.emplace(args)</code>：加入由args构造的元素。</p>
<p>// 仅适用于queue</p>
<p><code>q.front()</code>：返回首元素。</p>
<p><code>q.back()</code>：返回尾元素。</p>
<p>// 仅适用于priority_queue</p>
<p><code>q.top()</code>：返回最高优先级元素。</p></li>
</ul>
<h3 id="关联容器操作">关联容器操作</h3>
<p><code>key_type</code>：关键字类型。</p>
<p><code>mapped_type</code>：映射类型，仅适用于map。</p>
<p><code>value_type</code>：值类型，对于set与<code>key_type</code>等效，对于map等于<code>pair&lt;const key_type, mapped_type&gt;</code>。</p>
<h5 id="遍历">遍历</h5>
<p>可以通过<code>begin()</code>和<code>end()</code>获取对应的迭代器从而实现遍历。</p>
<h5 id="插入元素">插入元素</h5>
<p><code>c.insert(v)</code>：对于map和set，返回一个pair，包含指向该元素的迭代器和一个bool表示是否插入成功；key值重复时插入会失败。而multimap和multiset可以插入key值重复的元素，只返回指向该元素的迭代器。</p>
<p><code>c.emplace(args)</code>：行为同上，使用args构建元素。</p>
<p><code>c.insert(b, e)</code>：插入迭代器范围内的元素。</p>
<p><code>c.insert(li)</code>：插入初始化列表中的元素。</p>
<p><code>c.insert(p, v)</code>：从迭代器位置开始插入元素。</p>
<p><code>c.emplace(p, args)</code>：同上。</p>
<h5 id="删除元素">删除元素</h5>
<p><code>c.erase(k)</code>：删除所有key值为k的元素。</p>
<p><code>c.erase(p)</code>：删除迭代器指向的元素。</p>
<p><code>c.erase(b, e)</code>：删除迭代器范围内的元素。</p>
<h5 id="map的下标操作">map的下标操作</h5>
<p><code>map[key]</code>：取得key对应的value，如果key不存在则创建新元素。</p>
<h5 id="访问元素-1">访问元素</h5>
<p><code>c.find(k)</code>：返回指向第一个key值为k的元素的迭代器。</p>
<p><code>c.count(k)</code>：返回key值为k的元素的数量。</p>
<p><code>c.lower_bound(k)</code>：返回指向第一个key值不小于k的元素的迭代器。</p>
<p><code>c.upper_bound(k)</code>：返回指向第一个key值大于k的元素的迭代器。</p>
<p><code>c.equal_range(k)</code>：返回一个迭代器pair，表示关键字等于k的元素的范围。</p>
<h5 id="无序容器">无序容器</h5>
<p>无序容器<code>unordered_map</code>和<code>unordered_set</code>，在存储上组织为一组桶，每个桶保存0或多个元素。使用hash函数将元素映射到桶。因此，无序元素的性能依赖于hash函数的质量和桶的数量与大小。</p>
<p>适用于有序容器的操作也适用于无序容器，此外无序容器提供了一组管理桶的函数：</p>
<p><code>c.bucket_count()</code>：正在使用的桶的数目。</p>
<p><code>c.max_bucket_count()</code>：容器能容纳的最多的桶的数目。</p>
<p><code>c.bucket_size(n)</code>：第n个桶中有多少元素。</p>
<p><code>c.bucket(k)</code>：关键字为k的元素在哪个桶中。</p>
<p><code>local_iterator</code>：用来访问桶中元素的迭代器类型。</p>
<p><code>const_local_iterator</code>：迭代器的const版本。</p>
<p><code>c.begin(n)</code>、<code>c.end(n)</code>、<code>c.cbegin(n)</code>、<code>c.cend(n)</code>：桶n的对应迭代器。</p>
<p><code>c.load_factor()</code>：每个桶的平均元素数量，返回float值。</p>
<p><code>c.max_load_factor()</code>：c试图维护的平均桶大小，返回float值。c会在需要时添加新的桶，使load_factor &lt;= max_load_factor。</p>
<p><code>c.rehash(n)</code>：重组存储，使bucket_count &gt;= n且bucket_count &gt; size / max_load_factor。</p>
<p><code>c.reserve(n)</code>：重组存储，使c可以保存n个元素而不用rehash。</p>
<pre class="language-cpp line-numbers match-braces"><code>// 无序容器的使用
T1 hash(args);
bool equal(T2 a, T2 b);
// 由于模版参数接受的是类型，使用decltype取得函数的类型。
unordered_set&lt;T2, decltype(hash)*, decltype(equal)*&gt; foo;</code></pre>]]></content>
    </entry>
    <entry>
        <title type="html"><![CDATA[C++变量初始化]]></title>
        <id>https://xilong.site/post/Cpp_Initializing_Variables.html</id>
        <link rel="alternate" type="text/html" href="https://xilong.site/post/Cpp_Initializing_Variables.html" />
        <updated>2021-07-19T00:00:00Z</updated>
        <!-- Every post here opens with an abstract, which is what
             `abstract` holds and what `content` therefore starts after.
             A feed carries the whole article, so it needs both, in the
             order the page itself shows them. -->
        <content type="html"><![CDATA[<p>使用列表初始化时发现记忆很模糊，写下来备忘顺便总结一下。</p>
<h2 id="初始化的概念">初始化的概念</h2>
<p>初始化是指<strong>创建变量时赋予其一个初始值</strong>。特别要注意C++中初始化与赋值的区别，赋值的含义是抹去原有的值后赋予一个新值。不可以将赋值和初始化混为一谈。</p>
<p>比如对于一个类：</p>
<pre class="language-cpp line-numbers match-braces"><code>class Whatever {
public:
    Whatever();
private:
    int v1;
    int v2;
    std::string key;
    OtherClass value;
};</code></pre>
<p>考虑其构造函数两种定义形式的区别：</p>
<pre class="language-cpp line-numbers match-braces"><code>// 使用初始值列表
Whatever::Whatever() : v1(...), v2(...), key(...), value(...) {}

// 在构造函数内赋值
Whatever::Whatever() {
    v1 = ...;
    v2 = ...;
    key = ...;
    value = ...;
}</code></pre>
<p>这两种方式的区别在于，只有使用了初始值列表的方式真正实现了初始化，而构造函数内赋值的做法等价于先<em>默认初始化</em>一个对象中的所有成员再分别对其中的成员赋值。由于我们创建一个对象后马上就会调用它的构造函数，这两种方法似乎并没有显著的区别。</p>
<p>考虑到初始化和赋值的过程，可以知道先初始化再赋值的开销至少是直接初始化的两倍。对于一个内置类型的成员而言这样的代价可以忽略不计，然而一个类类型成员的构造代价却有可能非常大。因此，定义构造函数时应尽量使用初始值列表的方式，这不单是为了节省这些性能，也是一个语义上的准确表达。</p>
<h2 id="默认初始化">默认初始化</h2>
<p>定义一个变量而不显式指定初始值时，变量被默认初始化。默认初始化的规则如下</p>
<ul>
<li>类类型对象：由类的默认构造函数定义。</li>
<li>内置类型对象：
<ul>
<li>全局对象：初值为0。</li>
<li>非全局对象：不初始化，其值为未定义的，取决于分配到的内存块上已存在的值。</li>
</ul></li>
</ul>
<p>试图默认初始化一个不允许默认初始化的类类型对象将导致编译错误。</p>
<h2 id="直接初始化">直接初始化</h2>
<p>定义时显式地调用对象的构造函数称为直接初始化，例如：</p>
<pre class="language-cpp line-numbers match-braces"><code>int a(0);
std::string str(&quot;Hello&quot;);</code></pre>
<p>注意，只有定义时调用构造函数才是初始化，通过构造函数修改已存在变量的值也是赋值操作。</p>
<h2 id="列表初始化">列表初始化</h2>
<p>在C++11之前，可以对POD（Plain Old Data，即可以使用memcpy拷贝的类型）类型和内置数组进行列表初始化，如：</p>
<pre class="language-cpp line-numbers match-braces"><code>int arr[3] = {1, 2, 3};
struct A {
    int x;
    int y;
};
// 列表初始化, x = 1, y = 2
A a = {1, 2};
// 列表初始化, x = 1, y默认构造
A a2 = {1};</code></pre>
<p>C++11以后，这种初始化方式得到了普及，现在可以对任何对象使用列表初始化并且无需<code>=</code>号。如：</p>
<pre class="language-cpp line-numbers match-braces"><code>int a{5};
int arr[3]{1, 2, 3};
std::string str{&quot;hello&quot;};</code></pre>
<p>列表初始化有一个重要特性，内置类型不允许进行窄化的隐式类型转换。比如：</p>
<pre class="language-cpp line-numbers match-braces"><code>int a = 1.5; // a == 1
int b(1.5);  // b == 1
int c{1.5};  // error</code></pre>
<p>列表初始化和初始化列表有关系吗？答案是大有关系。列表初始化就是根据定义了初始化列表的构造函数初始化对象的。比如：</p>
<pre class="language-cpp line-numbers match-braces"><code>struct A {
    A(int a, int b) : x(a), y(b) {}
    int x;
    int y;
};
A{a, b} == A(a, b) // .x == a, .y == b</code></pre>
<p>那么类似于数组形式的列表初始化是如何实现的呢？使用<code>std::initializer_list</code>：</p>
<pre class="language-cpp line-numbers match-braces"><code>struct A {
    A(std::initializer_list&lt;int&gt; list)
    : size(list.size()), head(new int[size]) {
        auto cur = head;
        for (auto i : list) {
            *cur = i;
            ++cur;
        }
    }
    ~A() {
        delete[] head;
    }
    int size;
    int *head;
}; // 一个简单的数组， 可以接受任意数量的参数
A{1, 2, 3, 4} == A({1, 2, 3, 4});</code></pre>
<p>当同时存在接受参数的构造函数和接受<code>std::initializer_list</code>的构造函数时，列表初始化优先调用接受<code>std::initializer_list</code>的构造函数。</p>
<h2 id="拷贝初始化">拷贝初始化</h2>
<p>使用<code>Type id = value</code>或<code>Type id(value) // value 为一个Type类型的变量</code>的形式定义的初始化称为拷贝初始化。其实质是使用另一个对象的值来构造对象，使用拷贝赋值运算符函数定义其行为。</p>]]></content>
    </entry>
    <entry>
        <title type="html"><![CDATA[C++三/五法则]]></title>
        <id>https://xilong.site/post/Cpp_The_Rule_of_Three_Five.html</id>
        <link rel="alternate" type="text/html" href="https://xilong.site/post/Cpp_The_Rule_of_Three_Five.html" />
        <updated>2021-07-19T00:00:00Z</updated>
        <!-- Every post here opens with an abstract, which is what
             `abstract` holds and what `content` therefore starts after.
             A feed carries the whole article, so it needs both, in the
             order the page itself shows them. -->
        <content type="html"><![CDATA[<p>本以为三/五法则作为一个基础知识早已烂熟于心，未想纸上得来终是浅，还是在这个地方翻了次车。</p>
<h2 id="什么是三五法则">什么是三/五法则</h2>
<ul>
<li>三法则：C++11之前，一个需要<code>析构函数</code>的类也需要<code>拷贝构造函数</code>和<code>拷贝赋值运算符</code>。这三个组件总是成套出现，因此叫三法则。</li>
<li>五法则：C++11以后，一个需要<code>析构函数</code>的类同时需要<code>拷贝构造函数</code>、<code>拷贝赋值运算符</code>和<code>移动构造函数</code>以及<code>移动赋值运算符</code>。成套出现的组件数量变成了五，因此叫五法则。</li>
</ul>
<p>对于这两个法则，虽然内容在添加移动语义后有一些变化，但核心思想都是一样的。即类的基础组件应该成套构成。因此合称为三/五法则。</p>
<h2 id="翻车实况">翻车实况</h2>
<p>也许你会疑惑，这么浅显的地方怎么会翻车，看了这个翻车实况或许就会发现你也可能犯这样的错误。</p>
<p>起因是昨天写<a href="https://xilong.site/post/The_Level_Order_Iteration_of_Binary_Tree.html">二叉树的层序遍历</a>时，需要一个C++的实现，方便起见，我定义了一个非常简单的二叉链表结构来构造二叉树：</p>
<pre class="language-cpp line-numbers match-braces"><code>struct Tree {
    Tree() : left(nullptr), data(0), right(nullptr) {}
    Tree *left;
    char data;
    Tree *right;
};</code></pre>
<p>以及不可忽视的两点：</p>
<ol type="1">
<li><p>我的遍历函数使用了<strong><em>常量引用传递</em></strong>的方式接收树</p></li>
<li><p>遍历函数内部用到了<code>std::queue</code>作为遍历队列。存储相关语句为：</p></li>
</ol>
<pre class="language-cpp line-numbers match-braces"><code>// std::queue&lt;Tree&gt; nodeQueue;
// cur = nodeQueue.front();
nodeQueue.push(T);
if (cur.left)  nodeQueue.push(*cur.left);
if (cur.right) nodeQueue.push(*cur.right);</code></pre>
<p>函数签名：<code>void View(const Tree&amp; T);</code></p>
<p>同样是方便起见，我手动构造了一棵树用于测试：</p>
<pre class="language-cpp line-numbers match-braces"><code>Tree *GetTree() {
    auto T = new Tree;
    T-&gt;data = &#39;A&#39;;
    T-&gt;left = new Tree;
    T-&gt;left-&gt;data = &#39;B&#39;;
    T-&gt;right = new Tree;
    T-&gt;right-&gt;data = &#39;C&#39;;
    T-&gt;right-&gt;left = new Tree;
    T-&gt;right-&gt;left-&gt;data = &#39;D&#39;;
    T-&gt;right-&gt;right = new Tree;
    T-&gt;right-&gt;right-&gt;data = &#39;E&#39;;
    return T;
}

int main() {
    auto T = GetTree();
    // 正常情况下应该输出&quot;ABCDE&quot;
    View(*T);
    return 0;
}</code></pre>
<p>注意这里没有<code>delete T</code>，内存是全部泄露的，不过这种简单程序反正有操作系统回收，可以先不用关心。</p>
<p>于是问题来了，在我用这个版本的程序完成算法的测试后，出于习惯给这个<code>Tree</code>加上了一个简单的析构函数：</p>
<pre class="language-cpp line-numbers match-braces"><code>struct Tree {
    Tree() : left(nullptr), data(0), right(nullptr) {}
    ~Tree() {
        if (left) delete left;
        if (right) delete right;
    }
    Tree *left;
    char data;
    Tree *right;
};</code></pre>
<p>并且在<code>main</code>函数内释放了内存：</p>
<pre class="language-cpp line-numbers match-braces"><code>int main() {
    auto T = GetTree();
    View(*T);
    delete T;
    return 0;
}</code></pre>
<p>这时运行程序就可以喜提一个<code>Segment Error</code>了。</p>
<h2 id="问题解决">问题解决</h2>
<p>因为没有添加析构函数时并没有出现问题，所以总是怀疑自己对析构过程的理解有问题。难道析构函数不是自己理解的“死前抖擞精神，完成最后的任务，然后安详赴死”？对象在调用析构函数时就已经销毁了？不可能啊。</p>
<p>几经查阅后，发现我对析构过程的理解没有问题，对象在析构函数之后才被销毁。更离谱的是，我为了简化问题写的只存在树的构建和析构的程序运行起来完全没有出现问题。</p>
<p>于是我把目光投向了看起来安全的不能再安全的，接收<code>const Tree&amp;</code>类型参数的<code>View</code>函数。在出现问题的代码中将<code>View(*T);</code>注释掉，发现还真是这个函数的问题。</p>
<p>说来奇怪，还没有对问题做具体的分析，就直觉地想到改一下传参方式或许可以解决，于是我将<code>View</code>改成如下形式：</p>
<p>函数签名：<code>void View(const Tree *T)</code></p>
<p>存储语句：</p>
<pre class="language-cpp line-numbers match-braces"><code>// std::queue&lt;const Tree*&gt; nodeQueue;
// cur = nodeQueue.front();
if (T) nodeQueue.push(T);
if (cur-&gt;left)  nodeQueue.push(cur-&gt;left);
if (cur-&gt;right) nodeQueue.push(cur-&gt;right);</code></pre>
<p>然后果真没有问题了，这弄得我很疑惑。于是分析可能是<code>std::queue</code>相关的问题，但它也不会直接释放掉资源啊。一番思索，发现原因如下：</p>
<ul>
<li>对于<code>std::queue&lt;const Tree&gt;</code>，它在每一次<code>push(T)</code>时创建一个<code>T</code>的拷贝，并存储，由于<code>Tree</code>没有定义拷贝相关操作，会使用默认拷贝方式，即简单复制其中的指针。</li>
<li><code>std::queue</code>在<code>pop()</code>操作时会销毁临时对象。</li>
<li>当没有为<code>Tree</code>创建析构函数时，临时对象的销毁仅仅是简单销毁自身，因此没有出现问题。</li>
<li>而对于已经创建了析构函数的<code>Tree</code>，临时对象会递归地销毁其指针指向的子节点，此时再显式地<code>delete T</code>就会导致重复delete。从而引发<code>Segment Error</code>。</li>
</ul>
<p>因此，像上面那样使用指针传递的方式就解决了问题，这样临时对象的类型就变成了指针，从而不会对树本身产生影响。但这种方式本质上只是在逃避，并没有解决问题。</p>
<p>真正要解决这个问题，那还得是为<code>Tree</code>添加正确的拷贝构造函数、拷贝赋值运算符、移动构造函数和移动赋值运算符。</p>
<h2 id="总结">总结</h2>
<p>遵循三/五法则是一个类正常运行的基础，绝不能偷懒省略其中的组件。还好我以这样低的成本——一个测试算法用的临时程序——完成了三/五法则的试错。</p>]]></content>
    </entry>
    <entry>
        <title type="html"><![CDATA[二叉树的层序遍历]]></title>
        <id>https://xilong.site/post/The_Level_Order_Iteration_of_Binary_Tree.html</id>
        <link rel="alternate" type="text/html" href="https://xilong.site/post/The_Level_Order_Iteration_of_Binary_Tree.html" />
        <updated>2021-07-18T00:00:00Z</updated>
        <!-- Every post here opens with an abstract, which is what
             `abstract` holds and what `content` therefore starts after.
             A feed carries the whole article, so it needs both, in the
             order the page itself shows them. -->
        <content type="html"><![CDATA[<p>对之前的文章：<a href="https://xilong.site/post/Memory_Structure_of_Binary_Tree_and_Its_Non_Level_Order_Iteration.html">二叉树的存储结构及其非层序遍历</a>的一点小补充。</p>
<h2 id="原理">原理</h2>
<p>使用一个队列来对每个节点进行<code>入队-加入子节点-访问-出队</code>的操作即可，非常简单。</p>
<p>伪码表示：</p>
<pre class="language-none line-numbers match-braces"><code>输入：待访问的二叉树Tree
输出：对节点的层序访问
View:
  queue.push Tree
  while !queue.empty:
    cur = queue.front
    if (cur.left) queue.push cur.left
    if (cur.right) queue.push cur.right
    cur.show
    queue.pop</code></pre>
<h2 id="c实现">C++实现</h2>
<pre class="language-cpp line-numbers match-braces"><code>#include &lt;iostream&gt;
#include &lt;queue&gt;

using namespace std;

// 简单实现一个二叉树
struct Tree {
    Tree() : left(nullptr), data(0), right(nullptr) {}
    Tree *left;
    char data;
    Tree *right;
};

// 层序遍历
void View(const Tree &amp;T) {
    queue&lt;Tree&gt; nodeQueue;
    nodeQueue.push(T);
    while (!nodeQueue.empty()) {
        auto cur = nodeQueue.front();
        if (cur.left) nodeQueue.push(*cur.left);
        if (cur.right) nodeQueue.push(*cur.right);
        nodeQueue.pop();
        cout &lt;&lt; cur.data;
    }
    cout &lt;&lt; endl;
}</code></pre>
<h2 id="haskell实现">Haskell实现</h2>
<pre class="language-haskell line-numbers match-braces"><code>-- 二叉树
data Tree = Empty | Node Tree String Tree
  deriving (Eq, Show)

-- 将树转变为层序遍历序列
view :: Tree -&gt; String
view = view&#39;.view&#39;&#39;
    where
    -- 将一个树的列表转变为对应的值的列表
    view&#39; :: [Tree] -&gt; String
    view&#39; [] = &quot;&quot;
    view&#39; ((Node _ str _):xs) = str ++ view&#39; xs
    -- 将一个树转变为其层序遍历的列表
    view&#39;&#39; :: Tree -&gt; [Tree]
    view&#39;&#39; Empty = []
    view&#39;&#39; t = extend [t] 0
        where
        extend :: [Tree] -&gt; Int -&gt; [Tree]
        extend ts n = if(n &gt;= length ts) then ts
            else case (ts!!n) of
                (Node left _ right) -&gt; extend (ts
                    ++ (if (left == Empty) then [] else [left])
                    ++ (if (right == Empty) then [] else [right]))
                    (n + 1)</code></pre>
<p>Haskell学艺不精，写得挺丑，留待日后优化吧。</p>]]></content>
    </entry>
    <entry>
        <title type="html"><![CDATA[从零开始的Haskell（二）——ADT]]></title>
        <id>https://xilong.site/post/Haskell_from_0_to_1_2_ADT.html</id>
        <link rel="alternate" type="text/html" href="https://xilong.site/post/Haskell_from_0_to_1_2_ADT.html" />
        <updated>2021-07-17T00:00:00Z</updated>
        <!-- Every post here opens with an abstract, which is what
             `abstract` holds and what `content` therefore starts after.
             A feed carries the whole article, so it needs both, in the
             order the page itself shows them. -->
        <content type="html"><![CDATA[<p>这是系列的第二篇，主题是ADT：代数数据类型。</p>
<h2 id="前言关于haskell与数学基础">前言：关于Haskell与数学基础</h2>
<p>网上冲浪时看见很多类似于“学好Haskell一定要学会抽象代数和范畴论”这类的言论，这一度动摇了我学习Haskell的信心，考虑着是不是先学习相关的数学理论。后来想了想，或许学好Haskell一定要学会这些，但在入门阶段并不需要过于在意其中的数学原理，先上手再说。</p>
<p>就像我们学习C++的过程中，操作系统、计算机组成和数据结构相关的知识是非常有帮助的。了解了整个计算机体系后，理解C++的涉及底层的概念会非常容易。但我们也不必因此在入门阶段就直接去学习整个计算机原理。</p>
<p>于是废话说完，开始这次的Haskell之旅。</p>
<h2 id="枚举类型">枚举类型</h2>
<p>Haskell使用如下语法创建枚举（Enum）类型：</p>
<pre class="language-haskell line-numbers match-braces"><code>data Thing = Shoe
           | Ship
           | SealingWax
           | Cabbage
           | King
  deriving Show</code></pre>
<p>这段代码定义了一个名为<code>Thing</code>的类型，它有5个值构造器（data constructors），这些值构造器就是<code>Thing</code>可能拥有的值。</p>
<p><code>deriving Show</code>为<code>Thing</code>加载了显示功能，这使得它可以被当做字符串打印，这其中的细节之后再说。</p>
<pre class="language-haskell line-numbers match-braces"><code>-- 使用Thing
-- 作为变量
shoe :: Thing
shoe = Shoe
-- 作为列表类型
listOfThings :: [Thing]
listOfThings = [Shoe, Ship, SealingWax]
-- 作为函数参数
isSmall :: Thing -&gt; Bool
isSmall Shoe       = True
isSmall Ship       = False
isSmall SealingWax = True
isSmall Cabbage    = True
isSmall King       = False</code></pre>
<p>可以看到枚举类型的用途和我们在其它语言中用到的enum很相似。</p>
<h2 id="不只是枚举">不只是枚举</h2>
<p>其实在Haskell中，枚举类型只是一个ADT（Algebraic Data Types，代数数据类型）的特例。下面是一个不是枚举类型的ADT：</p>
<pre class="language-haskell line-numbers match-braces"><code>data FailableDouble = Failure
                    | OK Double
  deriving Show</code></pre>
<p>这个<code>FailableDouble</code>类型有两个值构造器，第一个值构造器<code>Failure</code>不接受参数，所以它本身就是<code>FailableDouble</code>的值；而第二个值构造器<code>OK</code>接受一个<code>Double</code>类型的参数，因此它本身并不成为<code>FailableDouble</code>的值，需要加上一个<code>Double</code>才能做为值。比如：</p>
<pre class="language-haskell line-numbers match-braces"><code>ex01 = Failure
ex02 = OK 3.4</code></pre>
<p>思考：<code>OK</code>的类型是什么？</p>
<p>它看起来像接收一个<code>Double</code>，返回一个<code>FailableDouble</code>的函数，用起来也像这样一个函数，那么我说，它就是一个<code>Double -&gt; FailableDouble</code>类型的函数。</p>
<p>既然值构造器的类型是函数，那么理所当然地，<strong>值构造器可以接受多个参数</strong>。由此可以创建一个这样的类型：</p>
<pre class="language-haskell line-numbers match-braces"><code>data Person = Person String Int Thing
  deriving Show</code></pre>
<p>注意这里的两个<code>Person</code>是不同的，等号左侧的<code>Person</code>称为类型构造器，用于指代类型；而等号右侧的<code>Person</code>是一个与类型构造器同名的值构造器，用于生成一个具体的<code>Person</code>类型的值。比如：</p>
<pre class="language-haskell line-numbers match-braces"><code>brent :: Person                      -- 类型构造器，说明类型
brent = Person &quot;Brent&quot; 31 SealingWax -- 值构造器，生成一个值</code></pre>
<p>这还导致了一个有趣的现象，就是你在类型声明中使用的永远是类型构造器，而在需要这个类型的值的地方使用的永远是值构造器。</p>
<h2 id="一般形式的adt">一般形式的ADT</h2>
<p>通常一个ADT有一个或多个值构造器，而每个值构造器接收一个或多个参数。</p>
<pre class="language-haskell line-numbers match-braces"><code>data ADT = Constr1 Type11 Type12
         | Constr2 Type21
         | Constr3 Type31 Type32 Type33
         | Constr4
{-
声明了一个名为ADT且含有4个值构造器的ADT，这四个值构造器分别接受不同数量的不同类型参数。
-}</code></pre>
<p>注意：类型构造器与值构造器的标识符永远以大写字母开头，而变量（包括函数）永远以小写字母开头。</p>
<h2 id="模式匹配">模式匹配</h2>
<p>根本上，模式匹配就是通过找出值构造器来对值进行分解。比如说，要想对上一节定义的类型<code>ADT</code>中的值进行操作，我们只要这样写：</p>
<pre class="language-haskell line-numbers match-braces"><code>foo (Constr1 a b)   = ...
foo (Constr2 a)     = ...
foo (Constr3 a b c) = ...
foo Constr4         = ...</code></pre>
<p>注意这里使用a、b、c为值命名，以及接受参数的值构造器要包围在括号里。</p>
<p>这就是模式匹配的主要思想了，但还有一些值得注意的地方：</p>
<ol type="1">
<li><p>下划线<code>_</code>可以匹配任何东西。</p></li>
<li><p>x@pat形式的模式可以在以pat匹配值的同时用x匹配整个值。例：</p>
<pre class="language-haskell line-numbers match-braces"><code>baz :: Person -&gt; String
baz p@(Person n _ _) = &quot;The name field of (&quot; ++ show p ++ &quot;) is &quot; ++ n

{-
运行：baz brent
结果：&quot;The name field of (Person \&quot;Brent\&quot; 31 SealingWax) is Brent&quot;
-}</code></pre></li>
<li><p>模式可以嵌套。例：</p>
<pre class="language-haskell line-numbers match-braces"><code>checkFav :: Person -&gt; String
checkFav (Person n _ SealingWax) = n ++ &quot;, you&#39;re my kind of person!&quot;
checkFav (Person n _ _)          = n ++ &quot;, your favorite thing is lame.&quot;</code></pre>
<p>注意这里的<code>Person</code>和<code>SealingWax</code>是嵌套的模式。</p></li>
</ol>
<p>注意，对于像<code>2</code>和<code>'c'</code>这样字面值，可以看做是一个不接受参数的值构造器。</p>
<h2 id="case表达式">case表达式</h2>
<p>case表达式是Haskell中一个用于模式匹配的基础结构：</p>
<pre class="language-haskell line-numbers match-braces"><code>case exp of
  pat1 -&gt; exp1
  pat2 -&gt; exp2
  ...</code></pre>
<p>其机制为使用exp从上而下地依次匹配模式，表达式的值为第一个匹配成功的模式对应的表达式的值。例：</p>
<pre class="language-haskell line-numbers match-braces"><code>failureToZero&#39; :: FailableDouble -&gt; Double
failureToZero&#39; x = case x of
                    Failure -&gt; 0
                    OK d -&gt; d</code></pre>
<h2 id="递归数据结构">递归数据结构</h2>
<p>数据结构可以是递归的，即自己可以是自己的组成部分。比如：</p>
<pre class="language-haskell line-numbers match-braces"><code>-- 定义一个`Int`类型的列表
data IntList = Empty | Cons Int IntList

-- 定义一个二叉树
data Tree = Leaf Char
          | Node Tree Int Tree
  deriving Show

lst :: IntList
lst = Cons 1 (Cons 2 Empty)

tree :: Tree
tree = Node (Leaf &#39;x&#39;) 1 (Node (Leaf &#39;y&#39;) 2 (Leaf &#39;z&#39;))</code></pre>]]></content>
    </entry>
    <entry>
        <title type="html"><![CDATA[使用移动硬盘制作本地git仓库]]></title>
        <id>https://xilong.site/post/Create_a_Local_Git_Storage_with_a_Portable_Hard_Drive.html</id>
        <link rel="alternate" type="text/html" href="https://xilong.site/post/Create_a_Local_Git_Storage_with_a_Portable_Hard_Drive.html" />
        <updated>2021-06-27T00:00:00Z</updated>
        <!-- Every post here opens with an abstract, which is what
             `abstract` holds and what `content` therefore starts after.
             A feed carries the whole article, so it needs both, in the
             order the page itself shows them. -->
        <content type="html"><![CDATA[<p>在一个普通的日子，突然想到用闲置的移动硬盘做一个本地git仓库。简单的理了理思路，确定了几个步骤：</p>
<ol type="1">
<li>准备硬盘，比如分区与格式化。</li>
<li>自动挂载硬盘，实现即插即用。</li>
<li>使用硬盘托管代码。</li>
</ol>
<p>于是放了一首歌，戴上耳机，哼着小曲开始了这次折腾。</p>
<h2 id="制备硬盘">制备硬盘</h2>
<p>使用fdisk将这块硬盘上的分区全部删除，然后创建一个新的分区，具体步骤这里略过。</p>
<p>现在是时候格式化分区了，就决定是你了Ext4……等等，既然这个分区只是用来托管代码，为什么不试试没用过的文件系统呢？就决定是你了——Btrfs！</p>
<p>查阅了ArchWiki，Btrfs的介绍是这样的：</p>
<blockquote>
<p>Btrfs 是一种新型的写时复制 (CoW) Linux 文件系统，已经并入内核主线。Btrfs 在设计实现高级功能的同时，着重于容错、修复以及易于管理。它由 Oracle, Red Hat, Fujitsu, Intel, SUSE, STRATO 等企业和开发者共同开发，Btrfs 以 GNU GPL 协议授权，同时也欢迎任何人的贡献。</p>
</blockquote>
<p>经过了解，发现几个比较感兴趣的特点：</p>
<ul>
<li>写时复制：任何写入操作都发生在空闲空间。与传统方式最显著的区别大概在于文件覆写时：传统方式直接在文件相应位置写入，而写时复制方式在空闲空间写入数据并通过修改原文件的元数据以使其相应位置的引用指向写入的位置，并在原地址引用数为0时释放其数据。</li>
<li>透明压缩：btrfs可以自动的尝试压缩文件，这样一方面减少了文件大小，另一方面显著延长了闪存介质的寿命。</li>
<li>SSD TRIM：btrfs可以从支持TRIM 命令的 SSD 驱动器中释放未使用的块。已释放的空间范围不会被马上丢弃，它们会被集中起来并在稍后由一个单独的工作线程进行 TRIM，这将能改善提交延迟，以提高SSD的性能。</li>
</ul>
<p>为了实现上述功能在挂载时需要添加两个参数：</p>
<p><code>compress=zstd</code>：使用zstd算法启用自动压缩。</p>
<p><code>discard=async</code>：使用SSD TRIM。</p>
<h2 id="自动挂载">自动挂载</h2>
<p>首先简单实现一个通过UUID挂载分区的脚本：</p>
<pre class="language-bash line-numbers match-braces"><code>#! /bin/sh
# /usr/local/bin/mount_repo
# 挂载点
readonly target_dir=&quot;/mnt/Repo&quot;
# 通过UUID获取分区名
label=`lsblk -f | grep 5398cf0b-266e-4874-a8e7-1ac903013b48 | grep -o -E sd..`
# 分区名存在则挂载，否则尝试卸载挂载点
if [ ${label} ]
then
    label=&quot;/dev/&quot;${label}
    echo ${label}
    mkdir ${target_dir}
    mount -o compress=zstd,discard=async ${label} ${target_dir}
else
    echo &quot;no device&quot;
    umount ${target_dir}
    rmdir ${target_dir}
fi</code></pre>
<p>现在我们有了通过指定UUID挂载分区的脚本了。问题是如何才能让硬盘插入时自动挂载呢？几经查询，发现了udev。</p>
<h3 id="使用udev">使用udev</h3>
<p>ArchWiki对udev的介绍如下：</p>
<blockquote>
<p>udev 是 Linux 内核的设备管理器。总的来说，它取代了 devfs 和 hotplug，负责管理 <code>/dev</code> 中的设备节点。同时，udev 也处理所有用户空间发生的硬件添加、删除事件，以及某些特定设备所需的固件加载。</p>
<p>与传统的顺序加载相比，udev 通过并行加载内核模块提供了潜在的性能优势。异步加载模块的方式也有一个天生的缺点：无法保证每次加载模块的顺序，如果机器具有多个块设备，那么它们的设备节点可能随机变化。例如如果有两个硬盘，<code>/dev/sda</code> 可能会随机变成<code>/dev/sdb</code>。</p>
</blockquote>
<p>当一个设备被添加或是移除时，udev会从kernel得知这个事件。然后遍历规则文件目录（默认在/etc/udev/rules.d）中的规则文件寻找匹配的规则，有就按规则处理，没有就作默认处理。</p>
<p>也就是说，我们可以通过编写规则文件的方式让udev在加载硬盘时进行挂载处理。</p>
<h4 id="udev规则简介">udev规则简介</h4>
<p>udev规则文件中的一行就是一条规则，一条规则包括了匹配部分和动作部分，各部分通过逗号<code>,</code>分隔。具有如下形式：</p>
<pre class="language-none line-numbers match-braces"><code>cond1,cond2,cond3,...,action1, action2, action3</code></pre>
<p>可以使用换行符<code>\</code>将一条规则分成几行编写。比如，对于以下规则：</p>
<pre class="language-none line-numbers match-braces"><code>KERNEL==&quot;video[0-9]*&quot; \
  , SUBSYSTEM==&quot;video4linux&quot; \
  , SUBSYSTEMS==&quot;usb&quot; \
  , ATTRS{idVendor}==&quot;05a9&quot; \
  , ATTRS{idProduct}==&quot;4519&quot; \
  , SYMLINK+=&quot;video-cam1&quot;</code></pre>
<ul>
<li><code>KERNEL</code>是设备的内核名称，这条规则使用了一个正则表达式对其进行匹配。</li>
<li><code>SUBSYSTEM</code>表示设备的类型</li>
<li><code>ATTRS{sth.}</code>获取设备的某个属性，属性名写在大括号中。</li>
<li><code>SYMLINK</code>是对该设备的软链接，使用+=对设备创建一个软链接。使用+=而不是=是因为不想覆盖掉默认操作。</li>
</ul>
<h4 id="编写自动挂载规则">编写自动挂载规则</h4>
<p>根据这个例子，摸着石头过河，编写一个使用脚本自动挂载硬盘的规则：</p>
<pre class="language-none line-numbers match-braces"><code>KERNEL==&quot;sd[a-z][0-9]&quot; \
  , ACTION==&quot;remove&quot; \
  , ATTRS{idVendor}==&quot;08e4&quot; \
  , ATTRS{idProduct}==&quot;01e8&quot; \
  , RUN+=&quot;/usr/local/bin/mount_repo&quot;

KERNEL==&quot;sd[a-z][0-9]&quot; \
  , ACTION==&quot;add&quot; \
  , ATTRS{idVendor}==&quot;08e4&quot; \
  , ATTRS{idProduct}==&quot;01e8&quot; \
  , RUN+=&quot;/usr/local/bin/mount_repo&quot;</code></pre>
<p>使用<code>udevadm control --reload</code>重新加载规则。</p>
<p>到这里，非常开心地，我们掉进坑里了。这条规则可以运行，但mount命令会出错，导致并不能如预期那样工作。</p>
<p>然后才看见ArchWiki上这条警告：</p>
<blockquote>
<p><strong>警告：</strong> 要挂载可移动设备，请<strong>不要</strong>通过在 udev 规则中调用 <code>mount</code> 命令的方法。对 FUSE 文件系统将会导致 <code>Transport endpoint not connected</code> 错误。应代之以 <a href="https://wiki.archlinux.org/title/Udisks_(简体中文)">udisks</a> 以正确处理自动挂载。或者把挂载动作放在 udev 规则内部：</p>
<p>将 <code>/usr/lib/systemd/system/systemd-udevd.service</code> 复制到 <code>/etc/systemd/system/systemd-udevd.service</code>，将 <code>MountFlags=slave</code> 替换为 <code>MountFlags=shared</code>。<a href="https://unix.stackexchange.com/a/154318">（来源）</a></p>
<p>Keep in mind though that udev is not intended to invoke long-running processes.</p>
</blockquote>
<p>试图更改systemd-udevd.service，发现没效果。几经辗转，发现使用systemd可以解决这个问题。不再需要折腾systemd-udevd.service了。</p>
<p>首先创建一个service，repo.service：</p>
<pre class="language-none line-numbers match-braces"><code>[Unit]
Description=Mount Repository Device on /mnt/Repo

[Service]
Type=oneshot
RemainAfterExit=true
ExecStart=/usr/local/bin/mount_repo
ExecStop=/usr/local/bin/mount_repo</code></pre>
<p>使用<code>systemctl daemon-reload</code>重新加载服务。</p>
<p>然后将规则文件改写为：</p>
<pre class="language-none line-numbers match-braces"><code>KERNEL==&quot;sd[a-z][0-9]&quot; \
  , ACTION==&quot;remove&quot; \
  , ATTRS{idVendor}==&quot;08e4&quot; \
  , ATTRS{idProduct}==&quot;01e8&quot; \
  , RUN+=&quot;/bin/systemctl stop repo.service&quot;

KERNEL==&quot;sd[a-z][0-9]&quot; \
  , ACTION==&quot;add&quot; \
  , ATTRS{idVendor}==&quot;08e4&quot; \
  , ATTRS{idProduct}==&quot;01e8&quot; \
  , RUN+=&quot;/bin/systemctl start repo.service&quot;</code></pre>
<p>使用<code>udevadm control --reload</code>重新加载规则。</p>
<p>到这里，自动挂载就可以正常工作了。</p>
<h2 id="在硬盘上创建仓库">在硬盘上创建仓库</h2>
<p>使用<code>git --bare init</code>创建一个远程仓库：</p>
<pre class="language-bash line-numbers match-braces"><code>cd /mnt/Repo
mkdir test.git
cd test.git
git --bare init</code></pre>
<p>为本地git仓库添加这个远程仓库：</p>
<pre class="language-bash line-numbers match-braces"><code>cd ~/someprojects
git remote add Repo /mnt/Repo/test.git
git push Repo master</code></pre>
<h2 id="后记">后记</h2>
<p>这次的折腾算是记录一下与udev的初次接触。使用linux的过程中总能用到以为永远不会碰的工具，这也是linux的魅力所在吧。</p>]]></content>
    </entry>
    <entry>
        <title type="html"><![CDATA[从零开始的Haskell（一）——Haskell基础]]></title>
        <id>https://xilong.site/post/Haskell_from_0_to_1_1_Basics.html</id>
        <link rel="alternate" type="text/html" href="https://xilong.site/post/Haskell_from_0_to_1_1_Basics.html" />
        <updated>2021-06-10T00:00:00Z</updated>
        <!-- Every post here opens with an abstract, which is what
             `abstract` holds and what `content` therefore starts after.
             A feed carries the whole article, so it needs both, in the
             order the page itself shows them. -->
        <content type="html"><![CDATA[<p>对Haskell一直挺感兴趣，也学习了一段时间。奈何IO太离谱，做不出实际的东西，导致学了忘忘了学痛苦万分。于是只好信奉好记性不如烂笔头，写几篇笔记记录下来。</p>
<p>这是第一篇，主题是Haskell的介绍和基础语法。</p>
<h2 id="给其它语言学习者的忠告">给其它语言学习者的忠告</h2>
<p>如果你之前学习了一大票主流语言，比如C、C++、JAVA、Python、Shell、JS、PHP、汇编等等。我的建议是：<strong>忘记它们</strong>。</p>
<p>之前为C++选手写过一篇入门Python的文章，本来也想写一篇基于C++基础入门Haskell的文章。但一上手发现，使用C++的思维还不如完全失忆更好接受Haskell。</p>
<p>这就牵扯到了编程范式的问题。上述一大票语言，不管多么千差万别，大体上的运行方式就是：从某一条语句开始，按顺序一条一条的往下执行。这就是所谓的命令式编程：告诉计算机它要做什么。</p>
<p>而Haskell和这些语言不一样，它没有一个固定的语句执行顺序，甚至于，你无法改变一个变量的值（我更倾向于将Haskell中的变量理解成没有参数的函数，也就是说，根本没有变量，<strong>一切都是函数</strong>）。你的程序里满是无所谓先后的函数定义，你要做的事情是使用一个函数描述出你要解决的问题。也就是函数式编程：告诉计算机问题是什么。</p>
<p>因为这一个How和What的区别，在座的各位步骤流程大师的很多经验失去了用武之地。既然这样，不如索性给它忘了，从零开始推开新世界的大门。</p>
<h2 id="什么是haskell">什么是Haskell</h2>
<p>Haskell是一门惰性求值、纯函数式的静态强类型编程语言。</p>
<h3 id="函数式">函数式：</h3>
<p>对于函数式并没有明确的定义，但它通常意味着：</p>
<ul>
<li>函数是“一等公民”，就是说，函数可以在任何需要一个值的地方作为值来使用。具体点说就是你可以把函数直接作为另一个函数的参数进行传递，而不用使用类似于函数指针或std::function之类的东西把它包起来。</li>
<li>程序围绕着“计算表达式”而不是“执行指令”来运行。</li>
</ul>
<p>学习Haskell花费时间最多的地方就在于这种从命令式到函数式的思维转换。</p>
<h3 id="纯">纯：</h3>
<p><em>“让函数式的归函数式，纯的归纯。”——《藏狐箴言》。</em></p>
<p>并不是所有函数式语言都是纯函数式，一个纯的语言意味着：</p>
<ul>
<li>没有改变，任何值都是不可变的。</li>
<li>表达式永远没有副作用，比如改变了某个变量的值或在屏幕上显示消息或发射一枚核弹。</li>
<li>使用相同的输入调用一个函数总能得到相同的输出。</li>
</ul>
<p>相信大家看到这已经懵了，这不是啥也干不了了吗？这语言什么用？rnm，退钱！</p>
<p>其实大可不必，面包还是会有的，只要亿点点思维转变，比如：</p>
<ul>
<li>等价代换：你永远可以使用一个等价的东西替换另一个东西，就像你还是一个炼金术士的时候那样。</li>
<li>并行：在没有副作用的世界，并行计算表达式会很轻松。</li>
<li>更少的头痛（？）：简单堆积，随意改动，各种行为作用会使程序非常难Debug和原因定位。</li>
</ul>
<h3 id="惰性求值">惰性求值：</h3>
<p>在Haskell中，一个表达式的值只有在真正被需要的时候才被计算出来（就像你只有在马上考试的时候才开始学习一样）。这种特性将会随着学习的深入加深理解。这里举几个浅显的小例子：</p>
<ul>
<li>可以简单的使用函数定义一个控制结构。</li>
<li>让使用无限数据的结构成为可能。</li>
<li>开启了一种更有创造性的编程风格（wholemeal programming直译为全麦编程，一种全局思考的编程风格）。</li>
<li>但它也带来了一个负面影响：非常难以计算时空复杂度。</li>
</ul>
<h3 id="静态强类型">静态强类型：</h3>
<p>Haskell中所有表达式都有一个类型，并且会在编译期提供类型检查。并且，Haskell中不允许隐式类型转换。</p>
<blockquote>
<p>静态/动态类型是指在程序执行过程中变量的类型是否允许改变。</p>
<p>弱/强类型是指程序是否允许隐式类型转换。</p>
</blockquote>
<h2 id="三个主题">三个主题</h2>
<p>在这个系列的学习中，会重点学习三个主题：</p>
<h3 id="类型">类型</h3>
<p>Haskell的严格的类型系统带来了以下好处：</p>
<ul>
<li><p>（被迫）更清晰的思考和表达程序结构。</p>
<p>一个函数的定义往往从思考并写下它的类型开始。</p></li>
<li><p>程序具有类似文档的形式。</p>
<p>每个函数的类型定义可以让使用者清楚地明白这个函数接受什么输出什么。</p></li>
<li><p>将运行期错误提前到编译期</p>
<p>更早发现错误的好处不言而谕。</p></li>
</ul>
<h3 id="抽象">抽象</h3>
<p>编程世界中有一句经常出现的话：“不要重复”，也叫抽象原则。意思是代码中的任何东西都不该在多处出现，所有的算法、数据段等内容都只该在一个确定的地方出现一次。比如相同的代码可以用函数封装起来供其它代码使用。</p>
<p>Haskell非常擅长抽象：像多态参数，高级函数和类型类这样的特性都是为了与重复斗争而加入的。</p>
<h3 id="全麦编程">全麦编程</h3>
<p>这词太离谱，总之就是在更整体的层面去思考问题。比如思考对一整个列表的操作，而不是列表里的一个个元素。开发一个解集而不是某个特定的解。想像一整个图，而不是某条路径。</p>
<p>在工程中体现为，先解决一个更普遍的问题，然后思考如何将普遍问题变换为一个特殊的问题。</p>
<p>举个例子，在C++或Java中，以下代码：</p>
<pre class="language-none line-numbers match-braces"><code>int acc = 0;
for (int i = 0; i &lt; lst.length; ++i) {
    acc = acc + 3 * lst[i];
}</code></pre>
<p>这段代码的目的其实就是：将lst中的所有元素乘以3，再计算它们的总和。</p>
<p>在Haskell中，可以写成：</p>
<pre class="language-none line-numbers match-braces"><code>sum (map (3*) lst)</code></pre>
<p>Haskell需要我们将思维转变成一种更加高屋建瓴的方式，而这种思维方式可以帮助我们写出更便于理解的代码。比如，在C++中：</p>
<pre class="language-cpp line-numbers match-braces"><code>// 先定义出两个基础函数，如果大量使用的话，这样看似繁琐的写法是值得的。因为它提供了更强大的抽象。
// 简单起见，暂不实现泛型的map和sum。
std::vector&lt;int&gt; map(std::function&lt;void(int&amp;)&gt; func, std::vector&lt;int&gt; &amp;n) {
    for (auto &amp;i : n) {
        func(i);
    }
    return n;
}

int sum(const std::vector&lt;int&gt; n) {
    int total = 0;
    for (auto i : n) {
        total += i;
    }
    return total;
}
...
// 使用上面的函数
void foo() {
    int acc = sum(map([](int &amp;a){a += 3;}, lst));
}</code></pre>
<h2 id="文档化的haskell">文档化的Haskell</h2>
<p>Haskell中支持一种以文档为主的文件格式<code>.lhs</code>，在这种格式下，以<code>&gt;</code>和一个空格开头的才被看做代码。这种文件格式可以更方便的写出大篇幅算法的解释等，毕竟没有人希望一个文件的主体全是注释。</p>
<h2 id="声明与变量">声明与变量</h2>
<p>观察以下代码：</p>
<pre class="language-haskell line-numbers match-braces"><code>x :: Int
x = 3

-- 单行注释以两个横线开头
{- 多行注释以两个
    括号-横线对包覆 -}</code></pre>
<p>这段代码声明了一个Int类型的变量x（::后面用于定义类型说明），并且将其值声明为3。此后x的值不能被改变。也不能对x进行重定义。</p>
<p>不难看出=号在Haskell中的含义与在其它语言中的不同。它并不是赋值运算符（Haskell中无值可赋），而是用于定义。<code>x = 4</code>不应理解成将x的值置为4，应该理解为x被定义为4。</p>
<p>考虑下面定义：</p>
<pre class="language-Haskell line-numbers match-braces"><code>y :: Int
y = y + 1</code></pre>
<p>多少人初学编程，无法理解这种等于自身+1的定义。后来终于将自己的思维扭转，只可惜历史是个圈。这个定义不再是y的值加1了，而是将y定义为y + 1。这是一个无限值，但由于Haskell的惰性求值特性，不使用它时并不会导致异常情况。</p>
<h2 id="基本类型">基本类型</h2>
<p>Haskell提供了一些耳熟能详的类型<code>Int</code>、<code>Char</code>、<code>Bool</code>、<code>Float</code>、<code>Double</code>与<code>String</code>，注意类型首字母要大写，以及几个注意事项。</p>
<ul>
<li><code>Int</code>大概相当于C++的int类型，长度取决于运行代码的机器。</li>
<li><code>Char</code>是Unicode编码字符。</li>
<li><code>Bool</code>的值为<code>True</code>和<code>False</code>，首字母依然要大写。</li>
<li><code>String</code>实际上是List的语法糖。</li>
</ul>
<p>Haskell也提供了无限大小的整形<code>Integer</code>，需要注意<code>Integer</code>与<code>Int</code>是不同的类型，不可混用。</p>
<p>注意Haskell中标识符使用小驼峰命名法。</p>
<h2 id="ghci">GHCi</h2>
<p>GHCi是Haskell的解释器，提供一个Haskell语言的解释运行环境，基本用法如下：</p>
<ul>
<li><code>:l</code>加载Haskell文件</li>
<li><code>:r</code>重新加载已加载文件</li>
<li><code>:q</code>退出GHCi</li>
<li><code>:?</code>打印帮助信息</li>
</ul>
<p>在GHCi中，可以很方便的测试简单代码。</p>
<h2 id="算术运算">算术运算</h2>
<p>可以在GHCi中进行一些简单运算的尝试：</p>
<pre class="language-haskell line-numbers match-braces"><code>-- 四则
ex01 = 3 + 2
ex02 = 19 - 27
ex03 = 2.35 * 8.6
ex04 = 8.7 / 3.1
-- 取模、乘方
ex05 = mod 19 3
ex06 = 19 `mod` 3
ex07 = 7 ^ 222
-- 负数
ex08 = (-3) * (-7)</code></pre>
<p>注意：</p>
<ul>
<li>Haskell在缺省类型说明时可以自动地推导类型。</li>
<li>所有运算符号本质都是函数。这些函数有的是中缀函数而有的是前缀函数，这是在定义时决定的。
<ul>
<li>默认情况下Haskell中的函数都是前缀函数。</li>
<li>前缀函数可以通过反引号当做中缀函数使用（ex06中的mod）。</li>
<li>函数调用不需要使用括号（函数调用符）。</li>
</ul></li>
<li>出现负数时要使用括号括起来，因为Haskell中没有函数调用符，负号与减号存在二义性（Haskell中为数不多的丑陋语法之一）。</li>
</ul>
<p>Haskell中不存在隐式类型转换，需要时必须使用显式类型转换，比如：</p>
<pre class="language-haskell line-numbers match-braces"><code>-- 将整型(Int, Integer)转换为任意其它类型时
fromIntegral n
-- 将浮点型转换为整型时，根据截断方式使用
round d
floor d
ceiling d</code></pre>
<p><code>/</code>运算符无法作用于整型，只能作用于浮点类型。整除函数为<code>div</code>，是一个前缀函数。</p>
<h2 id="布尔运算">布尔运算</h2>
<p>与或非运算分别为：<code>&amp;&amp;</code>、<code>||</code>、<code>not</code>。注意非运算不再是！号了。</p>
<p>比较运算有：<code>==</code>、<code>/=</code>、<code>&lt;</code>、<code>&gt;</code>、<code>&lt;=</code>、<code>&gt;=</code>。同样注意不等于不再是!=而是<code>/=</code>。</p>
<p>Haskell中也有<code>if condition then sth else sth</code>的表达式。但if表达式不是if语句，最大的区别在于if表达式不可省略else后的部分。</p>
<p>对于一个c++函数：</p>
<pre class="language-cpp line-numbers match-braces"><code>void foo(int x) {
    // ...
    if (condition) {
        // modify x
    }
    return x;
}</code></pre>
<p>其意义为满足一定条件时，返回对x进行一些操作后的值，否则输出x本身。</p>
<p>而对于Haskell函数，需要这样写：</p>
<pre class="language-haskell line-numbers match-braces"><code>foo n = if condition then modify n else n</code></pre>
<p>这样上述写法才在语义上等效，其中的关键思路是：Haskell中的表达式总是需要一个结果，省略掉else将导致程序无法产生结果。</p>
<p>这也是Haskell与命令式语言不同之处的体现：并非逐步执行，而是计算表达式。</p>
<p>不过Haskell中并不常用到if表达式，更多时候使用的是模式匹配和一种被称为<em>守卫（guards）</em>的机制。</p>
<h2 id="定义基础函数">定义基础函数</h2>
<p>一个函数可以这样定义</p>
<pre class="language-haskell line-numbers match-braces"><code>sumtorial :: Integer -&gt; Integer
sumtorial 0 = 0
sumtorial n = n + sumtorial (n - 1)</code></pre>
<p>其中的语法：</p>
<ul>
<li><code>sumtorial :: Integer -&gt; Integer</code>说明了函数的类型，接收一个<code>Integer</code>作为参数，返回一个<code>Integer</code></li>
<li>其后可以跟随多个从句，运行时使用参数从最上方定义的从句开始逐条匹配，并返回第一条匹配成功的从句定义的计算结果。这个过程就是模式匹配，比如说：
<ul>
<li>计算<code>sumtorial 0</code>，首先使用参数0与第一个从句的参数：0比较，匹配成功，返回第一个从句的值：0。</li>
<li>计算<code>sumtorial 3</code>，首先使用参数3与第一个从句的参数：0比较，匹配失败，再与第二个从句的参数n比较，n是一个变量，可以接受任何值，匹配成功，返回第二个从句的值：<code>3 + sumtorial (3 - 1)</code>。
<ul>
<li>由于Haskell是惰性求值的，只有用到这个结果时才会将表达式展开作下一步运算，这里暂且不管。</li>
</ul></li>
</ul></li>
</ul>
<p>也可以使用布尔表达式来筛选参数，也就是守卫机制：</p>
<pre class="language-haskell line-numbers match-braces"><code>hailstone :: Integer -&gt; Integer
hailstone n
  | n `mod` 2 == 0 = n `div` 2
  | otherwise      = 3 * n + 1</code></pre>
<p>守卫通过从句中的缩进（Haskell使用相同的缩进层级来划分代码块）和<code>|</code>来定义，从上而下进行判定，返回第一个满足条件的结果。<code>otherwise</code>表示无条件接收。</p>
<p>如果没有从句可以匹配变量，程序将报错退出。</p>
<p>一个细节，守卫是从句的下级机制，也就是说每个从句都可以拥有守卫：</p>
<pre class="language-haskell line-numbers match-braces"><code>foo :: Integer -&gt; Integer
foo 0 = 16
foo 1
  | &quot;Haskell&quot; &gt; &quot;C++&quot; = 3
  | otherwise = 4
foo n
  | n &lt; 0 = 0
  | n `mod` 17 == 2 = -43
  | otherwise       = n + 3
-- = 号并不需要对齐，这里只是出于美观对齐的</code></pre>
<p>这个例子也没啥意义，就是给看看怎么混合使用。</p>
<p>下面的程序是完全正确的，但有些啰嗦，考虑下问题在哪：</p>
<pre class="language-haskell line-numbers match-braces"><code>isEven :: Integer -&gt; Bool
isEven n
  | n `mod` 2 == 0 = True
  | otherwise      = False

-- 其实真正有效的部分只有n `mod` 2 == 0，所以可以写成以下形式
-- 函数命名使用单引号是合法的
isEven&#39; :: Integer -&gt; Bool
isEven&#39; n = n `mod` 2 == 0</code></pre>
<h2 id="序对">序对</h2>
<p>可以使用序对（Pair）将两个东西组合起来，比如：</p>
<pre class="language-haskell line-numbers match-braces"><code>p :: (Int, Char)
p = (3, &#39;x&#39;)</code></pre>
<p>注意：<code>(x, y)</code>这种语法既可以表示序对类型也可以表示序对的值。</p>
<p>可以使用模式匹配将序对中的值提取出来：</p>
<pre class="language-haskell line-numbers match-braces"><code>sumPair :: (Int, Int) -&gt; Int
sumPair (x, y) = x + y</code></pre>
<p>Haskell中含有三元组和多元组，但很少使用，因为有更好的方法，这个方法容我日后再说。</p>
<h2 id="接受多个参数的函数">接受多个参数的函数</h2>
<p>要让函数接受多个参数，只要在类型声明时使用更多的-&gt;就可以了：</p>
<pre class="language-haskell line-numbers match-braces"><code>f :: Int -&gt; Int -&gt; Int -&gt; Int
f x y z = x + y + z

useF = f 1 2 3</code></pre>
<p>在多个-&gt;组成的串中，前几项依序表示参数，最后一项表示返回类型。你可能会疑惑为什么使用这样一个似乎很容易混淆的形式，而不是类似于<code>f :: Int Int Int -&gt; Int</code>这样的形式。这背后是一个很优雅的语言特性，但这个特性也得留待后议。</p>
<p>注意前缀函数的运算优先级比中缀函数要高，所以以下写法是错误的：</p>
<pre class="language-haskell line-numbers match-braces"><code>f 3 n + 1 7</code></pre>
<p>因为它实际上会被解析成：</p>
<pre class="language-haskell line-numbers match-braces"><code>(f 3 n) + (1 7)</code></pre>
<p>正确的写法是加上括号：</p>
<pre class="language-haskell line-numbers match-braces"><code>f 3 (n + 1) 7</code></pre>
<h2 id="列表">列表</h2>
<p>列表（List）是Haskell中最基本的类型之一，使用<code>[]</code>表示，其中元素以<code>,</code>分隔：</p>
<pre class="language-haskell line-numbers match-braces"><code>nums :: [Integer]
nums   = [1, 2, 3, 19]</code></pre>
<p>之前提到过<code>String</code>是List的语法糖, 实际上<code>String</code>类型就是<code>[Char]</code>类型，比如:</p>
<pre class="language-haskell line-numbers match-braces"><code>hello1 :: [Char]
hello1 = [&#39;h&#39;, &#39;e&#39;, &#39;l&#39;, &#39;l&#39;, &#39;o&#39;]

hello2 :: String
hello2 = &quot;hello&quot;

-- helloSame 为 True
helloSame = hello1 == hello2</code></pre>
<h3 id="构建列表">构建列表</h3>
<pre class="language-haskell line-numbers match-braces"><code>-- 最简单的列表就是空列表了
emptyList = []

--使用构建运算符(:)将元素连接成列表, :运算符左边是一个元素，而右边是一个列表。
ex18 = 1 : []
-- :运算符符合右结合律，以便连接多个元素时可以省略括号。
ex19 = 3 : (1 : [])
ex20 = 2 : 3 : 4 : []

--[e1, e2, e3]实际上是e1 : e2 : e3 : []的语法糖
ex21 = [2, 3, 4] == 2 : 3 : 4 : []

--[e1, e2..en]的写法可以根据前两个元素自动展开列表（等差数列），省略第二个元素的情况下差值为1
-- 1, 2, 3 ... 100
range1 = [1 .. 100]
-- 2, 4, 6 ... 100
range2 = [2,4 .. 100]
-- a, b, c, d ... z
range3 = [&#39;a&#39; .. &#39;z&#39;]
-- 10, 9 ... 1
range4 = [10, 9 .. 1]
-- 无限列表1,2,3...
range5 = [1, 2 ..]
-- 使用浮点类型时要小心精度问题带来的异常情况
-- 实际生成[0.1， 0.3， 0.5， 0.7， 0.89999999， 1.09999999]
range6 = [0.1, 0.3 .. 1]

-- 列表生成式[expr | elem1&lt;-[range1], elem2&lt;-[range2]..., condition1, condition2...]
-- 看似复杂，其实记住：表达式，表达式中的变量怎么来的，变量的约束条件（条件需全部满足，即与关系）。
-- 很类似数学中集合的表示
list = [x * y | x&lt;-[4, 5, 6], y&lt;-[-1, 1, 2, 3], x &gt; y, y &gt; 0]

-- 使用函数生成列表, hailstone作为守卫机制的例子定义过了，可以翻回去看
hailstoneSeq :: Integer -&gt; [Integer]
hailstoneSeq 1 = [1]
hailstoneSeq n = n : hailstoneSeq (hailstone n)
</code></pre>
<h3 id="操作列表">操作列表</h3>
<p>列表的基本操作如下：</p>
<pre class="language-haskell line-numbers match-braces"><code>-- 使用++运算符拼接两个列表
-- [1，2，3，4，5，6]
list = [1,2,3] ++ [4,5,6]

-- 使用!!运算符取出列表中某个元素，类似数组下标，从0开始计数
-- n = 2
n = list!!1</code></pre>
<h2 id="处理列表的函数">处理列表的函数</h2>
<p>可以使用模式匹配来处理列表：</p>
<pre class="language-haskell line-numbers match-braces"><code>intListLength :: [Integer] -&gt; Integer
intListLength []  = 0
intListLength (x:xs) = 1 + intListLength xs
-- 对于仅仅用来表示模式而不实际使用的变量，如上例中x，可以使用下划线_占位
intListLength (_:xs) = 1 + intListLength xs

sumEveryTwo :: [Integer] -&gt; [Integer]
sumEveryTwo [] = []
sumEveryTwo (x : []) = [x]
sumEveryTwo (x : y : zs) = (x + y) : sumEveryTwo zs</code></pre>
<h2 id="组合函数">组合函数</h2>
<p>在Haskell中要尽可能地使用简单的函数组合成复杂的功能，比如要求hailstone数的数量，可以这样编写：</p>
<pre class="language-haskell line-numbers match-braces"><code>hailstoneLen :: Integer -&gt; Integer
hailstoneLen n = intListLength (hailstoneSeq n) - 1</code></pre>
<p>在这个函数中通过之前的例子定义的函数组合起来达成目的，其实这些函数本身也是由简单的函数组合成的，这样层层抽象将使得我们的心智负担更小。</p>
<h2 id="关于错误信息">关于错误信息</h2>
<p>不要害怕错误信息，它可以很好地帮助我们找出并改正代码中的错误。比如,在GHCi中：</p>
<pre class="language-none line-numbers match-braces"><code>Prelude&gt; &#39;x&#39; ++ &quot;foo&quot;</code></pre>
<p>将导致以下报错:</p>
<pre class="language-none line-numbers match-braces"><code>&lt;interactive&gt;:1:1:
  Couldn&#39;t match expected type &#39;[a0]&#39; with actual type &#39;Char&#39;
  In the first argument of &#39;(++)&#39;, namely &#39;x&#39;
  In the expression: &#39;x&#39; ++ &quot;foo&quot;
  In an equation for &#39;it&#39; : it = &#39;x&#39; ++ &quot;foo&quot;</code></pre>
<p>乍一看头都大了，怎么这么长一串报错。实际上耐心看下去就会发现，错误信息包括了出错原因与地点，还层层递进的显示了出错的语法，是非常友好的。</p>]]></content>
    </entry>
    <entry>
        <title type="html"><![CDATA[HMAC-SHA256算法解析与实现]]></title>
        <id>https://xilong.site/post/HMAC-SHA256_Algorithm_Analysis_and_Implementation.html</id>
        <link rel="alternate" type="text/html" href="https://xilong.site/post/HMAC-SHA256_Algorithm_Analysis_and_Implementation.html" />
        <updated>2021-05-29T00:00:00Z</updated>
        <!-- Every post here opens with an abstract, which is what
             `abstract` holds and what `content` therefore starts after.
             A feed carries the whole article, so it needs both, in the
             order the page itself shows them. -->
        <content type="html"><![CDATA[<p>对HMAC-SHA256算法做的整理。</p>
<h2 id="hmac算法">HMAC算法</h2>
<p>HMAC是Hash-based Message Authentication Code的缩写，意为基于哈希运算的消息认证码。其诞生目的是为了确保网络中报文的完整性以及信息来源的身份验证。其中有几个关键组成部分：</p>
<ul>
<li>哈希函数(Hash)：用以将任意长度的消息映射成为定长的哈希值。</li>
<li>密钥(key)：与原始消息组合后通过哈希函数，以起到身份验证功能。</li>
<li>原始消息(message)：将被处理的消息。</li>
<li>ipad：值为00110110(0x36)的循环，长度为Hash函数的分组长度。</li>
<li>opad：值为01011100(0x5c)的循环，长度为Hash函数的分组长度。</li>
</ul>
<p>HMAC算法描述为：</p>
<ol type="1">
<li>对key值进行填充，形成padded-key，填充方法如下：
<ol type="1">
<li>若key的长度小于Hash函数的分组长度，在其后用0填充至Hash函数分组长度。</li>
<li>若key的长度大于Hash函数的分组长度，使用Hash(key)生成padded-key。</li>
</ol></li>
<li>将生成的padded-key分别与ipad/opad进行XOR运算，得到ipad-key和opad-key。</li>
<li>将ipad-key与message首尾相接（ipad-key在message前），进行Hash(ipad-key+message)运算，得到hash1。</li>
<li>将得到的opad-key与hash1首尾相接，进行Hash(opad-key+hash1)运算，就得到了HMAC值。</li>
</ol>
<p>伪码描述：</p>
<pre class="language-none line-numbers match-braces"><code>input: key, message, Hash
output:hmac

chunk_size = Hash.chunk_size
ipad(chunk_size, 0x36)
opad(chunk_size, 0x5c)

padded_key = if (key.size &lt;= chunk_size)
             then key + padding(chunk_size - key.size, 0)
             else Hash(key)

ipad_key = XOR(padded_key, ipad)
opad_key = XOR(padded_key, opad)

hash1 = Hash(ipad_key + message)
hmac = Hash(opad_key + hash1)</code></pre>
<h2 id="sha256-算法">SHA256 算法</h2>
<p>SHA是Secure Hash Algorithm的缩写，是一个由美国国家安全局研发的算法族。这些算法大体结构相似，但在性能，数值范围与安全性上存在差别。SHA256算法是其中较为广为人知的一个算法，接受一个最大长度为(2^64 - 1)bit的消息，输出一个256bit长的哈希值。SHA256算法非常安全，目前还没有对SHA256算法的成功碰撞记录。</p>
<p>这个算法有几个关键组成部分：</p>
<ul>
<li>8个哈希初值：对自然界中前8个质数的平方根小数部分取前32个bit取得。</li>
</ul>
<pre class="language-none line-numbers match-braces"><code> 0x6a09e667, 0xbb67ae85, 0x3c6ef372, 0xa54ff53a
,0x510e527f, 0x9b05688c, 0x1f83d9ab, 0x5be0cd19</code></pre>
<ul>
<li>64个常数：对自然界中前64个质数的立方根小数部分取前32个bit取得。</li>
</ul>
<pre class="language-none line-numbers match-braces"><code> 0x428a2f98, 0x71374491, 0xb5c0fbcf, 0xe9b5dba5, 0x3956c25b
,0x59f111f1, 0x923f82a4, 0xab1c5ed5, 0xd807aa98, 0x12835b01
,0x243185be, 0x550c7dc3, 0x72be5d74, 0x80deb1fe, 0x9bdc06a7
,0xc19bf174, 0xe49b69c1, 0xefbe4786, 0x0fc19dc6, 0x240ca1cc
,0x2de92c6f, 0x4a7484aa, 0x5cb0a9dc, 0x76f988da, 0x983e5152
,0xa831c66d, 0xb00327c8, 0xbf597fc7, 0xc6e00bf3, 0xd5a79147
,0x06ca6351, 0x14292967, 0x27b70a85, 0x2e1b2138, 0x4d2c6dfc
,0x53380d13, 0x650a7354, 0x766a0abb, 0x81c2c92e, 0x92722c85
,0xa2bfe8a1, 0xa81a664b, 0xc24b8b70, 0xc76c51a3, 0xd192e819
,0xd6990624, 0xf40e3585, 0x106aa070, 0x19a4c116, 0x1e376c08
,0x2748774c, 0x34b0bcb5, 0x391c0cb3, 0x4ed8aa4a, 0x5b9cca4f
,0x682e6ff3, 0x748f82ee, 0x78a5636f, 0x84c87814, 0x8cc70208
,0x90befffa, 0xa4506ceb, 0xbef9a3f7, 0xc67178f2</code></pre>
<ul>
<li>原始消息(message)：将被处理的消息。</li>
<li>分段长度(chunk_size)：512bit</li>
<li>运算字数(word_count)：64</li>
<li>函数CROR(x, n) = x循环右移n位</li>
<li>函数S0(x) = CROR(x, 7) ^ CROR(x, 18) ^ (x &gt;&gt; 3)</li>
<li>函数S1(x) = CROR(x, 17) ^ CROR(x, 19) ^ (x &gt;&gt; 10)</li>
<li>函数EP0(x) = CROR(x, 2) ^ CROR(x, 13) ^ CROR(x, 22)</li>
<li>函数EP1(x) = CROR(x, 6) ^ CROR(x, 11) ^ CROR(x, 25)</li>
<li>函数CH(x, y, z) = (x &amp; y) ^ ((~x) &amp; z)</li>
<li>函数MAJ(x, y, z) = ((x &amp; y) ^ (x &amp; z) ^ (y &amp; z))</li>
</ul>
<p>算法描述如下：</p>
<ol type="1">
<li><p>对message进行预处理：</p>
<ol type="1">
<li><p>在message后填充1位1，然后填充若干位0，直到message的长度(bit)对512取模等于448（message.size % chunk_size = 448）。</p>
<ul>
<li>不管message本来长度是多少，都要先填充1位1。也就是说即使message的长度对512取模已经等于448了，还是要填充1位1，之后再填充511位0使其长度重新符合要求。</li>
<li>为什么是448？因为下一步要填充一个64bit的数，448+64等于分段长度512。</li>
</ul></li>
<li><p>使用一个64bit长的无符号整型数以大端字节序在message后填充原始message的长度。</p>
<ul>
<li><p>字节序，对于长度超过1字节的数据，在内存中的存储有两种顺序：</p>
<ol type="1">
<li>低地址存储高位字节，高地址存储低位字节，称为大端字节序。</li>
<li>低地址存储低位字节，高地址存储高位字节，称为小端字节序。</li>
</ol>
<p>例如，对于0x1234，若使用内存地址0x01, 0x02存储这两个字节，表现为：</p>
<pre class="language-none line-numbers match-braces"><code>// 大端序
0x01: 0x12
0x02: 0x34

// 小端序
0x01: 0x34
0x02: 0x12</code></pre>
<p>值得一提的是，对无论大端序还是小端序，对0x1234取地址都将得到0x01。</p></li>
</ul></li>
</ol></li>
<li><p>使用一个长度为8的数组H[]保存8个哈希初值。</p></li>
<li><p>使用一个长度为64的数组k[]保存64个常数。</p></li>
<li><p>将预处理后的message分割为若干长度为chunk_size的chunk。</p></li>
<li><p>依序对每个chunk进行下列处理：</p>
<ol type="1">
<li><p>建立一个大小为word_count(64)的数组w[]</p></li>
<li><p>将chunk分割为16个长度为32bit的word，存储在w[0]-w[15]中。</p>
<ul>
<li>注意将每一个word转换为机器字节序，否则位运算会出问题。</li>
</ul></li>
<li><p>对i从16到63进行循环：</p>
<ul>
<li>w[i] = w[i - 16] + S0(w[i - 15]) + w[i - 7] + S1(w[i - 2])</li>
</ul></li>
<li><p>使用创建H[]的拷贝h[]</p></li>
<li><p>对i从0到63进行循环，根据w[]和k[]计算h[]中的hash值：</p>
<ul>
<li><p>t1 = h[7] + EP1(h[4]) + CH(h[4], h[5], h[6]) + k[i] + w[i]</p></li>
<li><p>t2 = EP0(h[0]) + MAJ(h[0], h[1], h[2])</p></li>
<li><p>对i从7到1循环：</p>
<ul>
<li>if (i == 4) then h[i] = h[i - 1] + t1 else h[i] = h[i - 1]</li>
</ul></li>
<li><p>h[0] = t1 + t2</p></li>
</ul></li>
<li><p>更改H[]供下一个chunk使用：</p>
<ul>
<li>H[] += h[]</li>
</ul></li>
</ol></li>
<li><p>将最终得到的H[]按大端字节序首尾相接，即形成最终的256bit哈希值。</p></li>
</ol>
<p>伪码描述：</p>
<pre class="language-none line-numbers match-braces"><code>input: message
output: hash

H[8] = {0x6a09e667, 0xbb67ae85, 0x3c6ef372, 0xa54ff53a
       ,0x510e527f, 0x9b05688c, 0x1f83d9ab, 0x5be0cd19}

k[64] = {0x428a2f98, 0x71374491, 0xb5c0fbcf, 0xe9b5dba5, 0x3956c25b
        ,0x59f111f1, 0x923f82a4, 0xab1c5ed5, 0xd807aa98, 0x12835b01
        ,0x243185be, 0x550c7dc3, 0x72be5d74, 0x80deb1fe, 0x9bdc06a7
        ,0xc19bf174, 0xe49b69c1, 0xefbe4786, 0x0fc19dc6, 0x240ca1cc
        ,0x2de92c6f, 0x4a7484aa, 0x5cb0a9dc, 0x76f988da, 0x983e5152
        ,0xa831c66d, 0xb00327c8, 0xbf597fc7, 0xc6e00bf3, 0xd5a79147
        ,0x06ca6351, 0x14292967, 0x27b70a85, 0x2e1b2138, 0x4d2c6dfc
        ,0x53380d13, 0x650a7354, 0x766a0abb, 0x81c2c92e, 0x92722c85
        ,0xa2bfe8a1, 0xa81a664b, 0xc24b8b70, 0xc76c51a3, 0xd192e819
        ,0xd6990624, 0xf40e3585, 0x106aa070, 0x19a4c116, 0x1e376c08
        ,0x2748774c, 0x34b0bcb5, 0x391c0cb3, 0x4ed8aa4a, 0x5b9cca4f
        ,0x682e6ff3, 0x748f82ee, 0x78a5636f, 0x84c87814, 0x8cc70208
        ,0x90befffa, 0xa4506ceb, 0xbef9a3f7, 0xc67178f2}

// 实际上处理以字节为单位，而不是bit
chunk_size = 64;
word_count = 64;

CROR(x, n) = x循环右移n位
S0(x) = CROR(x, 7) ^ CROR(x, 18) ^ (x &gt;&gt; 3)
S1(x) = CROR(x, 17) ^ CROR(x, 19) ^ (x &gt;&gt; 10)
EP0(x) = CROR(x, 2) ^ CROR(x, 13) ^ CROR(x, 22)
EP1(x) = CROR(x, 6) ^ CROR(x, 11) ^ CROR(x, 25)
CH(x, y, z) = (x &amp; y) ^ ((~x) &amp; z)
MAJ(x, y, z) = ((x &amp; y) ^ (x &amp; z) ^ (y &amp; z))

// 预处理部分
unit_byte = 64
target_size = 56
// 第一个填充字节，值为10000000
first_append = 0x80

// 大小信息以bit为单位
length = message.size * 8

need_size = target_size - (message.size % chunk_size)
need_size += if (need_size &lt;= 0) then chunk_size else 0;

// zero构造一个长度为need_size - 1字节的串，big_endian保证返回一个数的大端序格式
message += first_append + zero(need_size - 1) + big_endian(length)

// 分块并计算hash值
chunk_count = message.size / chunk_size
for i in (0, chunk_count):
    // divide将chunk分解为16个机器字节序的word
    w[0..15] = divide(chunk[i])
    // 生成剩下的word
    for i in (16, word_count):
        w[i] = w[i - 16] + S0(w[i - 15]) + w[i - 7] + S1(w[i - 2])
    h = H
    for i in (0, word_count):
        t1 = h[7] + EP1(h[4]) + CH(h[4], h[5], h[6]) + k[i] + w[i]
        t2 = EP0(h[0]) + MAJ(h[0], h[1], h[2])
        for i in (7, 0):
            h[i] = h[i - 1]
            if (i == 4):
                h[i] += t1
        h[0] = t1 + t2
    for i in (0, 8):
        H[i] += h[i]

// 生成hash值，将H中每个值以大端格式组合
hash = big_endian_combine(H)</code></pre>
<h2 id="hmac_sha256算法实现">HMAC_SHA256算法实现</h2>
<p>HMAC_SHA256算法就是将SHA256算法作为Hash函数的HMAC算法。简单组合就可得到。</p>
<h3 id="c实现">C++实现</h3>
<p>理解了上述内容后使用C++实现出来还是很简单的。</p>
<pre class="language-cpp line-numbers match-braces"><code>/*********************************************
 * 一个HMAC和SHA256算法的跨平台实现
 * ******************************************/

#include &lt;cstdio&gt;
#include &lt;cstdint&gt;
#include &lt;string&gt;
#include &lt;array&gt;
#include &lt;functional&gt;

using std::array;
using std::function;
using std::pair;
using std::size_t;

/*********************************************
 * 字节序相关运算
 * ******************************************/

// 判定机器字节序，大端返回true，小端返回false
inline bool big_endian() {
    uint16_t test = 0x1234;
    uint8_t first = *reinterpret_cast&lt;uint8_t*&gt;(&amp;test);
    return first == 0x12;
}

// 对字节序进行转换
template&lt;typename T&gt;
inline T order_switch(const T &amp;input) {
    T output(0);
    constexpr std::size_t size = sizeof(input);
    uint8_t *data = reinterpret_cast&lt;uint8_t*&gt;(&amp;output);

    for (size_t i = 0; i &lt; size; ++i) {
        data[i] = input &gt;&gt; ((size - i - 1) * 8);
    }

    return output;
}

// 取一个数的大端表示，在大端机器上直接返回，小端机器上进行转换。
template&lt;typename T&gt;
inline T local2big(const T &amp;input) {
    if (big_endian()) {
        return input;
    }
    return order_switch(input);
}

// 取一个大端序数的机器表示，实际上与local2big等效。
template&lt;typename T&gt;
inline T big2local(const T &amp;input) {
    return local2big(input);
}

/********************************
 * 以字节方式查看变量
 * *****************************/
template&lt;typename T&gt;
void print_byte(const T &amp;input) {
    auto arr = reinterpret_cast&lt;const uint8_t*&gt;(&amp;input);
    for (size_t i = 0; i &lt; sizeof(input); ++i) {
        printf(&quot;%.2x &quot;, arr[i]);
        if ((i + 1) % 8 == 0) {
            putchar(&#39;\n&#39;);
        }
    }
    putchar(&#39;\n&#39;);
}

/*********************************************
 * SHA256算法实现
 * ******************************************/

using Packet = std::string;

// 为Packet特化字节查看模板
template&lt;&gt;
void print_byte(const Packet &amp;packet) {
    for (size_t i = 0; i &lt; packet.size(); ++i) {
        printf(&quot;%.2x &quot;, static_cast&lt;unsigned char&gt;(packet[i]));
        if ((i + 1) % 8 == 0) {
            putchar(&#39;\n&#39;);
        }
    }
    putchar(&#39;\n&#39;);
}

// 8个初始哈希值
const array&lt;uint32_t, 8&gt; h_init =
    {0x6a09e667, 0xbb67ae85, 0x3c6ef372, 0xa54ff53a
    ,0x510e527f, 0x9b05688c, 0x1f83d9ab, 0x5be0cd19};

// 64个常数
const array&lt;uint32_t, 64&gt; k =
    {0x428a2f98, 0x71374491, 0xb5c0fbcf, 0xe9b5dba5, 0x3956c25b
    ,0x59f111f1, 0x923f82a4, 0xab1c5ed5, 0xd807aa98, 0x12835b01
    ,0x243185be, 0x550c7dc3, 0x72be5d74, 0x80deb1fe, 0x9bdc06a7
    ,0xc19bf174, 0xe49b69c1, 0xefbe4786, 0x0fc19dc6, 0x240ca1cc
    ,0x2de92c6f, 0x4a7484aa, 0x5cb0a9dc, 0x76f988da, 0x983e5152
    ,0xa831c66d, 0xb00327c8, 0xbf597fc7, 0xc6e00bf3, 0xd5a79147
    ,0x06ca6351, 0x14292967, 0x27b70a85, 0x2e1b2138, 0x4d2c6dfc
    ,0x53380d13, 0x650a7354, 0x766a0abb, 0x81c2c92e, 0x92722c85
    ,0xa2bfe8a1, 0xa81a664b, 0xc24b8b70, 0xc76c51a3, 0xd192e819
    ,0xd6990624, 0xf40e3585, 0x106aa070, 0x19a4c116, 0x1e376c08
    ,0x2748774c, 0x34b0bcb5, 0x391c0cb3, 0x4ed8aa4a, 0x5b9cca4f
    ,0x682e6ff3, 0x748f82ee, 0x78a5636f, 0x84c87814, 0x8cc70208
    ,0x90befffa, 0xa4506ceb, 0xbef9a3f7, 0xc67178f2};

// 循环右移
inline uint32_t CROR(uint32_t input, size_t bits) {
    return ((input &gt;&gt; bits) | (input &lt;&lt; (32 - bits)));
}

// sha256中需要的一些运算
inline uint32_t S0(uint32_t x) {
    return CROR(x, 7) ^ CROR(x, 18) ^ (x &gt;&gt; 3);
}

inline uint32_t S1(uint32_t x) {
    return CROR(x, 17) ^ CROR(x, 19) ^ (x &gt;&gt; 10);
}

inline uint32_t EP0(uint32_t x) {
    return CROR(x, 2) ^ CROR(x, 13) ^ CROR(x, 22);
}

inline uint32_t EP1(uint32_t x) {
    return CROR(x, 6) ^ CROR(x, 11) ^ CROR(x, 25);
}

inline uint32_t CH(uint32_t x, uint32_t y, uint32_t z) {
        return ((x &amp; y) ^ ((~x) &amp; z));
};

inline uint32_t MAJ(uint32_t x, uint32_t y, uint32_t z) {
    return ((x &amp; y) ^ (x &amp; z) ^ (y &amp; z));
};

Packet sha256(const Packet &amp;message) {
    auto msg = message;
    constexpr size_t chunk_size = 64;
    constexpr size_t target_size = 56;
    // 预处理
    msg.push_back(0x80);
    while (msg.size() % chunk_size != target_size) {
        msg.push_back(0x00);
    }
    uint64_t length = local2big(message.size() * 8);
    for (int i = 0; i &lt; 8; ++i) {
        msg.push_back(reinterpret_cast&lt;uint8_t*&gt;(&amp;length)[i]);
    }
    // 分块并计算hash
    auto chunk_count = msg.size() / chunk_size;
    constexpr size_t word_count = 64;
    auto H = h_init;
    for (size_t i = 0; i &lt; chunk_count; ++i) {
        // 初始化word数组
        array&lt;uint32_t, word_count&gt; w;
        constexpr size_t word_size = 4;
        constexpr size_t word_per_chunk = chunk_size / word_size;
        // 从Packet中分割出原始word
        size_t pos = i * chunk_size;
        for (size_t j = 0; j &lt; word_per_chunk; ++j) {
            uint32_t value = *reinterpret_cast&lt;const uint32_t*&gt;(msg.c_str()
                + pos + word_size * j);
            w[j] = big2local(value);
        }
        // 根据原始word计算剩余word
        for (size_t j = word_per_chunk; j &lt; word_count; ++j) {
            w[j] = w[j - 16] + S0(w[j - 15]) + w[j - 7] + S1(w[j - 2]);
        }
        // 初始化hash值
        auto h = H;
        // 根据word值计算hash值
        for (size_t i = 0; i &lt; word_count; ++i) {
            auto t1 = h[7] + EP1(h[4]) + CH(h[4], h[5], h[6]) + k[i] + w[i];
            auto t2 = EP0(h[0]) + MAJ(h[0], h[1], h[2]);
            for (size_t j = 7; j &gt; 0; --j) {
                h[j] = h[j - 1];
                if (j == 4) {
                    h[j] += t1;
                }
            }
            h[0] = t1 + t2;
        }
        // 更新hash值供下一个chunk使用
        for (size_t i = 0; i &lt; h.size(); ++i) {
            H[i] += h[i];
        }
    }
    // 拼接H得到结果
    Packet result;
    for (auto v : H) {
        uint32_t value = local2big(v);
        for (size_t i = 0; i &lt; 4; ++i) {
            result.push_back(reinterpret_cast&lt;uint8_t*&gt;(&amp;value)[i]);
        }
    }
    return result;
}

/*********************************************
 * HMAC算法实现
 * ******************************************/

using Hash = pair&lt;size_t, function&lt;Packet(const Packet&amp;)&gt;&gt;;

Packet hmac(const Packet &amp;message , const Packet &amp;key, const Hash &amp;hash) {
    auto chunk_size = hash.first;
    uint8_t ipad(0x36);
    uint8_t opad(0x5C);

    // 填充key
    auto padded_key = key;
    if (padded_key.size() &gt; chunk_size) {
        padded_key = hash.second(padded_key);
    } else {
        while(padded_key.size() &lt; chunk_size) {
            padded_key.push_back(0x00);
        }
    }

    // 使用异或运算生成ipad_key和opad_key
    auto XOR = [](const Packet &amp;packet, uint8_t pad) {
        auto result = packet;
        for (auto &amp;c : result) {
            c ^= pad;
        }
        return result;
    };
    auto ipad_key = XOR(padded_key, ipad);
    auto opad_key = XOR(padded_key, opad);

    // 使用hash算法得到结果
    return hash.second(opad_key + hash.second(ipad_key + message));
}</code></pre>]]></content>
    </entry>
    <entry>
        <title type="html"><![CDATA[C++随机数的使用]]></title>
        <id>https://xilong.site/post/Cpp_Using_Random_Numbers.html</id>
        <link rel="alternate" type="text/html" href="https://xilong.site/post/Cpp_Using_Random_Numbers.html" />
        <updated>2021-05-17T00:00:00Z</updated>
        <!-- Every post here opens with an abstract, which is what
             `abstract` holds and what `content` therefore starts after.
             A feed carries the whole article, so it needs both, in the
             order the page itself shows them. -->
        <content type="html"><![CDATA[<p>整理一下STL中random库和cstdlib中随机数机制的用法区别。</p>
<h2 id="cstdlib中的随机数用法">cstdlib中的随机数用法</h2>
<pre class="language-cpp line-numbers match-braces"><code>#include &lt;cstdlib&gt;
#include &lt;ctime&gt;
#include &lt;cstdio&gt;

int main() {
    srand(time(0));
    for (int i = 0; i &lt; 10; ++i) {
        printf(&quot;%d\n&quot;, rand());
    }
    return 0;
}</code></pre>
<p>这段程序使用系统当前时间作随机数种子，然后使用rand()生成10个随机数。</p>
<h2 id="stl中的随机数用法">STL中的随机数用法</h2>
<pre class="language-cpp line-numbers match-braces"><code>#include &lt;random&gt;
#include &lt;ctime&gt;
#include &lt;cstdio&gt;

using namespace std;

int main() {
    default_random_engine e(time(0));
    for (int i = 0; i &lt; 10; ++i) {
        printf(&quot;%d\n&quot;, e());
    }
    return 0;
}</code></pre>
<p>这段程序也是使用系统当前时间作随机数种子，然后使用e()生成10个随机数。</p>
<p><del>好了，以上就是小编带来的关于如何在c++中使用随机数的全部内容了，你学会了吗？（逃</del></p>
<h2 id="为什么要使用stl的随机数">为什么要使用STL的随机数</h2>
<p>答：用法丰富，使用方便。直接上例子：</p>
<pre class="language-cpp line-numbers match-braces"><code>#include &lt;random&gt;
#include &lt;cstdlib&gt;
#include &lt;ctime&gt;

using namespace std;

int main() {
    default_random_engine e;
    // 设置种子
    srand(time(0));
    e.seed(time(0));
    // 生成一个范围内的整数
    int min = 0;
    int max = 9;
    rand() % (max - min) + min;
    uniform_int_distribution&lt;unsigned&gt; u(min, max);
    u(e);
    // 生成随机实数，STL的方法精度高于使用rand() / double的方式生成的实数
    uniform_real_distribution&lt;double&gt; u2(min, max);
    u2(e);
    // 生成随机布尔, 注意这个描述器不是模板
    bernoulli_distribution b;
    b(e);
    // 生成不均匀分布的随机数, 均值4， 标准差1.5
    normal_distribution&lt;&gt; n(4, 1.5);
    n(e);
    return 0;
}</code></pre>
<p>相信大家已经看出来标准库的方便之处了。</p>
<h2 id="一个非常常见的问题">一个非常常见的问题</h2>
<pre class="language-cpp line-numbers match-braces"><code>#include &lt;cstdlib&gt;
#include &lt;random&gt;
#include &lt;ctime&gt;

using namespace std;

int main() {
    for (int i = 0; i &lt; 10; ++i) {
        srand(time(0));
        rand();
        default_random_engine e;
        e();
    }
    return 0;
}</code></pre>
<p>这种方式会生成一样的数字，原因是随机数种子被设置时会重置随机数生成器的状态（Engine e初始化时同样设置了默认种子）。应避免在生成随机数时设置种子。</p>
<pre class="language-cpp line-numbers match-braces"><code>#include &lt;cstdlib&gt;
#include &lt;random&gt;
#include &lt;ctime&gt;

using namespace std;

int main() {
    srand(time(0));
    default_random_engine e;
    for (int i = 0; i &lt; 10; ++i) {
        rand();
        e();
    }
    return 0;
}</code></pre>
<p>这样就没问题了。</p>]]></content>
    </entry>
    <entry>
        <title type="html"><![CDATA[Python深拷贝与浅拷贝]]></title>
        <id>https://xilong.site/post/Python_Deep_Copy_vs_Shallow_Copy.html</id>
        <link rel="alternate" type="text/html" href="https://xilong.site/post/Python_Deep_Copy_vs_Shallow_Copy.html" />
        <updated>2021-05-15T00:00:00Z</updated>
        <!-- Every post here opens with an abstract, which is what
             `abstract` holds and what `content` therefore starts after.
             A feed carries the whole article, so it needs both, in the
             order the page itself shows them. -->
        <content type="html"><![CDATA[<p>自从上次略略学习了一些python基础就没怎么用过python了，这次遇到了深浅拷贝问题，在此记录。</p>
<h2 id="引子">引子</h2>
<p>考虑下面代码：</p>
<pre class="language-python line-numbers match-braces"><code>list1 = []
list2 = list1
list3 = list2

while (some condition):
    list1 = some value
    ...
    if (some condition):
        list2 = some value
    if (f(list3) &lt; f(list2)):
        list3 = list2

print(list3)</code></pre>
<p>这段代码试图在一些复杂运算中取出最优结果，并将其保存在list3中。由于平时基本是使用C++写程序，我设想它等效于以下C++代码：</p>
<pre class="language-cpp line-numbers match-braces"><code>vector&lt;T&gt; list1;
vector&lt;T&gt; list2 = list1;
vector&lt;T&gt; list3 = list1;

while (some condition) {
    list1 = some value;
    ...
    if (some condition) {
        list2 = some value;
    }
    if (f(list3) &lt; f(list2)) {
        list3 = list2
    }
}
//void print(const vector&lt;T&gt;&amp;), 打印vector中所有元素
print(list3)</code></pre>
<p>作为一个与C++相爱相杀近两年的人，我很确信这段代码能完成任务，事实上它的确能。但python代码却总是出错，于是我试图在list3唯一可能被修改的地方打印出它的值。</p>
<pre class="language-python line-numbers match-braces"><code>...
if (f(list3) &lt; f(list2)):
    list3 = list2
    print(list3)
...
print(&quot;final:&quot;)
print(list3)</code></pre>
<p>令人匪夷所思的事情出现了，输出结果居然是：</p>
<pre class="language-none line-numbers match-braces"><code>[aaaaaaaaa]
[bbbbbbbbb]
[ccccccccc]
....
[xxxxxxxxx]
final:
[yyyyyyyyy]</code></pre>
<p>最后一次赋值后的值居然跟最后输出的值不一样？！几经周折了解到，Python中存在深拷贝与浅拷贝的问题。</p>
<h2 id="什么是深拷贝与浅拷贝">什么是深拷贝与浅拷贝</h2>
<p>简单说，深拷贝就是新建一块内存空间，并将原内存空间中的数据拷贝到新的内存空间中。而浅拷贝不创建内存空间，只令对象引用已存在的内存空间。类比C++的指针：</p>
<pre class="language-cpp line-numbers match-braces"><code>T *a = new T();
T *b;
b = a; // 浅拷贝
b = new T(*a); // 深拷贝</code></pre>
<p>这里需要注意，不存在指针的语言中（如Python, Java）引用的含义和C++是不同的，更接近于C++中的指针。C++中的引用只是变量的别名，是不可以更改指向的变量的。而Python中的引用更像是一个自动的指针，可以取值也可以改变所指，并且无需显式指定操作，由语言情景决定该执行哪种操作。</p>
<h2 id="python的对象机制">Python的对象机制</h2>
<p>由于python中不存在指针和引用，也就无法像C++那样自由选择值传递或传引用传递。为了避免操作大对象时的巨大开销，python的应对方法是——一切皆引用。即，每个变量实际上都是引用类型，赋值（=）号通常并不新建对象，而是让变量的引用指向指定的地址。</p>
<p>也就是说，上面的程序中list1，list2和list3实际上是同一个对象的不同引用，验证如下：</p>
<pre class="language-python line-numbers match-braces"><code>list1 = []
list2 = list1
list3 = list1
print(id(list1), &quot; &quot; ,id(list2), &quot; &quot;, id(list3))</code></pre>
<p>可以看出它们的地址相同，即为同一个对象。那么理所应当地，我们通过哪一个引用改变变量的值都会更改这唯一的地址空间。</p>
<p>这里你可能对一切皆引用这个说法有所质疑，并提出如下例子：</p>
<pre class="language-Python line-numbers match-braces"><code>a = 5
b = a
b = 3
print(a, id(a))
print(b, id(b))</code></pre>
<p>输出：</p>
<pre class="language-none line-numbers match-braces"><code>5 139656604350896
3 139656604350832</code></pre>
<p>这输出似乎与一切皆引用有出入，因为更改b的值既没有影响a的值，a和b的地址也不一样。这里的核心是：语句<code>b = 3</code>的语义真的是更改b的值吗？我们对这个例子稍作改动：</p>
<pre class="language-python line-numbers match-braces"><code>a = 5
b = a
print(id(a), &quot; &quot;, id(b))
b = 3
print(id(b), &quot; &quot;, id(3))</code></pre>
<p>输出：</p>
<pre class="language-none line-numbers match-braces"><code>140143427922352   140143427922352
140143427922288   140143427922288</code></pre>
<p>没错，常量3也是一个引用。只不过无法改变它的指向。这里一个事实已经呼之欲出，赋值运算符（=）只改变引用的指向。即只能用作浅拷贝。</p>
<h2 id="如何进行深拷贝">如何进行深拷贝</h2>
<p>那么如何进行深拷贝呢？对一个列表，我们可能会想要使用切片创建新的内存空间：</p>
<pre class="language-python line-numbers match-braces"><code>list1 = [1,2,3]
list2 = list1[:]
print(id(list1), &quot; &quot;, id(list2))</code></pre>
<p>这里可以看出list2已经拥有了新的内存空间。但这种方法在处理多层列表的时候，会出现问题：</p>
<pre class="language-python line-numbers match-braces"><code>list1 = [[1], [2], [3]]
list2 = list1[:]
list1[0][0] = 2
print(list2[0][0])</code></pre>
<p>list2的值还是被list1的修改改动了，这是因为list2虽然和list1没有指向同一块地址空间。但其中第一个元素却指向了同一块地址空间。</p>
<p>因此，<strong>深拷贝唯一指定方法：copy.deepcopy()</strong></p>]]></content>
    </entry>
    <entry>
        <title type="html"><![CDATA[Haskell解决四柱汉诺塔问题]]></title>
        <id>https://xilong.site/post/Haskell_Solving_the_Four_Towers_of_Hanoi_Puzzle.html</id>
        <link rel="alternate" type="text/html" href="https://xilong.site/post/Haskell_Solving_the_Four_Towers_of_Hanoi_Puzzle.html" />
        <updated>2021-01-27T00:00:00Z</updated>
        <!-- Every post here opens with an abstract, which is what
             `abstract` holds and what `content` therefore starts after.
             A feed carries the whole article, so it needs both, in the
             order the page itself shows them. -->
        <content type="html"><![CDATA[<p>初学Haskell，在做<a href="https://www.seas.upenn.edu/~cis194/spring13/hw/01-intro.pdf">CIS 194 HomeWork1</a>时遇到的四柱汉诺塔最优解问题。过程中对递归与函数式编程产生了许多新的理解，在此做一下记录。</p>
<h2 id="回顾汉诺塔是什么">回顾：汉诺塔是什么？</h2>
<blockquote>
<p>The Towers of Hanoi is a classic puzzle with a solution that can be described recursively. Disks of different sizes are stacked on three pegs; the goal is to get from a starting configuration with all disks stacked on the first peg to an ending configuration with all disks stacked on the last peg, as shown in Figure 1.</p>
<p><img src="https://xilong.site/res/post-imgs/Haskell_Solving_the_Four_Towers_of_Hanoi_Puzzle/image-20210127013232812.png" alt="image-20210127013232812" style="zoom:33%;" /></p>
<p>​ Figure 1: The Towers of Hanoi The only rules are • you may only move one disk at a time, and • a larger disk may never be stacked on top of a smaller one. For example, as the first move all you can do is move the topmost, smallest disk onto a different peg, since only one disk may be moved at a time.</p>
<p><img src="https://xilong.site/res/post-imgs/Haskell_Solving_the_Four_Towers_of_Hanoi_Puzzle/image-20210127013307704.png" alt="image-20210127013307704" style="zoom:33%;" /></p>
<p>​ Figure 2: A valid first move. From this point, it is illegal to move to the configuration shown in Figure 3, because you are not allowed to put the green disk on top of the smaller blue one.</p>
<p><img src="https://xilong.site/res/post-imgs/Haskell_Solving_the_Four_Towers_of_Hanoi_Puzzle/image-20210127013331098.png" alt="image-20210127013331098" style="zoom:33%;" /></p>
<p>​ Figure 3: An illegal configuration. To move n discs (stacked in increasing size) from peg a to peg b using peg c as temporary storage,</p>
<ol type="1">
<li>move n − 1 discs from a to c using b as temporary storage</li>
<li>move the top disc from a to b</li>
<li>move n − 1 discs from c to b using a as temporary storage.</li>
</ol>
</blockquote>
<p>这东西相信大家都非常熟悉了，不多赘言。下面进入第一个问题，使用Haskell求解汉诺塔。</p>
<h2 id="haskell求解汉诺塔">Haskell求解汉诺塔</h2>
<blockquote>
<p>Given the number of discs and names for the three pegs, hanoi should return a list of moves to be performed to move the stack of discs from the first peg to the second.</p>
</blockquote>
<p>先上代码：</p>
<pre class="language-haskell line-numbers match-braces"><code>type Peg = String
type Move = (Peg, Peg)
-- hanoi numOfDiscs-&gt;originPeg-&gt;targetPeg-&gt;otherPeg-&gt;moves
hanoi :: Integer-&gt;Peg-&gt;Peg-&gt;Peg-&gt;[Move]
hanoi 0 a b c = []
hanoi n a b c = hanoi (n - 1) a c b ++ [(a, b)] ++ hanoi (n - 1) c b a</code></pre>
<p>这几行程序没费什么力，使我深深地体会到了Haskell的简洁与优雅，这种写法实在是太漂亮了。这里用了很简单的一个思路，hanoi n a b c表示由a柱，经c柱移动n个盘子到b柱。</p>
<p><code>hanoi n a b c = hanoi (n - 1) a c b ++ [(a, b)] ++ hanoi (n - 1) c b a</code></p>
<p>这句代码表达先把上层 n - 1个盘子由a柱移动到c柱，再把最底层盘子直接移动到b柱，最后把c柱上的盘子也移动到b柱。Haskell这种写法在简洁与表达力上实在是令我惊叹。</p>
<h2 id="再来一根四柱汉诺塔问题">再来一根：四柱汉诺塔问题</h2>
<p>顾名思义，四柱汉诺塔就是在三柱汉诺塔的基础上再加一根柱子。同样是求将一根柱子上的盘子全部移动到另一根上的过程序列。</p>
<p>解四柱汉诺塔的基本思路是由a柱，经过b柱、d柱的辅助，将一部分盘子移动到c柱。</p>
<p>由于所有先移出去的盘子一定比剩下任一的盘子小，在移动剩下的盘子时就无法再借助c柱了，问题变成两个三柱汉诺塔问题：</p>
<ol type="1">
<li>由a柱经过b柱的辅助将除最下层盘子外的盘子移动到d柱；</li>
<li>将最下层盘子移动到b柱；</li>
<li>由d柱经过a柱的辅助将盘子移动到b柱</li>
</ol>
<p>现在的状态是，a柱、d柱上没有盘子，c柱上有一开始移动出去的盘子，b柱上有剩下的盘子。由于c柱上的盘子都小于b柱上的盘子，故而在移动时可以借助b柱。则由c柱经过a柱、d柱的辅助将盘子移动到b柱上，即完成了将所有盘子由a柱移动到b柱的过程。</p>
<p>那么应该怎么把盘子分成两份呢？这里简单起见，将盘子平分成两份。</p>
<pre class="language-haskell line-numbers match-braces"><code>hanoiPlus :: Integer-&gt;Peg-&gt;Peg-&gt;Peg-&gt;Peg-&gt;[Move]
hanoiPlus 0 _ _ _ _ = []
hanoiPlus n a b c d = hanoiPlus (left - k) a c b d
            ++ hanoi k a d b
            ++ [(a, b)]
            ++ hanoi k d b a
            ++ hanoiPlus (left - k) c b a d
    where
        left = n - 1
        k = n `div` 2</code></pre>
<h2 id="你的时间非常值钱四柱汉诺塔最优解">你的时间非常值钱：四柱汉诺塔最优解</h2>
<p>平分是无法达到最优效率的，因为3柱移动比4柱移动耗时，要达到最优效率，需要加一个分割函数。</p>
<pre class="language-Haskell line-numbers match-braces"><code>hanoiPlus :: Integer-&gt;Peg-&gt;Peg-&gt;Peg-&gt;Peg-&gt;[Move]
hanoiPlus 0 _ _ _ _ = []
hanoiPlus n a b c d = hanoiPlus (left - k) a c b d
            ++ hanoi k a d b
            ++ [(a, b)]
            ++ hanoi k d b a
            ++ hanoiPlus (left - k) c b a d
    where
        left = n - 1
        k = minimalDivide n

minimalDivide :: Integer-&gt;Integer
minimalDivide 0 = 0
minimalDivide n = head (minimalDivideList n)

minimalDivideList :: Integer-&gt;[Integer]
minimalDivideList 0 = []
minimalDivideList n = minimalDivideList&#39; [1,2..n] []
    where
        minimalDivideList&#39; :: [Integer]-&gt;[Integer]-&gt;[Integer]
        minimalDivideList&#39; (x:xs) [] = minimalDivideList&#39; xs (0:[])
        minimalDivideList&#39; [] ys = ys
        minimalDivideList&#39; (x:xs) (y:ys) = minimalDivideList&#39; xs ((cur):(y:ys))
            where
                cur = if x - y &lt;= 1 || (hanoiPlus&#39; x y) &lt;= (hanoiPlus&#39; x (y + 1))
                    then y else y + 1
                hanoiPlus&#39; :: Integer-&gt;Integer-&gt;Integer
                hanoiPlus&#39; 0 _ = 0
                hanoiPlus&#39; n&#39; divide =
                    2 * (hanoiPlus&#39; left&#39; divide&#39;)
                    + (2^divide - 1) * 2 + 1
                    where
                        left&#39; = n&#39; - divide - 1
                        divide&#39; = if left&#39; == 0 then 0
                            else (reverse (y:ys))!!fromInteger(left&#39; - 1)</code></pre>]]></content>
    </entry>
    <entry>
        <title type="html"><![CDATA[Linux平台下C++库的生成与使用]]></title>
        <id>https://xilong.site/post/Generating_and_Using_Cpp_Library_in_Linux.html</id>
        <link rel="alternate" type="text/html" href="https://xilong.site/post/Generating_and_Using_Cpp_Library_in_Linux.html" />
        <updated>2020-06-07T00:00:00Z</updated>
        <!-- Every post here opens with an abstract, which is what
             `abstract` holds and what `content` therefore starts after.
             A feed carries the whole article, so it needs both, in the
             order the page itself shows them. -->
        <content type="html"><![CDATA[<p>学习C++也有一段时间了，却一直不太了解库相关的知识，今天得空学习了一些基础用法，在此记录。</p>
<h2 id="什么是库">什么是库</h2>
<h3 id="编译连接从源码到程序">编译连接：从源码到程序</h3>
<figure>
<img src="https://xilong.site/res/post-imgs/Generating_and_Using_Cpp_Library_in_Linux/compile.png" alt="compile" />
<figcaption aria-hidden="true">compile</figcaption>
</figure>
<p>上图展示了C++程序的生成过程。可以看到库文件和目标代码一起被处理，可见库文件与目标代码之间应该具有某种联系。</p>
<h3 id="库目标文件的打包">库：目标文件的打包</h3>
<p>事实上，库文件就是将一些目标文件打包而成的文件。这些文件往往与作为接口的头文件一起提供给程序使用。程序在使用库文件时不需要对文件中实现的内容进行重复编译，可以提高开发效率。</p>
<p>库又分为静态库与动态库。</p>
<h4 id="静态库">静态库</h4>
<p>静态库在Linux系统中通常以.a作为后缀，而在Windows中以.lib作为后缀。</p>
<p>静态库在链接过程中将自身拷贝到最终的可执行文件中，因此可执行文件运行时并不需要该库参与。即使用静态库生成的文件是独立的，并不依赖于它所使用的静态库。这无疑为软件的分发提供了很大的方便。</p>
<p>另一方面，这样的使用方式令生成程序所需时间大大增加，同时大幅增加了可执行文件的体积。且每当库发生改动时就要重新生成整个程序。不利于开发。</p>
<h4 id="动态库">动态库</h4>
<p>动态库在Linux系统中通常以.so作为后缀，在Windows中以.dll作为后缀。</p>
<p>动态库在链接过程中不把自身拷贝到可执行文件中，而是写入一些重定位和符号表信息。这样生成的可执行文件运行时必须要有库的存在，否则无法运行。这给分发软件造成了一些目标机器环境配置的麻烦。</p>
<p>然而，动态库大大缩减了链接所需时间和可执行程序的体积，在接口没有改动时即使改动了库文件也无需重新生成可执行文件，实现了增量修改。给开发带来了很大的便利。</p>
<h4 id="小结">小结</h4>
<ol type="1">
<li>静态链接的可执行文件可以独立运行，而动态链接不可以。</li>
<li>静态链接的可执行文件体积通常大于动态链接。</li>
<li>静态链接的链接速度小于动态链接</li>
<li>静态链接的可执行文件运行效率略高于动态链接</li>
<li>库文件发生改动时，静态链接生成的可执行文件必须重新生成，而动态链接不用。</li>
</ol>
<h2 id="静态库的生成与使用">静态库的生成与使用</h2>
<h3 id="编写静态库源码并生成目标代码">编写静态库源码并生成目标代码</h3>
<p>创建静态库文件夹static，并新建静态库源代码./static/test.cc</p>
<pre class="language-cpp line-numbers match-braces"><code>// ./static/test.cc
#include &lt;iostream&gt;
void Say_Hello()
{
    std::cout &lt;&lt; &quot;Hello Static Library!&quot; &lt;&lt; std::endl;
}</code></pre>
<p>编译源码，生成目标文件test.o</p>
<pre class="language-bash line-numbers match-braces"><code>g++ -c ./static/test.cc -o ./static/test.o</code></pre>
<h3 id="将目标代码打包成库文件">将目标代码打包成库文件</h3>
<pre class="language-bash line-numbers match-braces"><code># 库通常以libxxx.a命名
ar -rcs ./static/libtest.a ./static/test.o</code></pre>
<h3 id="为使用者提供接口">为使用者提供接口</h3>
<pre class="language-cpp line-numbers match-braces"><code>// ./static/test.h
void Say_Hello();</code></pre>
<h3 id="使用静态库">使用静态库</h3>
<p>创建main.cc</p>
<pre class="language-cpp line-numbers match-braces"><code>// ./main.cc
#include &quot;./static/test.h&quot;
int main()
{
    Say_Hello();
    return 0;
}</code></pre>
<p>生成并运行可执行文件</p>
<pre class="language-bash line-numbers match-braces"><code># -L指定库所在路径，-l指定库名称无需lib与后缀
g++ -o main main.cc -L./static -ltest
./main</code></pre>
<p>运行结果</p>
<pre class="language-none line-numbers match-braces"><code>Hello Static Library!</code></pre>
<h2 id="动态库的生成与使用">动态库的生成与使用</h2>
<h3 id="编写动态库源码并生成目标代码">编写动态库源码并生成目标代码</h3>
<p>创建动态库文件夹dynamic，并新建动态库源代码./dynamic/test.cc</p>
<pre class="language-cpp line-numbers match-braces"><code>// ./dynamic/test.cc
#include &lt;iostream&gt;
void Say_Hello()
{
    std::cout &lt;&lt; &quot;Hello Dynamic Library!&quot; &lt;&lt; std::endl;
}</code></pre>
<h3 id="制作动态库">制作动态库</h3>
<pre class="language-bash line-numbers match-braces"><code># 动态库通常以libxxx.so命名
g++ ./dynamic/test.cc -fPIC -shared -o ./dynamic/libtest.so</code></pre>
<h3 id="为使用者提供接口-1">为使用者提供接口</h3>
<pre class="language-cpp line-numbers match-braces"><code>// ./dynamic/test.h
void Say_Hello();</code></pre>
<h3 id="使用动态库">使用动态库</h3>
<p>创建main.cc</p>
<pre class="language-cpp line-numbers match-braces"><code>// ./main.cc
#include &quot;./dynamic/test.h&quot;
int main()
{
    Say_Hello();
    return 0;
}</code></pre>
<p>生成并运行可执行文件</p>
<pre class="language-bash line-numbers match-braces"><code># -L指定库所在路径，-l指定库名称
g++ -o main main.cc -L./dynamic -ltest
./main</code></pre>
<p>运行结果</p>
<pre class="language-none line-numbers match-braces"><code>./main: error while loading shared libraries: libtest.so: cannot open shared object file: No such file or directory</code></pre>
<p>找不到<code>libtest.so</code>，这是因为linux是通过<code>/etc/ld.so.conf</code>文件中的路径搜寻动态库的。解决方法：</p>
<ol type="1">
<li>把<code>libtest.so</code>所在的路径添加进<code>/etc/ld.so.conf</code>，再运行<code>ldconfig</code>更新目录，程序就可以正常运行了。</li>
<li>把<code>libtest.so</code>复制到<code>/usr/lib</code>，再运行程序。</li>
<li>改变坏境变量<code>export LD_LIBRARY_PATH=./dynamic</code>，再运行程序。</li>
</ol>
<p>由于这个程序仅作实验用，故不推荐用前两种方式改动系统设置。此处用方法3:</p>
<pre class="language-bash line-numbers match-braces"><code>export LD_LIBRARY_PATH=./dynamic
./main</code></pre>
<p>运行结果</p>
<pre class="language-none line-numbers match-braces"><code>Hello Dynamic Library!</code></pre>
<h2 id="总结">总结</h2>
<p>库是将源码打包而形成的，以链接进其它程序的方式进行使用的文件形式。分为静态库和动态库。静态库具有链接慢，空间成本高，不易更新的缺点，优点是能够生成独立的可执行文件。动态库易于更新扩展，链接快，空间成本低，但生成的文件必须依赖库运行。</p>]]></content>
    </entry>
    <entry>
        <title type="html"><![CDATA[基于C++的Python3入门笔记]]></title>
        <id>https://xilong.site/post/Quick_Start_with_Python3_Base_on_Cpp.html</id>
        <link rel="alternate" type="text/html" href="https://xilong.site/post/Quick_Start_with_Python3_Base_on_Cpp.html" />
        <updated>2020-06-07T00:00:00Z</updated>
        <!-- Every post here opens with an abstract, which is what
             `abstract` holds and what `content` therefore starts after.
             A feed carries the whole article, so it needs both, in the
             order the page itself shows them. -->
        <content type="html"><![CDATA[<p>虽然Python与C++有众多区别，但基本上同属命令式语言（甚至Python的解释器是C++实现的），因此在不求深入学习Python时记住一些基础语法差异即可大概使用。</p>
<h2 id="基本区别">基本区别</h2>
<p>python中以缩进（4个空格）而不是花括号区分代码块。</p>
<p>python中以换行而不是分号区分语句</p>
<p>python中不需要main函数，从代码第一行开始执行</p>
<h3 id="注释">注释</h3>
<pre class="language-python line-numbers match-braces"><code># 单行注释：井号+空格
# 多行注释本质上是野生三引号字符串
&#39;&#39;&#39;
多行注释1:三个单引号
&#39;&#39;&#39;
&quot;&quot;&quot;
多行注释2:三个双引号
&quot;&quot;&quot;</code></pre>
<h2 id="变量">变量</h2>
<h3 id="数值">数值</h3>
<p>python是动态类型语言，定义变量时无需指定类型，且程序运行过程中可改变类型。</p>
<pre class="language-python line-numbers match-braces"><code>i = 1
f = 2.3
str = &#39;string&#39;
f = &#39;change to string&#39;</code></pre>
<h3 id="字符串">字符串</h3>
<pre class="language-python line-numbers match-braces"><code># 单引号
&#39;Hello&quot;&quot;Wo\&#39;\&#39;rld&#39; # Hello&quot;&quot;Wo&#39;&#39;rld
# 双引号
&quot;Hello&#39;&#39;Wo\&quot;\&quot;rld&quot; #Hello&#39;&#39;Wo&quot;&quot;rld
# 单双引号唯一的区别是其中包含哪种引号时需要转义
# 三引号包含单双引号都不用转义，可作注释用</code></pre>
<p>格式化</p>
<pre class="language-python line-numbers match-braces"><code># 占位符
&#39;Hello,%s %d %.2f, %02d&#39; % (&#39;World!&#39;, 123, 3.14159, 1) # Hello,World! 123 3.14, 01
# format(),用{0}{1}...当占位符
&#39;Hello,{0}:{1:.1f}&#39;.format(&#39;World!&#39;, 3.14159) # Hello,World!:3.1</code></pre>
<h3 id="listtuple和dictset">list、tuple和dict、set</h3>
<h4 id="定义">定义</h4>
<pre class="language-python line-numbers match-braces"><code># []、()、{}、([])
# list用[]定义, 可变长，可变元素值，可用下标位序取值
l = [1, 2, 3, 4]
# tuple用()定义，不可变长，不可变元素值，可用下标位序取值
t = (1, 2, 3, 4)
t1 = (1, ) # 若无逗号则为整数1
# dict用{}定义， 类似c++的map; set用{}定义（或set()函数），类似set
d = {a:1, 2:b, 3:c} # d[a] = 1, d[2] = b, d[3] = c
s = {1, 1, 2, 2, 3, 4} # set自动去重，s = {1, 2, 3, 4}</code></pre>
<h4 id="操作">操作</h4>
<ol type="1">
<li>list
<ol type="1">
<li>l.append(): push_back</li>
<li>l.pop():pop_back</li>
<li>l.pop(i):erase(i)</li>
<li>l.insert(pos, vue)</li>
</ol></li>
<li>dict
<ol type="1">
<li>‘keyvalue’ in d //d中是否存在key值为‘keyvalue’</li>
<li>d.get(‘keyvalue’, -1) //无’keyvalue’时返回-1，没有第二个参数则返回None</li>
<li>d.pop(‘keyvalue’) //删除keyvalue</li>
</ol></li>
<li>set
<ol type="1">
<li>add(key)</li>
<li>remove(key)</li>
</ol></li>
</ol>
<h2 id="运算符">运算符</h2>
<ul>
<li>算术运算符：+ - * / % **(幂) //(整除)</li>
<li>比较运算符：== != &gt; &lt; &gt;= &lt;=</li>
<li>赋值运算符：= 算术=</li>
<li>位运算符：&amp; | ^ ~ &lt;&lt; &gt;&gt;</li>
<li>逻辑运算符：and or not</li>
<li>成员运算符：in not in</li>
<li>身份运算符：is is not //判断两对象地址是否相同</li>
</ul>
<h2 id="分支与循环">分支与循环</h2>
<pre class="language-python line-numbers match-braces"><code># if-else语句
if condition:
    pass # 占位用关键字，不执行任何操作
elif condition:
    pass
else:
    pass
# 范围for
for x in l:
    pass
# 可用range(10)生成0-9的列表
# while
while condition:
    pass</code></pre>
<h2 id="函数">函数</h2>
<pre class="language-python line-numbers match-braces"><code>def Add(x, y):
    return x+y

def Dont_Do_Anything(x, y):
    return x, y
#隐式返回一个元组

def Default_Function(x, y=2):
    return x**y
#默认参数

def Add_End(L):
    L.append(&#39;End&#39;)
    return L
#多次调用会出现{End, End, End}，原因：参数并非临时变量，故而改进

def Add_End_Fixed(L=None):
    if L is None:
        L = []
    L.append(&#39;End&#39;)
    return L

def Calc(*numbers):
    sum = 0
    for x in numbers:
        sum += x
    return sum
#可变数量参数，隐式生成一个tuple, 已有list或tuple可直接前加*传入

def person(name, age, **kw):
    if &#39;key&#39; in kw:
        pass

# 关键字参数，调用时连关键字一同写入，如person(&#39;Jack&#39;, 23, city=&#39;Heaven&#39;)
def person(name, *, city, age):
    pass

def person(name, *age, city):
    pass
# 命名关键字参数，跟在可变数量参数或一个空*参数后，只能传入指定关键字</code></pre>
<h2 id="类">类</h2>
<pre class="language-python line-numbers match-braces"><code>class My_Class(object):
    def __init__(self, name, score): # 前后各2下划线，类内任何函数首参数都为self
        self.name = name
        self.__score = score #前置2下划线则私有，仍可通过._My_Class__score访问
    def Get_Name(self):
        print(self.name)
    Sex = &#39;Male&#39;
# 括号内表示父类，object是python中的根基类；__init__()相当于构造函数
# 构造函数外的属性相当于static成员

mc = My_Class(&#39;Jack&#39;, 70)
mc.age = 10
# 通过构造函数来实例化类对象，可以给对象添加属性
# 使用del mc.age删除属性

class Mumei(My_Class):
    def Get_Name(self):
        print(self.__score)
# 子类通过定义同名函数来重载基类函数
# 用函数isinstance(a, type)判断对象的类型是否为type， 使用type(a)得到对象类型
# 使用dir(a)获得对象的所有属性和方法
# 使用hasattr(obj, &#39;sth&#39;)判断是否有属性sth
# 使用getattr(obj, &#39;sth&#39;)取属性地址

def Name(MC):
    MC.Get_Name()

mumei = Mumei(&#39;Tom&#39;, &#39;2&#39;)
Name(mc)
Name(mumei)
# 对基类和子类通用

other = Other_Class(&#39;Jerry&#39;)
Name(other)
# 任何有Get_Name的对象都可调用</code></pre>
<h2 id="高级特性">高级特性</h2>
<h3 id="切片">切片</h3>
<p>取一个list或tuple的部分元素</p>
<pre class="language-python line-numbers match-braces"><code>L = [1, 2, 3, 4, 5]
L[0:2] # 取{1, 2}即下标范围[0,2)的元素
L[:2] # 第一个参数为0时可省略
L[-1] # 取倒数第一个元素
L[-2:-1] # 取倒数两个元素
L[-2:] #-1可省略</code></pre>
<h3 id="列表生成式">列表生成式</h3>
<p>用[express]生成一个列表</p>
<pre class="language-python line-numbers match-braces"><code>[x * x for x in range(1, 11)] # 1x1,2x2...10x10
[x * x for x in range(1, 11) if x % 2 == 0] # 2x2,4x4...10x10
[m + n for m in &#39;ABC&#39; for n in &#39;DEF&#39;] # ABC与DEF的全排列
# 当if出现在for后面时，不可带else
# 当if出现在for前面时，必须带else</code></pre>
<h3 id="生成器">生成器</h3>
<p>生成器仅存储一个生成方法而不是具体对象，有助于节省空间。</p>
<p>方法1: 用(express)生成一个生成器(generator)</p>
<pre class="language-python line-numbers match-braces"><code>g = (x * x for x in range(10))
for n in g:
    print(n)</code></pre>
<p>方法2: 用函数来生成一个生成器</p>
<pre class="language-python line-numbers match-braces"><code># 输出斐波那契数列的函数如下
# a, b = b, a + b =&gt; a, b = (b, a + b) =&gt; a = b  b = a + b(a与b的值同时改变)
def fib(max):
    n, a, b = 0, 0, 1
    while n &lt; max:
        print(b)
        a, b = b, a + b
        n = n + 1
    return &#39;done&#39;

#把上述函数改成generator, 仅需将print(b)换成yield b
def fib(max):
    n, a, b = 0, 0, 1
    while n &lt; max:
        yield b
        a, b = b, a + b
        n = n + 1
    return &#39;done&#39;

f = fib(6)
for n in f:
    print(n)</code></pre>]]></content>
    </entry>
    <entry>
        <title type="html"><![CDATA[二叉树的存储结构及非层序遍历]]></title>
        <id>https://xilong.site/post/Memory_Structure_of_Binary_Tree_and_Its_Non_Level_Order_Iteration.html</id>
        <link rel="alternate" type="text/html" href="https://xilong.site/post/Memory_Structure_of_Binary_Tree_and_Its_Non_Level_Order_Iteration.html" />
        <updated>2020-04-24T00:00:00Z</updated>
        <!-- Every post here opens with an abstract, which is what
             `abstract` holds and what `content` therefore starts after.
             A feed carries the whole article, so it needs both, in the
             order the page itself shows them. -->
        <content type="html"><![CDATA[<p>二叉树是我接触的第一个非线性数据结构。在对它进行操作前，如何对其进行构建与遍历很自然地成为了首先要关心的问题。</p>
<h2 id="二叉树的五个性质">二叉树的五个性质</h2>
<ol type="1">
<li><p>二叉树的第i层上至多有<span class="math inline">2<sup><em>i</em> − 1</sup></span>个结点</p></li>
<li><p>深度为k的二叉树至多有<span class="math inline">2<sup><em>k</em></sup> − 1</span>个结点</p></li>
<li><p>对任何一棵二叉树T, 其终端结点数为度为2的结点数 + 1</p></li>
<li><p>具有n个结点的完全二叉树深度为：<span class="math inline">⌊<em>l</em><em>o</em><em>g</em><sub>2</sub><em>n</em>⌋ + 1</span></p>
<p>满二叉树：每一层结点数都为最大</p>
<p>完全二叉树：每一结点按层的编号都与对应的满二叉树一一对应</p>
<figure>
<img src="https://xilong.site/res/post-imgs/Memory_Structure_of_Binary_Tree_and_Its_Non_Level_Order_Iteration/Binary-Tree-0.png" alt="Binary-Tree-0" />
<figcaption aria-hidden="true">Binary-Tree-0</figcaption>
</figure>
<p><em>a.满二叉树 b.完全二叉树</em></p></li>
<li><p>对一颗有n个结点的完全二叉树，将其结点按层序编号i，有</p>
<ol type="1">
<li><p>i=1，则该结点为根结点，无双亲</p></li>
<li><p>2i&gt;n，则结点i无左孩子，否则其左孩子是2i</p></li>
<li><p>2i + 1 &gt; n则结点无右孩子，否则其右孩子是2i + 1</p></li>
</ol></li>
</ol>
<h2 id="二叉树的存储结构">二叉树的存储结构</h2>
<h3 id="顺序存储结构">1. 顺序存储结构</h3>
<p>将完全二叉树上序号为i的结点存在数组中标号为i - 1的地址中，如非完全二叉树，则空出来的地址留空。此时子结点用性质5即可得到。</p>
<figure>
<img src="https://xilong.site/res/post-imgs/Memory_Structure_of_Binary_Tree_and_Its_Non_Level_Order_Iteration/Binary-Tree-1.png" alt="Binary-Tree-1" />
<figcaption aria-hidden="true">Binary-Tree-1</figcaption>
</figure>
<p>上面三个二叉树的存储结构分别为：</p>
<figure>
<img src="https://xilong.site/res/post-imgs/Memory_Structure_of_Binary_Tree_and_Its_Non_Level_Order_Iteration/Binary-Tree-2.png" alt="Binary-Tree-2" />
<figcaption aria-hidden="true">Binary-Tree-2</figcaption>
</figure>
<p><em>(用0表示结点不存在)</em></p>
<p>可以看出，当二叉树不是完全二叉树时，这种结构非常浪费存储空间。因此仅适合用作完全二叉树的存储。</p>
<h3 id="链式存储结构">2. 链式存储结构</h3>
<p>二叉树用链表来存储是非常自然的，常见的有二叉链表和三叉链表。</p>
<h4 id="二叉链表">二叉链表</h4>
<p>二叉链表的组织形式：</p>
<figure>
<img src="https://xilong.site/res/post-imgs/Memory_Structure_of_Binary_Tree_and_Its_Non_Level_Order_Iteration/Binary-Tree-3.png" alt="Binary-Tree-3" />
<figcaption aria-hidden="true">Binary-Tree-3</figcaption>
</figure>
<h4 id="三叉链表">三叉链表</h4>
<p>三叉链表在二叉链表的基础上添加了指向父结点的指针，与二叉链表大同小异。</p>
<p>三叉链表的组织形式：</p>
<figure>
<img src="https://xilong.site/res/post-imgs/Memory_Structure_of_Binary_Tree_and_Its_Non_Level_Order_Iteration/Binary-Tree-4.png" alt="Binary-Tree-4" />
<figcaption aria-hidden="true">Binary-Tree-4</figcaption>
</figure>
<h4 id="代码实现">代码实现</h4>
<pre class="language-cpp line-numbers match-braces"><code>typedef struct Node
{
    Node *left;
    Node *right;
    int data;
} *BinTree;

int CreateBinTree(BinTree &amp;tree)
{
    tree = new Node{nullptr, nullptr, 0};
    if(tree == nullptr)
    {
        cerr &lt;&lt; &quot;Error While Create BinTree!&quot; &lt;&lt; endl;
        return -1;
    }
    return 0;
}

int InsertChild(Node *aim, bool left)
{
    Node *newNode = new Node{nullptr, nullptr, 0};
    if(newNode == nullptr)
    {
        cerr &lt;&lt; &quot;Error While Add Node!&quot; &lt;&lt; endl;
        return -1;
    }
    if(left)
    {
        aim-&gt;left = newNode;
    }
    else
    {
        aim-&gt;right = newNode;
    }
    return 0;
}

int DeleteChild(Node *aim, bool left)
{
    if(aim == nullptr) return -1;
    Node *preDel = (left) ? aim-&gt;left : aim-&gt;right;
    if(preDel != nullptr)
    {
        if(preDel-&gt;left != nullptr)
        {
            DeleteChild(preDel, true);
        }
        if(preDel-&gt;right != nullptr)
        {
            DeleteChild(preDel, false);
        }
        delete preDel;
        preDel = nullptr;
    }
    if(left)
    {
        aim-&gt;left = nullptr;
    }
    else
    {
        aim-&gt;right = nullptr;
    }
    return 0;
}

int Visit(BinTree T)
{
    if(T == nullptr) return -1;
    cout &lt;&lt; T-&gt;data &lt;&lt; endl;
    return 0;
}</code></pre>
<h2 id="二叉树的遍历">二叉树的遍历</h2>
<p>要遍历二叉树，可将二叉树分为三个部分，左子树(L)、根(D)、右子树(R)，并依次访问每个部分。若规定左子树一定先于右子树访问，则共有三种情况：DLR、LDR、LRD。分别称为前（先）序遍历、中序遍历和后序遍历。</p>
<p>这三种遍历的算法是递归描述的，如下：</p>
<h3 id="前序遍历">前序遍历</h3>
<h4 id="算法描述">算法描述</h4>
<p>若二叉树为空，则空操作，否则</p>
<ol type="1">
<li>访问根结点</li>
<li>先序遍历左子树</li>
<li>先序遍历右子树</li>
</ol>
<h4 id="算法的递归实现">算法的递归实现</h4>
<pre class="language-cpp line-numbers match-braces"><code>int DLR(BinTree T)
{
    if(T == nullptr) return 0;
    if(Visit(T) == -1) return -1;
    if(DLR(T-&gt;left) == -1) return -1;
    if(DLR(T-&gt;right) == -1) return -1;
    return 0;
}</code></pre>
<h3 id="中序遍历">中序遍历</h3>
<h4 id="算法描述-1">算法描述</h4>
<p>若二叉树为空，则空操作，否则</p>
<ol type="1">
<li>中序遍历左子树</li>
<li>访问根结点</li>
<li>中序遍历右子树</li>
</ol>
<h4 id="算法的递归实现-1">算法的递归实现</h4>
<pre class="language-cpp line-numbers match-braces"><code>int LDR(BinTree T)
{
    if(T == nullptr) return 0;
    if(LDR(T-&gt;left) == -1) return -1;
    if(Visit(T) == -1) return -1;
    if(LDR(T-&gt;right) == -1) return -1;
    return 0;
}</code></pre>
<h3 id="后序遍历">后序遍历</h3>
<h4 id="算法描述-2">算法描述</h4>
<p>若二叉树为空，则空操作，否则</p>
<ol type="1">
<li>后序遍历左子树</li>
<li>后序遍历右子树</li>
<li>访问根结点</li>
</ol>
<h4 id="算法的递归实现-2">算法的递归实现</h4>
<pre class="language-cpp line-numbers match-braces"><code>int LRD(BinTree T)
{
    if(T == nullptr) return 0;
    if(LRD(T-&gt;left) == -1) return -1;
    if(LRD(T-&gt;right) == -1) return -1;
    if(Visit(T) == -1) return -1;
    return 0;
}</code></pre>
<h3 id="三种遍历的非递归实现">三种遍历的非递归实现</h3>
<h4 id="原理">原理</h4>
<p>由上面的描述可以看出用递归实现三种遍历是非常简洁自然的，然而在大部分情况下递归实现的性能开销大于非递归实现（函数反复调用以及系统堆栈带来的），因此在非常需要考虑性能时可以使用算法的非递归实现（算法的递归几乎都可以转化成非递归实现）。</p>
<p>为了实现非递归遍历，先来看看遍历过程中发生了什么。</p>
<p>在遍历过程中，每个结点有三次访问机会，即指针从父结点指向自身，从左孩子退回，从右孩子退回。这里我们不妨规定没有左/右孩子的结点仍能获得空指针退回的访问机会（即将空指针看做一个无法进入的孩子结点）。</p>
<figure>
<img src="https://xilong.site/res/post-imgs/Memory_Structure_of_Binary_Tree_and_Its_Non_Level_Order_Iteration/Binary-Tree-5.png" alt="Binary-Tree-5" />
<figcaption aria-hidden="true">Binary-Tree-5</figcaption>
</figure>
<p>由于我们规定了左子树一定在右子树之前遍历，整个树的遍历顺序就如上图所示(a-&gt;b)。我们在每个结点的左侧、下侧和右侧分别设定一个触发点，并将它们在遍历路径中出现的顺序记录下来。</p>
<p>对于左触发点：ABDECFG</p>
<p>对于下触发点：DBEAFCG</p>
<p>对于右触发点：DEBFGCA</p>
<p>可以看出，它们分别是这个二叉树的前序序列、中序序列和后序序列。因此，实现正确的遍历顺序，并在合适的时机访问结点，就可以实现非递归地遍历二叉树。</p>
<h4 id="前序遍历和中序遍历">前序遍历和中序遍历</h4>
<p>前序遍历和中序遍历的实现相对后序遍历简单，描述为：</p>
<ol type="1">
<li>向左一路前进，若下一结点为空则退栈，否则将其压入栈中。</li>
<li>若指针是左子树退回，则进入右子树。若指针是右子树退回，则表示当前层遍历结束，继续退一层。这也意味着进入右子树时可以将当前结点直接退栈。</li>
<li>栈为空时，遍历完成。</li>
</ol>
<pre class="language-cpp line-numbers match-braces"><code>int LDR(BinTree T)
{
    //定义一个存储遍历信息的栈和一个用来遍历树的指针
    stack&lt;Node*&gt; S;
    Node *cur = T;
    //每访问一个结点就将结点出栈，因此以栈非空作为循环条件
    //最后出栈的必是一个叶子结点，因此指针的值在结束时必为nullptr
    while(!S.empty() || cur != nullptr)
    {
        //指针非空时一路向左走并将沿途结点压入栈中
        //指针为空则表示走到了当前路径的尽头，将最后入栈的结点出栈并令指针指向该结点的右子树
        if(cur != nullptr)
        {
            S.push(cur);
            //cout &lt;&lt; cur-&gt;data; 前序时在此输出。
            cur = cur-&gt;left;
        }
        else
        {
            cur = S.top();
            S.pop();
            cout &lt;&lt; cur-&gt;data; //中序时在此输出。
            cur = cur-&gt;right;
        }

    }
    return 0;
}</code></pre>
<p>总结：一路向左，非空则进。遇空出栈，右子代之。</p>
<h4 id="后序遍历-1">后序遍历</h4>
<p>在前面的代码中我们实际上省略了对指针是由左子树退回还是右子树退回的判断，直接在指针进入右子树时将当前结点出栈。对于前序遍历和中序遍历而言这样做并没有影响，因为它们的访问操作都在指针进入右子树之前。但是对于后序遍历显然是不行的，这里对上述算法进行改进：</p>
<ol type="1">
<li>指针非空时向左前进到底，若指针非空则压入栈中，初始化一个指针保存最近出栈的结点。</li>
<li>指针为空时令指针指向栈顶，进行判定，若指针的右子树存在且没有遍历过则进入右子树，否则输出指针所指元素并退栈。同时将指针置零以免将已退栈的元素重新入栈。</li>
<li>栈为空时，遍历完成。</li>
</ol>
<pre class="language-cpp line-numbers match-braces"><code>int LRD(BinTree T)
{
    stack&lt;Node*&gt; S;
    Node *cur = T;
    //存储最后退栈的元素
    Node *lastPop = nullptr;
    while(!S.empty() || cur != nullptr)
    {
        //非空时向左前进到底
        if(cur != nullptr)
        {
            //cout &lt;&lt; cur-&gt;data; 仍然可用于前序遍历
            S.push(cur);
            cur = cur-&gt;left;
        }
        else
        {
            cur = S.top();
            //判定当前结点是否存在右子树以及右子树是否遍历过
            //此处是否存在的判定是必要的，否则当lastPop非空而当前结点又不存在右子树时，
            //将导致指针不断尝试进入不存在的右子树引发死循环
            if(cur-&gt;right != nullptr &amp;&amp; cur-&gt;right != lastPop)
            {
                //cout &lt;&lt; cur-&gt;data; 中序遍历输出根结点
                cur = cur-&gt;right;
            }
            else
            {
                //右子树不存在或已遍历过，输出根结点并退栈
                S.pop();
                cout &lt;&lt; cur-&gt;data;
                //if(cur-&gt;right == nullptr) cout &lt;&lt; cur-&gt;data; 中序遍历输出叶子结点
                //令lastPop指向最后退栈结点，将cur指针置0以免下一轮循环将已退栈的结点重新入栈
                lastPop = cur;
                cur = nullptr;
            }
        }

    }
    return 0;
}</code></pre>
<p>总结：一路向左，非空则进，遇空判定，有右则进，无右则出，不忘置零。</p>
<h3 id="图解后序遍历的非递归算法">图解后序遍历的非递归算法</h3>
<figure>
<img src="https://xilong.site/res/post-imgs/Memory_Structure_of_Binary_Tree_and_Its_Non_Level_Order_Iteration/Binary-Tree-6.gif" alt="Binary-Tree-6" />
<figcaption aria-hidden="true">Binary-Tree-6</figcaption>
</figure>
<p>精力有限，只好挑一个难度最大的做图解。</p>
<h2 id="通过中序序列前序后序序列构建二叉树">通过中序序列+前序/后序序列构建二叉树</h2>
<h3 id="原理-1">原理</h3>
<ul>
<li><p>前序序列中任一子树以根结点-左子树-右子树的结构排列。</p></li>
<li><p>中序序列中任一子树以左子树-根结点-右子树的结构排列。</p></li>
<li><p>后序序列中任一子树以左子树-右子树-根结点的结构排列。</p></li>
</ul>
<p>根据以上性质，可以得到算法：</p>
<ol type="1">
<li>从前/后序序列中取首/尾元素，确定树的根结点</li>
<li>在中序序列中搜索根结点，确定左子树和右子树</li>
<li>对左子树和右子树分别重复这个过程，直到不可再分</li>
</ol>
<h4 id="图解以前序-中序构建为例">图解：以前序-中序构建为例</h4>
<figure>
<img src="https://xilong.site/res/post-imgs/Memory_Structure_of_Binary_Tree_and_Its_Non_Level_Order_Iteration/Binary-Tree-7.gif" alt="Binary-Tree-7" />
<figcaption aria-hidden="true">Binary-Tree-7</figcaption>
</figure>
<h3 id="代码实现-1">代码实现</h3>
<p>前序-中序构建二叉树</p>
<pre class="language-cpp line-numbers match-braces"><code>//根据前序-中序序列构建二叉树，代码是通过递归实现的
//SI是string::iterator类型，函数的四个参数分别指向
//前序序列p的首元素和尾后元素，中序序列m的首元素和尾后元素
BinTree Pre_Mid_Build(SI p_begin, SI p_end, SI m_begin, SI m_end)
{
    //用前序序列的首元素初始化一个仅有根结点的树
    Node *boot = new Node{nullptr, nullptr, *p_begin};
    //左子树的前序序列首元素地址为当前前序序列的首元素地址+1
    //中序序列的首元素地址和当前中序序列相同
    auto left_p_begin = p_begin + 1;
    //左子树中序序列的尾后地址为根结点在当前中序序列中出现的位置
    //搜索当前中序序列求出，并求出左子树的长度
    auto left_m_end = m_begin;
    int num = 0;
    while(*left_m_end != *p_begin)
    {
        ++left_m_end;
        ++num;
    }
    //利用左子树的长度求出左子树前序序列的尾后迭代器
    auto left_p_end = left_p_begin + num;
    //若左子树存在，递归构建左子树
    if(m_begin != left_m_end)
    {
        boot-&gt;left = Pre_Mid_Build(left_p_begin, left_p_end, m_begin, left_m_end);
    }
    //右子树的迭代器比较方便取得
    auto right_p_begin = left_p_end;
    auto right_m_begin = left_m_end + 1;
    //若右子树存在，递归构建右子树
    if(right_m_begin != m_end)
    {
        boot-&gt;right = Pre_Mid_Build(right_p_begin, p_end, right_m_begin, m_end);
    }
    return boot;
}</code></pre>
<p>中序-后序构建二叉树</p>
<pre class="language-cpp line-numbers match-braces"><code>//代码与前序-中序大同小异，不再写注释
BinTree Post_Mid_Build (SI p_begin, SI p_end, SI m_begin, SI m_end)
{
    Node *boot = new Node{nullptr, nullptr, *(p_end - 1)};
    auto left_m_end = m_begin;
    int num = 0;
    while(*left_m_end != *(p_end - 1))
    {
        ++left_m_end;
        ++num;
    }
    auto left_p_end = p_begin + num;
    if(m_begin != left_m_end)
    {
        boot-&gt;left = Post_Mid_Build (p_begin, left_p_end, m_begin, left_m_end);
    }
    auto right_p_begin = left_p_end;
    auto right_p_end = p_end - 1;
    auto right_m_begin = left_m_end + 1;
    if(right_m_begin != m_end)
    {
        boot-&gt;right = Post_Mid_Build (right_p_begin, right_p_end, right_m_begin, m_end);
    }
    return boot;
}</code></pre>
<h2 id="计算一对先序序列和后序序列可能表示的二叉树个数">计算一对先序序列和后序序列可能表示的二叉树个数</h2>
<h3 id="原理-2">原理</h3>
<ul>
<li><p>前序序列中任一子树以根结点-左子树-右子树的结构排列。</p></li>
<li><p>后序序列中任一子树以左子树-右子树-根结点的结构排列。</p></li>
</ul>
<p>可能混淆的情况有：根（左/右）+（左/右）根。</p>
<p>可以知道，前序序列与后序序列中任何有两个子树的树都是确定的。而每一对仅一个子树的树将有两种可能结构。</p>
<p>因此只要求出序列对中有多少对无法确定的子树即可，很容易发现这样的树对以AB &amp; BA的方式存在。只要搜索两个序列即可。</p>
<h3 id="代码">代码</h3>
<pre class="language-cpp line-numbers match-braces"><code>//因为要用到位运算， 使用无符号类型
using UL = unsigned long;

int main()
{
    string pre, post;
    cin &gt;&gt; pre &gt;&gt; post;
    //搜索并计数
    UL sum = 0;
    for(UL i = 0; i &lt; pre.length() - 1; ++i)
    {
        for(UL j = 1; j &lt; post.length(); ++j)
        {
            if(pre[i] == post[j] &amp;&amp; pre[i + 1] == post[j - 1])
            {
                ++sum;
            }
        }
    }
    UL base = 1;
    //位运算计算2的次幂方便且快速，注意括号
    cout &lt;&lt; (base&lt;&lt;sum) &lt;&lt; endl;
    return 0;
}</code></pre>]]></content>
    </entry>
    <entry>
        <title type="html"><![CDATA[C++的声明与定义]]></title>
        <id>https://xilong.site/post/Cpp_Declaration_and_Definition.html</id>
        <link rel="alternate" type="text/html" href="https://xilong.site/post/Cpp_Declaration_and_Definition.html" />
        <updated>2020-02-26T00:00:00Z</updated>
        <!-- Every post here opens with an abstract, which is what
             `abstract` holds and what `content` therefore starts after.
             A feed carries the whole article, so it needs both, in the
             order the page itself shows them. -->
        <content type="html"><![CDATA[<p>偶然间看见一个声明:</p>
<p><code>struct tm *(*(*Pfunc)[3])(int(*)(int, int), float(*[])(float));</code></p>
<p>一时间感到云里雾里。为了弄懂此类复杂的声明学习一些相关的知识，在此总结。</p>
<h2 id="声明与定义的区别">声明与定义的区别</h2>
<h3 id="声明">声明</h3>
<p><strong>对于C++中的声明，比较通用的描述为：一条声明语句由一个基本数据类型和紧随其后的一个声明符列表组成。每个声明符命名一个变量并指定该变量为与基本数据类型有关的某种类型。</strong></p>
<p><em>声明语句： 基本数据类型 声明符1&lt;, 声明符2, 声明符3 …&gt;</em></p>
<p>例如：</p>
<pre class="language-cpp line-numbers match-braces"><code>int a, b = 2;
//int为基本数据类型， a,b为一个含有2个声明符的声明符列表，a与b都是声明符，分别声明（并定义）了名称为a, b的int型变量， 并把2赋值给b。</code></pre>
<h3 id="定义">定义</h3>
<p>可以看出，这条语句在声明了a, b的同时定义了它们。这里引出了声明和定义的关系：</p>
<p><strong>声明使得名字为程序所知，而定义负责建立名字与实体间的关系。</strong>声明规定了变量的类型与名字，而定义在此基础上为变量分配存储空间，还可能为其赋一个初始值。</p>
<h2 id="extern关键字">extern关键字</h2>
<p>extern关键字常用于表示一个变量已在其它文件中定义。</p>
<ul>
<li>如果要<strong>声明一个变量而不定义它</strong>，则在声明语句前加上extern</li>
</ul>
<pre class="language-cpp line-numbers match-braces"><code>extern int a; //声明int型变量a，但未定义
extern int b = 2; //声明并定义int型变量b，并为其赋初始值2</code></pre>
<p><strong><em>任何显式初始化的声明即成为定义</em></strong>。即使一个声明符已用extern标记，对其进行初始化仍会导致定义行为。</p>
<ul>
<li><p>对于<strong>多文件</strong>程序，若要在多个文件中使用<strong>同一个变量</strong>，则必须在<strong>所有</strong>使用该变量的文件中<strong>声明</strong>它，但仅可在<strong>一个</strong>文件中<strong>定义</strong>该变量。</p></li>
<li><p><strong>不可在函数体内部初始化</strong>一个含有extern标记的变量。</p></li>
</ul>
<h2 id="复合类型">复合类型</h2>
<p><strong>复合类型指基于其它类型定义的类型 。</strong></p>
<h3 id="引用">1.引用</h3>
<p>引用即对象的别名，通过将声明符写成&amp;d的形式定义引用类型，其中d是变量名。</p>
<p>引用<strong>并非对象，不占用内存空间</strong>，仅作为一个已存在对象的别名。因此引用<strong>必须初始化，且不能再绑定到其它对象上。</strong></p>
<p>引用<strong>类型要与它所绑定的对象严格匹配</strong>，且<strong>仅能绑定在对象上</strong>，而不能绑定在字面值或表达式的计算结果上。该规则有两个例外：</p>
<ol type="1">
<li>对const的引用初始值可为任一能转换为引用的类型的对象、字面值或表达式结果。</li>
<li>基类的引用或指针可绑定到派生类对象上。</li>
</ol>
<p>例：</p>
<pre class="language-cpp line-numbers match-braces"><code>int i = 2;
int &amp;r; //X, 引用必须初始化
int &amp;ri = i;
double &amp;rdi = i;//X, 引用类型不匹配
double &amp;rd = 3.14;//X, 非const引用必须绑定到对象上
const double &amp;crdi = i;
const double &amp;crd = 3.14;</code></pre>
<h3 id="指针">2.指针</h3>
<p>指针存放对象的地址，通过将声明符写成*d的形式定义，其中d是变量名。由于指针存放的并非对象，而是对象的地址，故需要<strong>用取地址符&amp;取得对象地址。操作其绑定的对象时也要使用解引用符*</strong>。</p>
<p>取地址符&amp;与引用声明符虽然使用同一个符号，但意义不同，一个作用于声明符，一个作用于对象。</p>
<p>解引用符*与指针声明符亦然，另外解引用符和引用没有关系。</p>
<pre class="language-cpp line-numbers match-braces"><code>int a = 2;
int *pa = &amp;a; //pa是a的指针， &amp;是取地址符
int &amp;ra = a; //ra是a的引用， &amp;是引用声明符
ra = 3; //通过引用改变a的值
*pa = 0;//通过指针改变a的值
pa = 0;//改变指针本身的值</code></pre>
<p>指针与引用类似，但有两点不同：</p>
<ol type="1">
<li>指针本身是一个对象，允许赋值和拷贝。</li>
<li>指针无须在定义时赋初始值，且在函数体内定义的指针有一个不确定的初始值。</li>
</ol>
<h4 id="特别注意">特别注意</h4>
<ol type="1">
<li>空指针: 不指向任何对象</li>
</ol>
<pre class="language-cpp line-numbers match-braces"><code>int *p1 = nullptr; //C++11
int *p2 = 0;
int *p3 = NULL; //#include&lt;cstdlib&gt;, 值等于0</code></pre>
<ol start="2" type="1">
<li><p>void*指针：可指向任何对象，且不能操作所指对象。</p></li>
<li><p>指向指针的指针</p></li>
</ol>
<pre class="language-cpp line-numbers match-braces"><code>int *p1;
int **p2 = &amp;p1;</code></pre>
<ol start="4" type="1">
<li>指向数组的指针</li>
</ol>
<pre class="language-cpp line-numbers match-braces"><code>int (*p1)[3];</code></pre>
<ol start="5" type="1">
<li>函数指针</li>
</ol>
<pre class="language-cpp line-numbers match-braces"><code>int (*p1)(&lt;参数列表&gt;) = test;
int (*p2)(&lt;参数列表&gt;) = &amp;test;//函数指针赋值时可以不用取地址
p1(&lt;&gt;);//函数指针使用时可以不用解引用
(*p1)(&lt;&gt;);</code></pre>
<ol start="6" type="1">
<li>指针的数组</li>
</ol>
<pre class="language-cpp line-numbers match-braces"><code>int *p1[5];</code></pre>
<ol start="7" type="1">
<li>常量指针</li>
</ol>
<pre class="language-cpp line-numbers match-braces"><code>int *const p1 = 0;</code></pre>
<h2 id="const限定符">const限定符</h2>
<ul>
<li><p>const<strong>作用于基本类型</strong>或与*连写成<strong>*const</strong>（只要在*后就表示指针本身是常量，与*间可有空格）用以声明常量指针，受const影响的变量的值不能被改变。</p></li>
<li><p>const对象<strong>仅在文件内有效</strong>，若要在其它文件中使用则需要在<strong>所有声明或定义</strong>语句前<strong>加extern</strong></p></li>
<li><p>引用可绑定到const对象上形成对const的引用，也称<strong>常量引用</strong>。非常量引用无法绑定常量对象。</p></li>
<li><p>常量引用<strong>不可用作修改对象的值</strong>，另一方面<strong>其初始值可为任一能转换为引用的类型的对象、字面值或表达式结果</strong>，此时该常量引用实际<strong>绑定了一个临时量</strong>。</p></li>
<li><p>对于指针而言，<strong>指针本身是const称为顶层const，指针指向的对象是const称为底层const</strong>。仅底层const可用于指向常量对象。</p></li>
<li><p>在<strong>类成员函数参数列表后使用const</strong>将该函数声明为const成员函数，其内在原理为作用于隐式参数<em>this</em>指针，从而使其能指向常量对象。因此<strong>类的const对象仅能调用const成员函数</strong>。</p></li>
</ul>
<pre class="language-cpp line-numbers match-braces"><code>int i = 2; //i的值可变
const int &amp;ri = i; //不可通过ri改变i的值
const int *pib1 = &amp;i; //不可通过pib1改变i的值， 可改变pib1的值
int *const pib2 = &amp;i; //可通过pib2改变i的值， 不可改变pib2的值
const int *const pib3 = &amp;i;//不可通过pib3改变i的值， 不可改变pib3的值
const int j = 3;
int &amp;rj = j; //X
int *pj = &amp;j; //X
int const* pj2 = &amp;j; //合法，底层const可以绑定const对象。
/*
class A{
public:
    void HW(){cout &lt;&lt; &quot;HelloWorld&quot; &lt;&lt; endl;}
    void HW_c() const {cout &lt;&lt; &quot;HelloWorld&quot; &lt;&lt; endl;}
}
*/
A a1;
a1.HW(); //合法
a1.HW_c();//合法，普通对象可调用const成员函数
const A a2;
a2.HW();//非法，即使非常量成员函数内没有改变对象的操作，仍不能被const对象调用
a2.HW_c();//合法</code></pre>
<h2 id="constexpr关键字">constexpr关键字</h2>
<p>常量表达式指在编译时就能得到值且不会改变的表达式。常见的有字面值与用常量表达式初始化的const对象。</p>
<p>实际使用时往往很难确定一个表达式是否是常量表达式。此时可用constexpr声明该变量， 以由编译器检查其是否为常量表达式。</p>
<p>constexpr在声明指针时，会将指针设为顶层const。</p>
<p>constexpr函数需要满足：</p>
<ul>
<li>返回类型及所有形参类型都是字面值类型。</li>
<li>函数体中有且只有一条return语句。</li>
</ul>
<pre class="language-cpp line-numbers match-braces"><code>constexpr int *p = nullptr; //p是指向整数的常量指针
const int *p1 = nullptr;    //p1是指向整数常量的指针
constexpr const int *p2 = nullptr;  //p2是指向整数常量的常量指针
const int *const p3 = nullptr;  //p3是指向整数常量的常量指针</code></pre>
<h2 id="static关键字">static关键字</h2>
<p>static将作用对象声明为静态对象，有四种主要用法：</p>
<ol type="1">
<li><p>对于<strong>全局或命名空间</strong>作用域，使用static标记声明符使该对象<strong>仅在此文件可用</strong>。</p></li>
<li><p>对于在<strong>函数</strong>作用域定义的变量，使用static标记使该变量在函数<strong>调用结束后不被释放</strong>。</p></li>
<li><p>对于在<strong>类</strong>作用域定义的<strong>数据成员</strong>，使用static标记使该成员为<strong>整个类共用</strong>而不属于任何对象。通常类的静态成员必须<strong>在类外定义及初始化</strong>，且<strong>不能在类外重复使用static</strong>。</p>
<ul>
<li><em>字面值常量类型的constexpr静态数据成员（常量表达式并不一定是用constexpr关键字定义的）可在类内用const整数类型的初始值初始化。即便如此，仍应在类外定义该成员，否则任何编译器不能直接用该成员的值替换该成员的场景都会引起错误。且此时在类外的定义不能再提供初始值。</em></li>
</ul></li>
<li><p>对于在<strong>类</strong>作用域定义的<strong>函数成员</strong>，使用static标记使该成员为<strong>整个类共用</strong>。静态成员函数不与任何对象绑定，不包含<em>this</em>指针，因此不能声明为const类型 。静态函数成员仅能使用其它静态成员。</p></li>
</ol>
<ul>
<li>union的成员不能声明成static类型 。</li>
</ul>
<pre class="language-cpp line-numbers match-braces"><code>//a.cpp
static int a = 1;
int b = 2;
//b.cpp
extern int a;   //X, a.cpp内定义的a只能在本文件使用
extern int b;
extern int a = 10; // 合法， 重新定义了一个a
extern int b = 3; //非法， 重复定义
int a = 4;  //合法
int b = 5; //非法

class A{
public:
    static int c = 0; //错误， 不可在类内初始化普通静态成员
    static int d;
    static constexpr int e = 10;
    static const int f = 10; //在确定表达式为常量表达式时也可以使用const
    static void HelloWorld(){
        cout &lt;&lt; &quot;HelloWorld!&quot; &lt;&lt; endl;
    }
    static void HW();
};

//错误，不可重复static
static void A::HW(){
    cout &lt;&lt; &quot;HW&quot; &lt;&lt; endl;
}

void A::HW(){
    cout &lt;&lt; &quot;HW&quot; &lt;&lt; endl;
}

int A::d = 10;

constexpr int A::e;

//void AnotherFunc(const int &amp;A);
AnotherFunc(A::e);
AnotherFunc(A::f);//错误，未在类外定义</code></pre>
<h2 id="类型别名">类型别名</h2>
<h3 id="typedef关键字">typedef关键字</h3>
<p>typedef <声明语句></p>
<pre class="language-cpp line-numbers match-braces"><code>typedef int (*name)[10]; //将声明语句表示的类型用name指代
name p2; //等价于 int (*p2)[10]</code></pre>
<h3 id="using关键字">using关键字</h3>
<p>using <名称1> = <名称2></p>
<pre class="language-cpp line-numbers match-braces"><code>using SI = StringItem; //令SI等价于StringItem
SI s; //等价于 StringItem s;</code></pre>
<p>注意无论是typedef还是using，它们的别名都是基于语义的，不可以理解成#define式的字符串替换。比如：</p>
<pre class="language-cpp line-numbers match-braces"><code>typedef char *PC1;
using PC2 = char*;
// 此时PC1与PC2表示的类型都是char的指针
PC1 &amp;p1;
// 对于这个变量，其类型为PC1的引用即char的指针的引用：char *&amp;p1；而不是char &amp;*p1;
// 对PC2同理，但PC2更容易犯这样的错误，如PC2&amp; = (char*)&amp; = char*&amp;这样的理解是绝对不行的。</code></pre>
<h2 id="类型推导">类型推导</h2>
<h3 id="auto关键字">auto关键字</h3>
<p>通过初始值推导类型，故而必须初始化。</p>
<ul>
<li>用引用初始化以auto声明的变量时，变量会以引用的对象类型作为变量类型。如需引用类型需要明确指出。</li>
<li>以指针初始化auto声明的变量时，会忽略顶层const。如需顶层const需要明确指出。</li>
<li>要在一条语句中声明多个变量，它们的初始值应该相同。</li>
</ul>
<pre class="language-cpp line-numbers match-braces"><code>int i = 2;
int &amp;a = i;
int *p = &amp;i;
const int *p1 = &amp;i;
const int *const p2 = &amp;i;
auto ii = i; //ii为int
auto aa = a; //aa为int
auto pp = p; //pp为int*
auto pp1 = p1; //pp1为 const int*
auto pp2 = p2; //pp2为 const int*

auto &amp;raa = a; //raa为int&amp;
const auto cpp1 = p1; //cpp1为 const int *const
const auto &amp;rii = i; //rii为 const int&amp;

auto b = rii, c = raa;//合法, rii与raa均为int（auto会舍弃顶层const与引用）</code></pre>
<h3 id="decltype关键字">decltype关键字</h3>
<p>decltype(表达式) <声明符></p>
<ul>
<li><p>decltype检查表达式的值类型，但<strong>不实际计算该表达式</strong>。</p></li>
<li><p>decltype并不会改变顶层const和引用。</p>
<ul>
<li>引用仅在这种用途时不作为其绑定对象的同义词。</li>
</ul></li>
</ul>
<pre class="language-cpp line-numbers match-braces"><code>int i = 1;
int &amp;r = i;
int *const p = &amp;i;

decltype(r) rr = i; //rr为 int&amp;
decltype(p) pp = nullptr;//pp为 int *const</code></pre>
<h3 id="复杂声明的理解">复杂声明的理解</h3>
<p><strong>由内而外，由右及左。</strong></p>
<p>即优先找离声明符最近的复合类型声明。对于距离声明符距离相同的复合类型声明，优先处理声明符右边。</p>
<p>例如：</p>
<pre class="language-cpp line-numbers match-braces"><code>struct tm *(*(*Pfunc)[3])(int(*)(int, int), float(*[])(float));
/*
    1.首先，要找到主声明符的名字，这里是Pfunc
    2.找离Pfunc最近的复合类型声明，越近则影响越大，这里离Pfunc最近的是*，即Pfunc最本质上是一个指针。
    3.采用由内而外，由右及左的顺序分析，出于语序最好使用英文
    Pfunc is a pointer to an array(size 3) about pointer to function(C1, C2) return a pointer to struct tm.
    C1: a pointer to a function(int , int) return int
    C2: an array about pointer to a function(float) return float
*/

const int *(*&amp;i)[3] = 0;
/*
    i is a reference for pointer to an array(size 3) about pointer to const int;
    const作用是修饰基本类型，不影响判断
*/</code></pre>]]></content>
    </entry>
    <entry>
        <title type="html"><![CDATA[C语言中浮点数的二进制表示（IEEE754）]]></title>
        <id>https://xilong.site/post/C_The_Binary_Representation_of_Float_Numbers_IEEE_754.html</id>
        <link rel="alternate" type="text/html" href="https://xilong.site/post/C_The_Binary_Representation_of_Float_Numbers_IEEE_754.html" />
        <updated>2019-08-18T00:00:00Z</updated>
        <!-- Every post here opens with an abstract, which is what
             `abstract` holds and what `content` therefore starts after.
             A feed carries the whole article, so it needs both, in the
             order the page itself shows them. -->
        <content type="html"><![CDATA[<p>最近在C语言学习中遇到了浮点运算精度的问题， 在查找资料后发现是浮点数的储存方式引起的问题，在此做一个记录。</p>
<h2 id="问题代码">问题代码</h2>
<pre class="language-c line-numbers match-braces"><code>#include&lt;stdio.h&gt;

int main()
{
    int arr[10] = {3, 3, 3, 3, 3, 3, 3, 3, 3, 3};
    int i;
    float a = 0;
    for (i = 0; i &lt; 10; i++)
        a += (float)arr[i] / 10.0;  //求arr中所有数的平均数
    for (i = 0; i &lt; 10; i++)
        if(arr[i] &gt; a) printf(&quot;%d &quot;, arr[i]); //将arr中大于平均数的数打印出来
    return 0;
}</code></pre>
<p>不难看出，以上程序理论上不应该输出任何数据，可是实际运行结果如下:</p>
<pre class="language-none line-numbers match-braces"><code>3 3 3 3 3 3 3 3 3 3
</code></pre>
<h2 id="分析">分析</h2>
<p>经过一番尝试，最后发现是由于本代码中a的值并非3.0而是2.99999，由此判断应该是浮点数的运算精度问题。</p>
<p>浮点数在内存中是按照IEEE754标准进行储存的， 即一个float类型的数据占用4Byte内存，其中包括符号位1位，阶码8位和尾数23位。图示如下：</p>
<table>
<thead>
<tr>
<th style="text-align: center;">S(符号位)</th>
<th style="text-align: center;">E(阶码)</th>
<th style="text-align: center;">M(尾数)</th>
</tr>
</thead>
<tbody>
<tr>
<td style="text-align: center;">0</td>
<td style="text-align: center;">0000 0000</td>
<td style="text-align: center;">0000 0000 0000 0000 0000 000</td>
</tr>
</tbody>
</table>
<p>其中符号位决定该浮点数的正负，正值为0，负值为1。</p>
<p>阶码用以表示该浮点数的指数，其值为</p>
<p><code>E = e(指数值) + 127</code></p>
<p>这样可以保证E不为负数，方便机器运算。其中127为float类型的偏移值，其它浮点类型有其它偏移值。</p>
<p>按照浮点规格化表示，尾数的最高有效位应为1，这意味着M表示的值为1.M。</p>
<p>以遇到的问题中的值0.3为例， 其转化过程如下。</p>
<ol type="1">
<li><p>将十进制数转换为二进制，小数点前除2取余，小数点后乘2取整 <span class="math display">(0.3)<sub>10</sub> = (0.0100110011001100110011001)<sub>2</sub></span> 此时可以发现0.3的二进制是无限循环的，故而只能截取到精度对应的位数。</p></li>
<li><p>规格化表示 <span class="math display">0.0100110011001100110011001 = +1.00110011001100110011001 × 2<sup>−2</sup></span></p></li>
<li><p>计算相应的值 S=0, E = 127 - 2 = 125 = 0111 1101, M = 0011 0011 0011 0011 0011 001</p></li>
</ol>
<p>所以0.3在内存中应该为</p>
<table>
<thead>
<tr>
<th>S</th>
<th>E</th>
<th>M</th>
</tr>
</thead>
<tbody>
<tr>
<td>0</td>
<td>0111 1101</td>
<td>0011 0011 0011 0011 0011 001</td>
</tr>
</tbody>
</table>
<p>转化为16进制数为：3E999999</p>
<p>可以用以下程序验证</p>
<pre class="language-c line-numbers match-braces"><code>#include&lt;stdio.h&gt;

int main()
{
    float a = 0.3;
    printf(&quot;%x&quot;, *(int *)&amp;a);
    return 0;
}</code></pre>
<h2 id="结论">结论</h2>
<p>得到结果：3E99999A， 与理论计算值3E999999相差1，应该是计算机处理过程中对末位进行了四舍五入。</p>]]></content>
    </entry>
</feed>